Preface
About this Guide
HQbird User Guide contains detailed description of functions and features of HQbird — advanced Firebird distribution, including with configuration examples and best practices recommendations.
About IBSurgeon
IBSurgeon (https://www.ib-aid.com) was founded in 2002 with the idea to provide InterBase and Firebird developers and administrator with services and tools focused on databases safety, performance and availability. In Russia, IBSurgeon is mostly known as iBase.ru, famous by its Russian InterBase and Firebird portal www.ibase.ru. IBSurgeon is a member of Firebird Foundation and, as a member of Technical Task Group, has strong relationship with Firebird Project, with direct representatives in Firebird-Admins and in Firebird Foundation Committee. Today, IBSurgeon serves thousands of companies worldwide with emergency, optimization and maintenance tools and various services. Our clients are medical institutions, financial organizations and ISVs in Germany, Brazil, Russia and other countries, and all who have applications based on Firebird and/or InterBase. The flagship project of IBSurgeon is HQbird, the advanced distribution of FirebirdSQL for big databases with enterprise features.
1. Overview of HQbird
1.1. What is HQbird
HQbird is a distribution of the Firebird DBMS for enterprises from IBSurgeon Software (www.ib-aid.com[https://www.ib-aid.com]), which includes additional functions that mainly improve performance for large and highly loaded databases, and a set of tools for organizing a full cycle of database maintenance without a DBA (including tools for performance optimization, monitoring, local and cloud backups, and recovery in case of failures).
HQbird speeds up the performance of large databases (from 50 GB to 2 TB) and enables companies to manage large databases without requiring a dedicated database administrator for a few servers, or lowering support expenses for many (hundreds and thousands) Firebird servers. The minimal hardware requirements for HQbird are 8Gb RAM and 4 cores.
The first version of HQbird was released in 2015, the current version is HQbird 2024.
1.2. How is Firebird related to HQbird?
To put it simply, HQbird is an enterprise version of the open-source Firebird DBMS. In keeping with the tradition of open-source projects, we call Firebird the “vanilla” version: in the same way, there is a “vanilla” version of PostgreSQL and commercial versions of EnterpriseDB, PostgresPro, etc.
HQbird is not a “different” database in terms of compatibility with Firebird: there is no need to make a backup-restore when switching between HQbird and Firebird, no need to rewrite SQLs or change client applications.
Without any problems, you can install HQbird and the vanilla version of Firebird in parallel on the same server, work with the database file using HQbird, then switch to the vanilla Firebird, and vice versa.
HQbird’s 100% compatibility with vanilla Firebird is the most important feature of HQbird! Almost all functions that are developed for HQbird end up in Firebird within 1-2 versions: for example, replication appeared in HQbird for version 2.5, and it appeared in vanilla version 4.0, external connection pooling was developed in HQbird 3.0, and appeared in Firebird 4.0, multithreaded backup, restore, sweep capabilities appeared starting with HQbird 2.5, and became available in vanilla Firebird 5.0, etc.
In addition to the new functionality, bugs fixed in HQbird are also fixed in the corresponding versions of vanilla Firebird.
Also, IBSurgeon Software provides public testing of Firebird and HQbird in terms of reliability and performance: the testing results are published on the website www.firebirdtest.com.
1.3. What is the price of HQbird?
The permament license for 1 server is USD$899. It also includes 1 replica server license.
What will be the price of HQbird for a company that needs to use not 1 or 2 servers, but several hundred or even thousands of installations? If the number of servers is more than 20, purchasing permanent licenses (USD899/server) becomes too expensive. That’s why we offer HQbird Unlimited Subscription for software development companies.
HQbird Unlimited Subscription for software development companies costs USD$1200/month (or USD$13450/year with upfront payment), for the annual contract (please note, that regional pricing can be different).
This is a special license for software development companies that allows you to install and use an unlimited number of HQbird copies along with business applications (ERP, CRM, etc) produced by the company.
For example, if a company has 40 clients, then the subscription will cost USD$1200/month, that is, approximately $30 per client per month. If the software development company has 400 clients, then the cost for 1 client per month will be $3 per month.
1.4. What’s new in HQbird 2024
HQbird 2024 is a new major version that adds support for Firebird 5.0 and a number of important features:
-
Replacing queries "on the fly"
-
Improved Firebird Streaming technology:
-
Added control file, with the same format used for replication in Firebird 4 and higher
-
Added recovery of the
fb_streamingservice after a failure (replication segments are not deleted until the transactions started in them are completed or rolled back. After a failure, transactions that have not yet been committed are repeated). -
Added new Kafka CDC plugin (Change Data Capture)
-
In addition, HQbird 2024 still offers advanced replication features, external connection pooling, prepared statement pooling, and other features needed when working with large databases under high load.
1.5. Feature matrix
Below is a matrix of features and their level of support in the various versions of Firebird included with HQBird.
| # | Feature | V5.0 | V4.0 | V3.0 | V2.5 | Level |
|---|---|---|---|---|---|---|
1 |
High-performance native replication |
X |
X |
X |
X |
server |
2 |
Replacing queries “in the air” |
X |
X |
X |
X |
server |
3 |
Plugins to access ODBC/MySQL through Execute Statement On External |
X |
X |
X |
plugin |
|
4 |
Caching BLOBs in temp space |
X |
X |
X |
X |
server |
5 |
Improvements in optimizer for JOINs and large sortings |
X |
X |
X |
server |
|
6 |
Cache of compiled statements |
X |
X |
X |
server |
|
7 |
Streaming/Change Data Capture (plugins for Kafka, JSON, etc) |
X |
X |
plugin |
||
8 |
Full Text Search |
X |
X |
X |
plugin |
|
9 |
Multi-thread backup/restore/sweep, creation of indices |
X |
X |
X |
X |
server |
10 |
Parallel Reading of consistent data |
X |
X |
X |
X |
server |
11 |
Pool of External Connections |
X |
X |
X |
server |
|
12 |
Encryption |
X |
X |
X |
server |
|
13 |
Automatic correction of |
X |
X |
X |
X |
server |
14 |
Advanced Monitoring of Performance (trace, MON, locks, CPU, RAM, frequency) |
X |
X |
X |
X |
tools |
15 |
Monitoring of queries with large sortings |
X |
X |
X |
X |
server |
16 |
Manage (and configure replication) many databases at once with command-line tools |
X |
X |
X |
X |
tools |
17 |
Backups, Restore, and Automatic Backup/Restore |
X |
X |
X |
X |
tools |
18 |
Transfer backups, segments, etc through FTP/sockets/Amazon S3 |
X |
X |
X |
X |
tools |
19 |
Advanced database maintenance: proper garbage collection and more |
X |
X |
X |
X |
tools |
20 |
Multi-instance support |
X |
X |
X |
X |
tools |
21 |
Silent installation on Windows and Linux |
X |
X |
X |
X |
tools |
22 |
Tool to analyze database statistics |
X |
X |
X |
X |
tools |
23 |
Tool to analyze connections/transactions/memory consumption/IO operations |
X |
X |
X |
X |
tools |
24 |
Recovery tools |
X |
X |
X |
X |
tools |
25 |
Optimized configurations |
X |
X |
X |
X |
tools |
1.6. Brief Description of HQBird Features
1.6.1. High-performance native replication
HQbird includes native replication to create fault-tolerant systems based on Firebird databases:
-
Replicates databases with 1500+ connections
-
Asynchronous replication with 1-30 seconds delay,
-
Synchronous replication without delay,
-
No triggers or other changes in schema required
-
Automatic propagation of DDL changes,
-
Online re-initialization of replicas.
-
Embedded transport for replication changes, verification of transferred replication segments
Native replication is configured through the special plugin, with the ability to exclude records without PK/UK at the plugin level.
HQbird has complete transport to arrange transfer of segments for asynchronous replication for 1-to-1 or 1-to-many schemas, with automatic setup, transfer and validation of replication segments via sockets or FTP. HQbird has command-line commands to set up databases for replication in bulk, to choose databases in the folder, or in nested folders.
1.6.2. Replacing queries "on the fly"
If you have an application with inaccessible or missing sources, HQbird can help you change texts of incompatible or most resource-consuming SQL queries “on the fly”, and therefore help to optimize the performance or migrate an application without SQL queries sources. The replacement is easy configurable, it is implemented by pairs of files which contains text of original and replaced queries.
With Advanced Monitoring, you can find SQL queries that cause issues and then configure the substitution for them, even without access to the application’s source code. The replaced query will occur in trace and MON$ tables with the new text.
1.6.3. Plugins for performing external connections with MySQL and ODBC
HQbird has External Datasource plugins for ODBC and MySQL. Using these plugins, it is possible to execute commands EXECUTE STATEMENT ON EXTERNAL with
queries to MySQL or ODBC data source, in order to read data from external datasources, or to write data to external datasources.
Plugins support input parameters and correct mapping of data types (however, in case of ODBC it depends on the specific driver implementation).
See example of an external connection below:
execute block
returns (
  emp_no bigint,
  birth_date date,
  first_name varchar(14),
  last_name varchar(16),
  gender char(1),
  hire_date date
)
as
  declare dsn_mysql varchar(128);
begin
  dsn_mysql = ':mysql:host=localhost;port=3306;database=employees;user=root';
  for
    execute statement q'{
select
  emp_no,
  birth_date,
  first_name,
  last_name,
  gender,
  hire_date
from employees
order by birth_date desc limit 5
}'
    on external dsn_mysql
    as user null password 'sa'
    into
      emp_no, birth_date, first_name,
      last_name, gender, hire_date
  do
    suspend;
end1.6.4. Caching blobs in temp space
HQbird can cache BLOBs in temp space, in order to speed up BLOBs operations (+15%-200% faster than in vanilla Firebird), and to prevent growth of the database file in case of mistaken BLOB operations.
HQbird uses an extra firebird.conf parameter BlobTempSpace to control this feature.
The caching option can be:
-
0 — disabled,
-
1 — enabled for PSQL (default),
-
2 — enabled for all blobs operations.
1.6.5. Improvements in optimizer for JOINs and large sortings
LeftJoinConversion / OuterLeftConversion
HQbird can automatically convert implicit inner joins to explicit ones for better optimization in versions 3 and 4.
To activate this feature, change the LeftJoinConversion setting in firebird.conf to true. HQbird in v5.0 supports the OuterLeftConversion option that is available in the vanilla version 5.0.
SortDataStorageThreshold / InlineSortThreshold
HQbird can optimize queries that involve large sorting operations. In versions 2.5 and 3.0, you can use the SortDataStorageThreshold setting to activate the Refetch plan for this purpose.
In the vanilla version 4.0, this setting is renamed as InlineSortThreshold. Usually, we recommend to set SortDataStorageThreshold to 8192 or 16384 bytes.
1.6.6. Cache of compiled queries
This feature can improve the performance of repeated queries, especially when using a connection pool (PHP, etc).
Cache keeps a certain number of prepared queries in each connection’s memory. HQbird has this cache in versions 3.0 and 4.0, and you can adjust it with the DSQLCacheSize setting (default is 0, i.e., disabled).
In vanilla version 5.0, there is a comparable feature, regulated by the MaxCompiledCache option, which is measured in Megabytes, the default is 2Mb.
1.6.7. Streaming/Change Data Capture (plugins for Kafka, JSON, etc)
Firebird Streaming is a technology that tracks changes in the database and sends them to another system, such as Kafka, JSON files, RabbitMQ, full text search plugin, etc.
HQbird offers a replication-based Change Data Capture plugin. The plugin creates a change flow that reflects transaction commits/rollbacks.
HQbird provides ready-made plugins for Kafka, RabbitMQ, JSON files, and also supports their configuration for any destination. CDC is useful for processing queues, sending alerts asynchronously, and copying changes to other systems (such as business intelligence or data science pipelines).
CDC plugin available upon request. For more information, contact IBSurgeon support ([email protected]).
See more Firebird Streaming
1.6.8. Full-text search
Full-text search is a technique that allows you to search for any word or phrase within a large collection of documents or data. Full-text search is different from searching based on metadata or partial text, which may not capture the full meaning or context of the query. Full-text search uses a full-text engine, such as Lucene, to perform the search and return the results.
IBSurgeon Full Text Search UDR is a user-defined routine (UDR) that integrates Lucene with Firebird. A UDR is a custom function that can be called from SQL statements. IBSurgeon Full Text Search UDR allows you to perform full-text search on Firebird tables in varchar and BLOB fields using Lucene engine.
This UDR is available in open source, but HQbird, provides a customizable plugin based on streaming for operational update.
More details: https://www.firebirdsql.org/en/full-text-search-udr/
1.6.9. Multi-threaded backup, restore, sweep, creation of indices
HQbird implements multi-thread maintenance (sweep), backup, restore, and create index operations. Firebird 2.5, 3.0 and 4.0 are supported, and this functionality also appeared in Firebird vanilla version 5.0.
The format of backup files is the same as in the vanilla Firebird. On the test server with CPU with 8 cores and SSD, we have the following results (compared with 1 thread);
-
Backup — 4-6x times faster
-
Restore — 2-4x time faster on CPUs with 8 cores and SSD
-
Sweep — 4-6x time faster
The actual acceleration depends on CPU, disk subsystem of the server, and structure of the database. Install HQbird in the trial mode (up to 30 days) and check what results will be on your server!
More details and test results can be found here: https://ib-aid.com/articles/firebird-gbak-backuptips-and-tricks#110hqbirdbackup
1.6.10. Parallel reading of consistent data
HQbird, starting from version 2.5, supports two important features:
-
make_dbkey()function, which enables reading a table that is partitioned by physical storage blocks (from pointer pages), -
and “shared snapshot” transaction mode, which facilitates parallel operations in multiple connections.
These features help to achieve parallel reading of large data sets, and to accelerate 2-10x times export operations (such as for BI exports or data pipeline). These features are also available in Firebird vanilla, from version 4.0.4 onwards.
-
More details are in the article: https://ib-aid.com/articles/parallel-reading-of-data-in-firebird
-
Example application & sources: https://github.com/IBSurgeon/FBCSVExport
1.6.11. Pool of external connections
HQbird has a pool of external connections for Firebird 2.5, 3.0, and this pool is also available in vanilla version since 4.0.
An external connection pool allows you to execute EXECUTE STATEMENT ON EXTERNAL statements with less overhead in reconnecting to the external database.
The feature is controlled in the firebird.conf with ExtConnPoolSize and ExtConnPoolLifeTime parameters.
From the application perspective, no extra steps are needed to use or not use — it is switched on or off in the server configuration, and completely transparent for the applications. It is also possible to disable garbage collection for queries executed in external connections. It is regulated through configuration parameter ExtConnNoGarbageCollect.
See details: Pool of external connections
1.6.12. Encryption
HQbird supports encryption with Encryption Framework’s Plugin. The main features are:
-
DB encryption plugin (available on demand) for versions 3, 4, 5, Windows & Linux. Comprehensive and fast encryption plugin framework, with AES256. Performance loss is between 4%-20%, depending on the RAM and configuration.
-
Support for multi-thread work (for middleware applications, with connections to multiple databases).
-
Sending keys through
fbclient.dllto implement encryption without changing the application. If you have a database tool that does not support key transfer, or a third-party application, key can be sent throughfbclient.dllwith a special configuration. -
Password input window for
fbclient.dllin Windows and password input on the terminal in Linux.
We can offer examples of client applications in various languages, such as Delphi, NET, Java, PHP, C++, etc., upon request.
1.6.13. Automatic correction of firebird.conf (DefaultDbCachePages)
Incorrect configuration of DefaultDbCachePages in firebird.conf, databases.conf or in database header is a common configuration mistake, which often happens during the migration between versions. For instance, it can be too large values of Page Buffers in database header for Classic or SuperClassic, or too low for SuperServer.
HQbird will automatically fix the wrong setting in firebird.conf and databases.conf and it will overwrite, if the configuration is unsuitable for a selected architecture.
1.6.14. Advanced Monitoring of Performance (trace, MON, locks, CPU, RAM, frequency)
Advanced Monitoring of Performance in HQbird is a feature that allows you to monitor and analyze the performance of your Firebird databases (version 5.0, 4.0, 3.0, 2.5) in real time. It collects data from various sources, such as Trace API, MON$ tables, lock table, transactions, CPU and RAM usage, and displays them in graphical and tabular forms. You can see the overall performance trends, as well as drill down to the details of each minute, query, or transaction.
You can also identify performance problems, such as slow and frequent queries, long-running transactions, lock table spikes, etc., and view their plans and statistics.
-
More details: https://ib-aid.com/monitoring-in-hqbird
1.6.15. Monitoring of queries with large sortings
This feature helps to troubleshoot queries that produce large reports, where many records need to be sorted. HQbird can track queries and operations that create sorting files larger than a given size. When such a query is detected, its text is recorded to firebird.log
Configured as a TempSpaceLogThreshold parameter in firebird.conf, which defines the size of the sorting file for monitoring.
1.6.16. Manage (and configure replication) many databases at once with command-line tools
If you have many databases stored in the folder, and want to register all of them in HQbird to setup replication, in HQbird v2024 there is new command-line command to generate JSON file from the folder (recursive or not) with the registration information, which can be used for mass registration.
From replica side, there is special version of HQBird Central for Replicas, which allows to store hundreds of replicas (from different servers) on the single server. HQbird Central for Replicas is shipped by request.
1.6.17. Backups, Restore, and Automatic Backup/Restore
-
Backups: HQbird implements all types of backups with sophisticated or simple scheduling (all can be done online, with connected users):
-
Verified backup with
gbak.exe. The traditional Firebird backup format when Firebird reads every record in the database, guaranteeing that database is healthy. In HQbird (versions 2.5-5.0) verified backup is very fast due to multi-thread support. HQbird implements rotation of verified backups, compression, and test restore. HQbird calculates necessary space for backups to ensure that backup will fit into the free space, and creates detailed logs for all operations. -
Incremental backup. The fast physical level backup which copies changed data pages. HQbird offers 3 backup schemes: simple weekly 3-levels backup, enhanced multi-level backup (up to 5 levels), and dump backup to create a copy of the database. Backup files are rotated, the necessary space is calculated.
-
-
Restores
-
Restore your databases from backups. HQbird allows to restore database from FBK. It is especially important for cloud instances, when FBK is uploaded to the cloud instance, so there is no necessity to connect to server’s console (i.e., ssh or RDP).
-
Test restore, as part of verified backup process. You can opt to perform test of restore of fresh backup, it will be done as a part of verified backup restore process.
-
Scheduled restores. It is possible to organize scheduled restores of verified (gbak) backups and/or incremental (nbackup) backups, for example, as part of backup infrastructure.
-
-
Automatic backup-restore. Support of full backup-restore cycle, both planned and by request. HQbird will do the full backup-restore in the safe and fast manner: stop all users, do backup and restore, enable users. The old copy of the database will be kept. In case of a problem the process will be reverted. If there will be not enough space, backup-restore will not start.
With HQbird, you can always keep track of your backups and avoid losing them, no matter how many databases you have or where they are.
1.6.18. Transfer backups, segments, etc through FTP/sockets/Amazon S3
HQbird can transfer backups (or other files by mask) via FTP, sockets, or to Amazon S3 (needs plugin which is available on demand).
HQbird also has built-in FTP server and sockets server with easy setup.
1.6.19. Advanced maintenance: proper garbage collection and more
Excessive record versions, also known as garbage versions, slow down Firebird databases significantly. HQbird implements the proper combination of sweep operations and “soft” shutdown of long running writeable transactions, and allows to avoid frequent database backups/restores. With HQbird it is recommended to do backup/restore no more than once per year.
Maintenance can also include the recalculation of indices statistics and the verification of indices health, as well as the examination of metadata health.
1.6.20. Multi-instance support
HQbird allows installation of multiple Firebird instances of different versions on the same server. It makes migration from one version to another easier. HQbird for Windows installs all supported Firebird versions (5.0, 4.0, 3.0, 2.5) by default, each instance with a different port. You can choose to install only one version, or several versions, during the installation.
To install HQbird for Linux with multiple instances, please use united installer (it is a new feature of HQbird v2024), and indicate what versions you want.
1.6.21. Silents installation on Windows and Linux
The fastest way to install HQbird is to use the silent installation in the command line.
In the example below we will install HQbird with Firebird 3.0 into c:\HQbird, the configuration will be c:\HQbirdData\config, output in c:\HQbirdData\output.
HQbirdServer2024.exe /VERYSILENT /SP- /TYPE="hqbird30x64" /DIR="C:\HQbird2020" /CONFIGDIR=C:\HQBirdData\config /OUTPUTDIR=C:\HQBirdData\output
See also:
-
How to setup on Linux: Installing HQbird Server on Linux
-
More details: Silent installation on Windows
1.6.22. Tool to analyze database statistics
HQbird’s Admin package (it runs on Windows), includes Database Analyst, a tool that assists a user to analyze in detail Firebird database statistics and identify possible problems with database performance, maintenance and how an application interacts with the database. IBAnalyst graphically displays Firebird database statistics in a user-friendly way and highlights the following problems:
-
tables and BLOBs fragmentation,
-
record versioning,
-
garbage collection,
-
indices effectiveness, etc
More details: Database structure analysis
1.6.23. Tool to analyze connections/transactions/memory consumption/IO operations
HQbird MonLogger is a tool to analyze monitoring tables output in Firebird and find problems with slow SQL queries, wrongly designed transactions (long-running transactions, transactions with incorrect isolation level, etc) and identify problematic applications.
MonLogger can connect to Firebird database with performance problems and identify what is the reason of slowness: is it some user attachment, slow SQL query or long-running transaction?
MonLogger supports Firebird 2.1, 2.5, 3.0, 4.0 and 5.0 — for older Firebird versions or InterBase please use FBScanner (it is not included in HQbird, should be purchased separately).
MonLogger can show you:
-
Top attachments with highest number of IO operations, non-indexed and indexed reads
-
Top SQL statements with highest number of IO operations, non-indexed and indexed reads
-
Problematic transactions: long-running transactions, transactions with erroneous isolation level, read/write transactions, and related information: when they started, what applications started these transactions, from what IP address, etc
-
Attachments and statements with the most intensive garbage collection actions
-
Read/write ratio, INSERTS/UPDATE/DELETE ratio, and more.
1.6.24. Recovery tools
HQbird includes license of FirstAID, recovery toold for Firebird. IBSurgeon FirstAID is the tool that can automatically diagnose and repair corrupted Firebird or InterBase databases — it can recover corruptions that neither gbak nor gfix can fix. Supported versions: Firebird 1.0, 2.0, 2.1, 2.5, 3.0, 4.0, 5.0, InterBase from 4.0 to 2020.
It uses its layer for low-level database access without using the InterBase or Firebird engine, so it can perform real "surgical" operations and repair your database when all other standard mechanisms (gfix and gbak) cannot.
1.6.25. Optimized configurations
HQbird comes with the optimized configuration by default to make the best use of resources of powerful servers and Virtual Machines. To improve HQbird configuration, you can use Cofiguration Calculator for Firebird, where you can choose “HQbird”, to obtain the basic optimized configuration for your system here: https://cc.ib-aid.com/democalc.html.
Please note that Calculator produces conservative configurations, and to create customized configuration, you need to monitor and analyze performance logs. IBSurgeon can assist you to create the ideal configuration in the context of Optimization/Configuration/Audit Incident for Firebird: https://ib-aid.com/en/firebird-interbase-performance-optimization-service/
2. Installation of HQbird
HQbird contains 2 parts: Server and Admin. Let’s consider how to install them.
2.1. Installing HQbird Server on Windows
HQbird Server 2024 includes Firebird 2.5, 3.0, 4.0 and 5.0 with replication, multi-thread support and other enhancements as part of its installer, so Firebird must be installed as part of HQbird.
It is mandatory to install Firebird bundled with HQbird Server installer, if you plan to use replication (it also requires HQbird Master license, Replica or Trial) and other enhancements.
Optionally you can choose to not install Firebird binaries shipped with HQbird – in this case, make sure that installed version is compatible (2.5.x, 3.0.x, 4.0.x, 5.0.x).
Please note, that only Firebird 2.5, 3.0, 4.0 and 5.0 are fully supported in HQbird. We offer the comprehensive Firebird migration service with guaranteed and fast result to migrate Firebird to the latest version.
2.1.1. Silent installation on Windows
The fastest way to install HQbird is to use the silent installation command.
In the example below we will install HQbird with Firebird 5.0 into c:\HQbird2024, configuration will be c:\HQbirdData\config, output in c:\HQbirdData\output.
HQBird2024.exe /VERYSILENT /SP- /TYPE="hqbird50x64" /DIR="C:\HQbird2024"
/CONFIGDIR=C:\HQBirdData\config /OUTPUTDIR=C:\HQBirdData\output
The following parameters are mandatory to perform the silent installation:
-
/VERYSILENT /SP- options to perform the silent installation -
/TYPE– what HQbird version should be installed. If you are doing silent upgrade, make sure the version is the same as it was installed previously.-
"HQBird25x64" - "HQbird (with Firebird 2.5 x64)";
-
"HQBird30x64" - "HQbird (with Firebird 3.0 x64)";
-
"HQBird40x64" - "HQbird (with Firebird 4.0 x64)";
-
"HQBird50x64" - "HQbird (with Firebird 5.0 x64)".
-
-
/DIR- where to install HQBird. If you are doing silent upgrade, make sure the version is the same as it was installed previously. -
/CONFIGDIR– where to store configuration data for HQbird. -
/OUTPUTDIR– where to store output data (default location for backups, performance reports, etc).
Optional parameters for the silent installation of HQbird:
-
/fbport=3050- port for Firebird to be installed with HQbird -
/LOG=C:\temp\HQBirdServerSetup.log- where to store installation log -
DataGuard parameters:
-
/DGPORT=8082– port for web interface of HQbird (FBDataGuard) -
/DGLOGIN=admin– login for web interface of HQbird (FBDataGuard) -
/DGPASSWORD=strong password– password for web interface of HQbird (FBDataGuard) -
/DISSVC- disable all installed services (use function IsDisableServices) -
/DISMONSVC- disable installed services except DG (use function IsDisableMonServices)
-
-
Automatic registration parameters:
-
/REGEMAIL=[email protected]- email to perform the automatic registration of HQBird -
/REGPASS=yourpassword– password from IBSurgeon Deploy Center account to register HQbird -
/REGTYPE=R|M|T== Replica, Master, Trial – license type, must be specified if you need to register HQbird during the installation
-
-
Offline registration (incompatible with REG **)
-
/REGUIK=<uik filename> -
/REGUNLOCK=<unlock filename>
-
Must be set in pairs, both are required!
/REGUIK="z:\HQBird\test\uik" /REGUNLOCK="z:\HQBird\test\unl"
-
Email alerts parameters:
-
/EAHOST=smtp.company.com– SMTP server for email alerts -
/EAPORT=25– SMTP port for email alerts -
/EALOGIN=support– SMTP login to send email alerts -
/EAPASSWORD=psw– SMTP password to send email alerts -
/EATO=[email protected]– where to send email alerts -
/EAFROM=[email protected]– from address -
/EAENABLED=true– enable or disable email alerts -
/EADEFALT=true– send a copy of email alerts to IBSurgeon Control Center
-
-
Built-in FTP server parameters:
-
/FTPENABLED=true– enable or disable FTP server -
/FTPPORT=8721- FTP port -
/FTPLOGIN=admin2- FTP login -
FTPPASSWORD=strong password2- FTP password
-
Please note, that in a case of error, for example, if you are trying to run silent installation to install HQbird to the location which is different from the current location, the error message window will popup and installation will be canceled.
2.2. Installing HQbird Server for Windows using the installer
Download HQbird from https://ib-aid.com/en/download-hqbird
The HQbird server distribution contains only 64-bit versions of the Firebird engine; 32-bit versions of Firebird are provided upon user request.
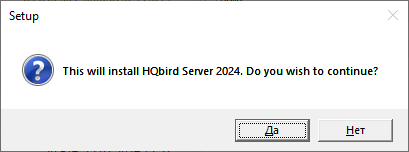
Make sure that HQbird installer is signed with valid IBSurgeon certificate («iBase LLC») and run it:
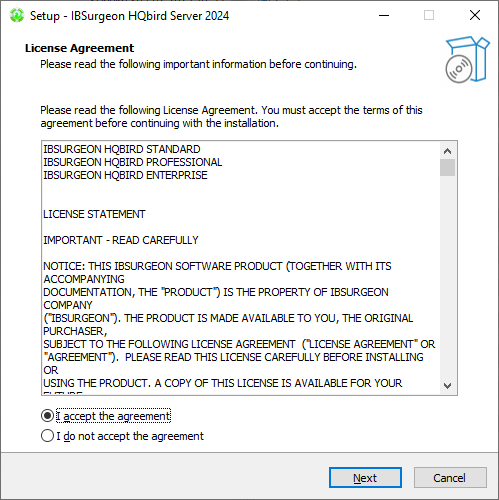
The HQbird Server Side installation wizard will be launched after that and it will take you through several steps, such as agreeing to the license agreement and selecting the installation folder.
At first, the installer will ask you where to install HQbird:
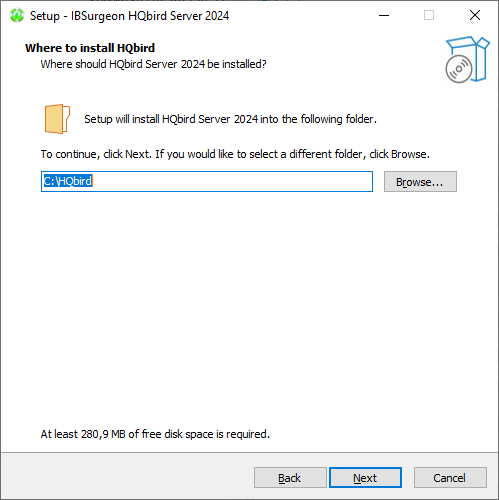
We recommend to use the default location c:\HQbird, but you can use any suitable location.
After that, you should select folders for storing configuration files, backup copies of databases, statistics and HQbird log files:
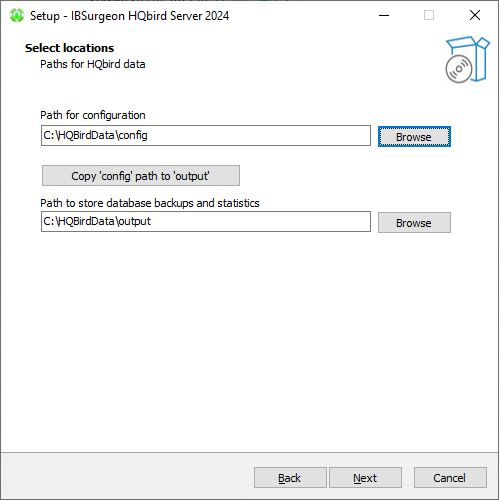
By default, the installation wizard offers to create folders for configuration and log files in C:\HQbirdData.
|
Usually, we recommend selecting a disk with a large amount of free space for this purpose, but you can configure it later. |
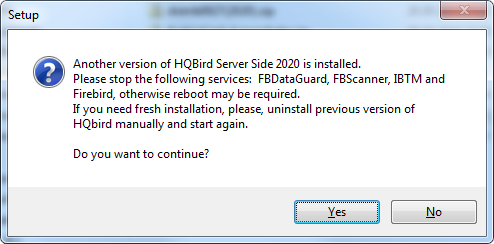
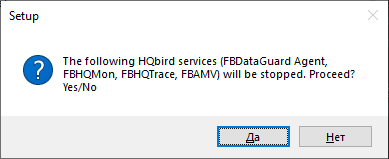
If configuration files already exist in the selected location, the installation wizard will display the corresponding warning:
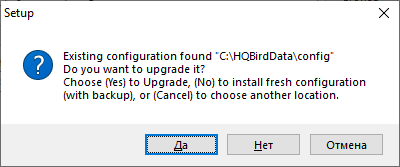
We recommend the automatic upgrade, so default answer should be Yes.
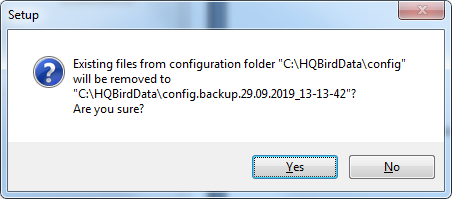
However, you can choose to create fresh configuration of HQbird, and click No – it this case the installer will warn you that existing configuration files will be moved:
In case of choosing Cancel, you need to specify the different location for the configuration and output/backup files.
After you confirm it, the folder with the existing configuration files will be renamed and the installation will continue.
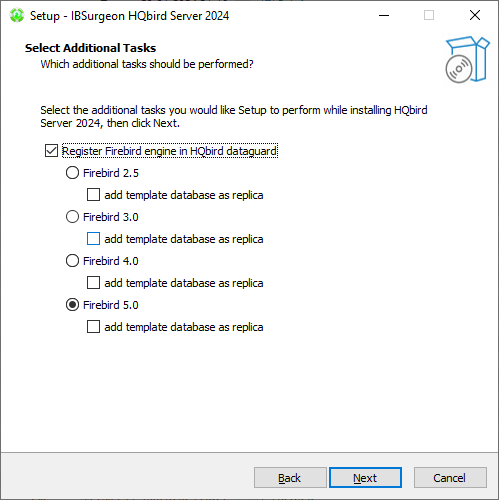
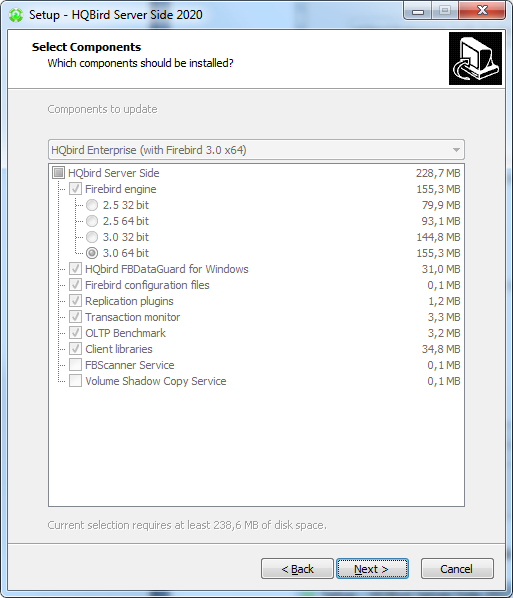
After that, you will see the installation step where you can select components to be installed:
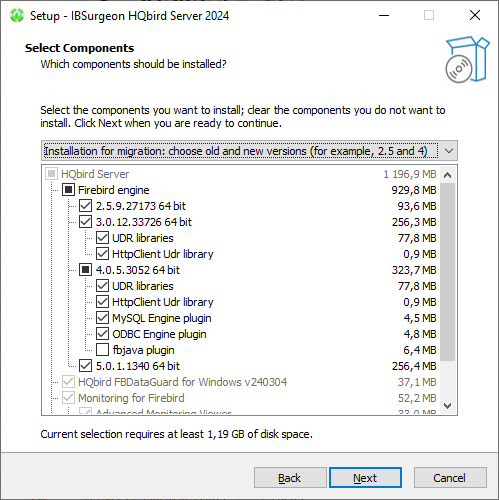
We recommend that you install all HQbird components and Firebird, to avoid further configuration. All HQbird modules are installed in the inactive mode and do not affect the operation of the Firebird server until they are configured or used.
If you choose to install HQbird with Firebird, by default each version of Firebird will be installed in a subfolder of the HQbird installation. By default for each version of Firebird:
-
C:\HQbird\Firebird25 -
C:\HQbird\Firebird30 -
C:\HQbird\Firebird40 -
C:\HQbird\Firebird50
The installation wizard will then ask you to specify the port for each version of Firebird installed alongside HQbird:
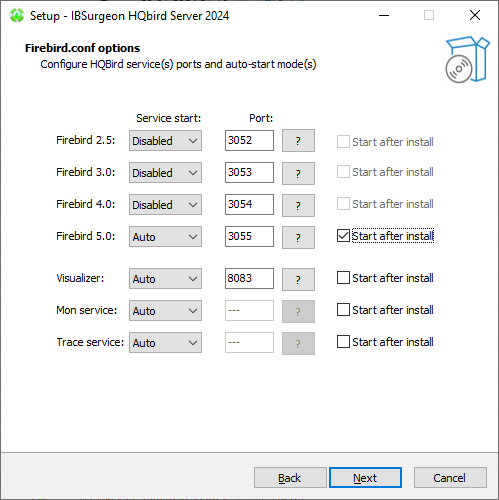
If the port is occupied by another running Firebird, the installation wizard will warn you and prompt you to select a different port. Or you can stop and remove another Firebird service.
Here you can select services that will start automatically when the system starts.
Then, you will be asked to specify the port for HQbird FBDataGuard (web interface to manage HQbird):
We recommend to keep 8082, but sometimes this port can be occupied, so you can change it.
Default password: strong password
In the next step, you can set the built-in FTP server settings.

Default password: strong password
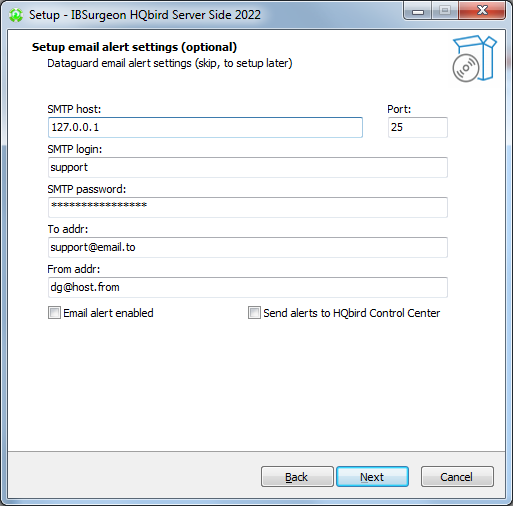
After that, the installer will ask about email settings to be used to send email alerts:
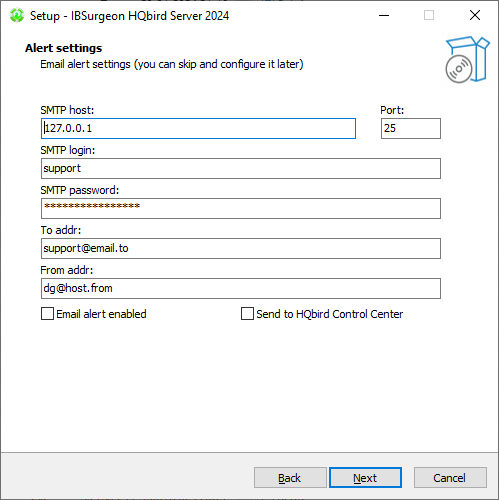
|
You can skip this step: all email alerts can be set later in web interface. |
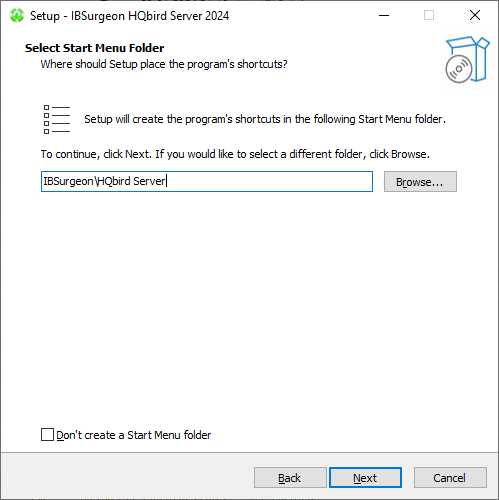
Then, you can specify the folder name and location in Windows menu:
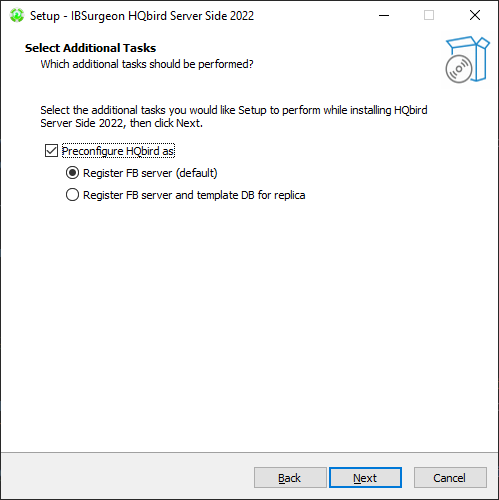
At the next step the installer will offer you to pre-configure HQbird to be used as master or replica server:
You can skip this step, this configuration can be done later.
The final step is a summary of components to be installed and their paths:
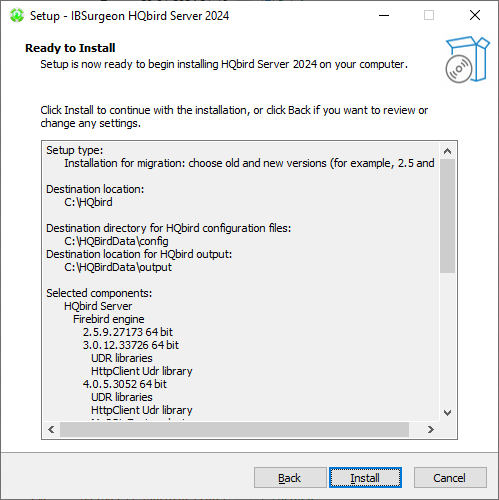
After that you have to activate HQbird (see How to Activate HQbird) and proceed to configure the HQbird components.
At the end of installation process, you will be asked about next steps:
2.3. Installing HQbird Administrator on Windows
To install HQbird Administrator, download the distribution package from link: https://ib-aid.com/en/hqbird/, or from your account at http://deploy.ib-aid.com.
The name of HQbird Administrator package is HQbirdAdminNNNN.exe (it is in the zip archive).
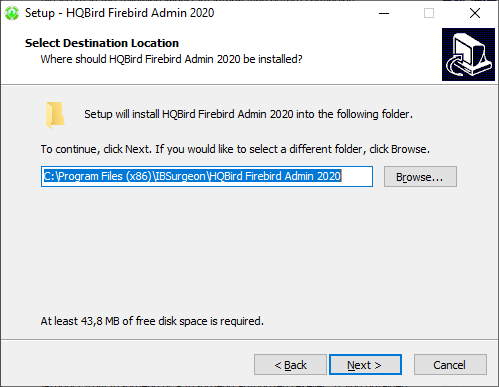
Run the installation wizard and follow the standard installation steps: digital signature check, license, then select the installation folder:
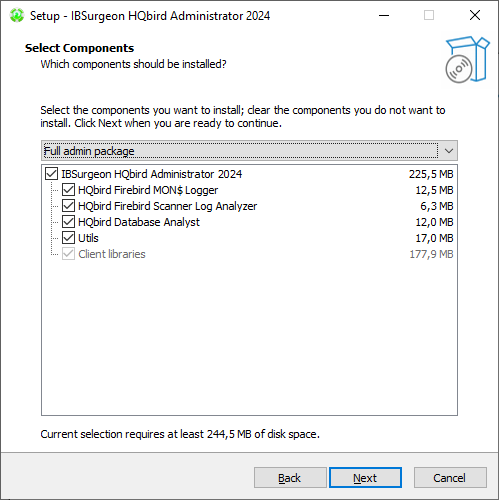
Select tools to install after that. We recommend that you install all tools.
Follow the instructions after that. After the installation is over, you will be offered to launch the activation wizard. If you are installing HQbird Admin on the same computer where HQbird Server was already installed, the license will be automatically detected by HQbird Admin tools.
2.3.1. How to install community version of Firebird on Windows
The easiest way is to install Firebird bundled with HQbird – just choose the desired version during the installation. However, sometimes it is necessary to use HQbird with a community version of Firebird.
|
Please note – to enable replication and performance features in HQbird you need to install Firebird bundled with HQbird ServerSide. |
To install Firebird separately, download the Firebird zip archive from www.firebirdsql.org
Unpack the archive file to a suitable location (for instance, C:\Firebird25), after that copy the optimized configuration file firebird.conf (see Optimized Configurations below) to this folder.
Then, go to the Bin folder and then use the Run As Administrator option to run the batch file with the architecture you need.
-
For Firebird 2.5 – run
install-superclassic.bat. -
For Firebird 3.0 and higher – set parameter
ServerMode=Superand runinstall_service.bat.
Of course, you can choose the SuperServer for 2.5 or Classic architecture for 3.0 if you know what you need.
As a result of running the command file, Firebird of the selected architecture will be installed and run as a service.
You can make sure the Firebird service is installed and running in the Services snap-in (services.msc in command prompt):
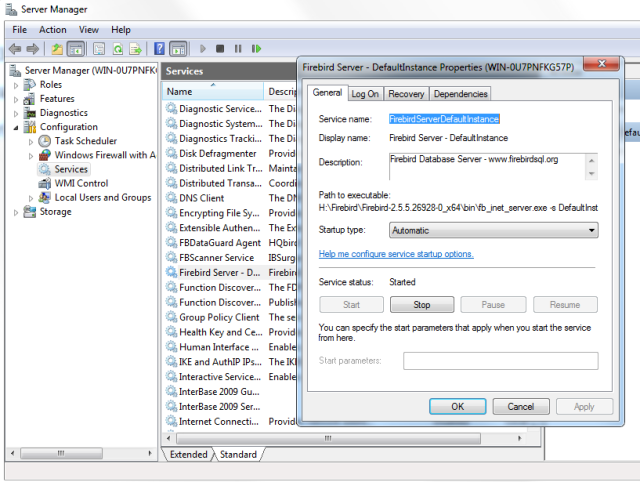
In this example, Firebird is installed in the folder H:\Firebird\Firebird-2.5.5.26928-0_x64 and running as a service with the SuperClassic architecture.
2.4. Installing HQbird Server on Linux
To install HQbird Server Side on Linux, you need to download HQbird ServerSide for Linux with built-in Firebird of the appropriate version from the link https://ib-aid.com/en/download-hqbird/
Depending on your version of Firebird, you need to download one of 4 files:
-
install_fb25_hqbird2024.sh -
install_fb30_hqbird2024.sh -
install_fb40_hqbird2024.sh -
install_fb50_hqbird2024.sh
You must be root or sudoer to install HQbird on Linux!
General prerequisites: install java version 1.8 before installing HQbird! We recommend OpenJDK, but Oracle’s Java is also fine.
2.4.1. Installation of HQbird with Firebird 2.5 on Linux
-
Uninstall all previously installed Firebird versions before running this installer. Make sure you don’t have Firebird installed from repositories!
-
Apply execution rights to the installation package:
chmod +x install_fb25_hqbird2024.sh -
Run installation script
install_fb25_hqbird2024.sh. It will install Firebird into/opt/firebirdand HQbird into/opt/hqbird -
By default, Firebird 2.5 is installed as Classic. We recommend to install it as SuperClassic – for this run script
/opt/firebird/bin/changeMultiConnectMode.shand choose thread
Next steps:
-
Please note that Firebird 2.5 will be installed with SYSDBA/masterkey
-
You can stop/start Firebird 2.5 with command
service firebird stoporservice firebird start. Check is it running with commandps aux | grep firebird -
You can stop/start HQbird with command
service hqbird stoporservice hqbird start. Check is it running with commandps aux | grep dataguard -
Run browser, and log in to HQbird FBDataGuard http://serverurl:8082, with user/password = admin/strong password
-
Choose “I have HQbird” and register HQbird with the email and password you have received from IBSurgeon Deploy Center.
-
If necessary, follow steps to setup — or see the appropriate chapter of this Guide.
2.4.2. Installation of HQbird with Firebird 3.0 on Linux
Prerequisites: make sure you have libtommath, libncurses5-dev and ICU installed (there will be an appropriate error message if they are not installed).
-
Uninstall all previously installed Firebird versions before running this installer
-
Apply execution rights to the installation package:
chmod +x install_fb30_hqbird2024.sh -
Run installation script
install_fb30_hqbird2024.sh. It will install Firebird into/opt/firebirdand HQbird into/opt/hqbird -
By default, Firebird 3.0 is installed as SuperServer. Keep it.
-
Firebird 3.0 will be installed with SYSDBA/masterkey
Next steps:
-
You can stop/start Firebird 3.0 with command
service firebird-superserver stoporservice firebird-superserver start. Check is it running with commandps aux | grep firebird -
You can stop/start HQbird with command
service hqbird stoporservice hqbird start. Check is it running with commandps aux | grep dataguard -
Run browser, and log in to HQbird FBDataGuard http://serverurl:8082, with user/password = admin/strong password
-
Choose “I have HQbird” and register HQbird with the email and password you have received from IBSurgeon Deploy Center.
-
If necessary, follow steps to setup — or see the appropriate chapter of this Guide.
2.4.3. Installation of HQbird with Firebird 4.0 on Linux
Prerequisites: make sure you have libtommath and ICU installed (there will be an appropriate error message if they are not installed).
-
Uninstall all previously installed Firebird versions before running this installer
-
Apply execution rights to the installation package:
chmod +x install_fb40_hqbird2024.sh -
Run installation script
install_fb40_hqbird2024.sh. It will install Firebird into/opt/firebirdand HQbird into/opt/hqbird -
By default, Firebird 4.0 is installed as SuperServer. Keep it.
-
Firebird 4.0 will be installed with SYSDBA/masterkey
Next steps:
-
You can stop/start Firebird 4.0 with command
service firebird-superserver stoporservice firebird-superserver start. Check is it running with commandps aux | grep firebird -
You can stop/start HQbird with command
service hqbird stoporservice hqbird start. Check is it running with commandps aux | grep dataguard -
Run browser, and log in to HQbird FBDataGuard http://serverurl:8082, with user/password = admin/strong password
-
Choose “I have HQbird” and register HQbird with the email and password you have received from IBSurgeon Deploy Center.
-
If necessary, follow steps to setup — or see the appropriate chapter of this Guide.
2.4.4. Installation of HQbird with Firebird 5.0 on Linux
Prerequisites: make sure you have libtommath and ICU installed (there will be an appropriate error message if they are not installed).
-
Uninstall all previously installed Firebird versions before running this installer
-
Apply execution rights to the installation package:
chmod +x install_fb50_hqbird2024.sh -
Run installation script
install_fb50_hqbird2024.sh. It will install Firebird into/opt/firebirdand HQbird into/opt/hqbird -
By default, Firebird 5.0 is installed as SuperServer. Keep it.
-
Firebird 5.0 will be installed with SYSDBA/masterkey
Next steps:
-
You can stop/start Firebird 5.0 with command
service firebird-superserver stoporservice firebird-superserver start. Check is it running with commandps aux | grep firebird -
You can stop/start HQbird with command
service hqbird stoporservice hqbird start. Check is it running with commandps aux | grep dataguard -
Run browser, and log in to HQbird FBDataGuard http://serverurl:8082, with user/password = admin/strong password
-
Choose “I have HQbird” and register HQbird with the email and password you have received from IBSurgeon Deploy Center.
-
If necessary, follow steps to setup — or see the appropriate chapter of this Guide.
2.4.5. Installation of HQbird without Firebird on Linux
If you don’t want to change the existing Firebird installation, please run the following command:
install_fb4_hqbird2024.sh –-nofirebirdIt will install HQbird without Firebird binaries.
|
Please note, that advanced features (replication, multi-thread support, encryption, authentication) require HQbird with Firebird binaries! |
2.4.6. Firewall settings
Make sure these ports are allowed in your firewall configuration:
-
3050 - Firebird;
-
3051 - events Firebird
-
8082 - web-console DataGuard
-
8083 - monitoring
-
8721 - Passive FTP
-
40000-40005 - FTP passive ports
-
8720 - active FTP
-
8722 - socket server
-
8765 - license server
These ports can be changed in /opt/firebird/firebird.conf (RemoteServicePort), /opt/hqbird/conf/network.properties (server.port) and /opt/hqbird/conf/license.properties (serverlicense.port).
Make sure to allow these ports in your firewall configuration.
|
Attention!
After upgrade, make sure that there is only the one copy of HQbird is running! If there are 2 copies, stop them ( |
2.5. Upgrade existing HQbird version
HQbird installer on Windows (from v 2018R2) and on Linux (from v 2018R3) supports automatic upgrade of the configuration of already installed HQbird version 2017R2 and later.
If HQbird installer will notice the previous version of HQbird, it will ask you to confirm the upgrade, and in case of the positive answer, it will stop Firebird, HQbird and upgrade their files.
The configuration will be retained — it means that firebird.conf, aliases.conf or databases.conf, securityX.fdb, and HQbird configuration files will not be deleted (HQbird configuration files will be upgraded to the new configuration version).
The upgrade does not change the Windows service settings for Firebird and HQbird – it means that if you have changed “Run As” properties of the service, they will be retained.
|
After upgrade on Linux Firebird and HQbird must be started manually! |
|
After upgrading HQbird, open the web-console and choose in the right upper corner: “Refresh HQbird web-console”. It is necessary to clean the cache of JavaScript part of the application. 
|
Please note — if you are installing HQbird 2024 over the old version of HQbird on Windows, the dialog with installation options will be shown as disabled, because we cannot automatically upgrade from 2.5 to 3.0, 4.0 or 5.0, and installer can only upgrade the same components. If you need a different installation, remove old version of HQbird from the computer prior installing 2024.
2.6. Registration of HQbird
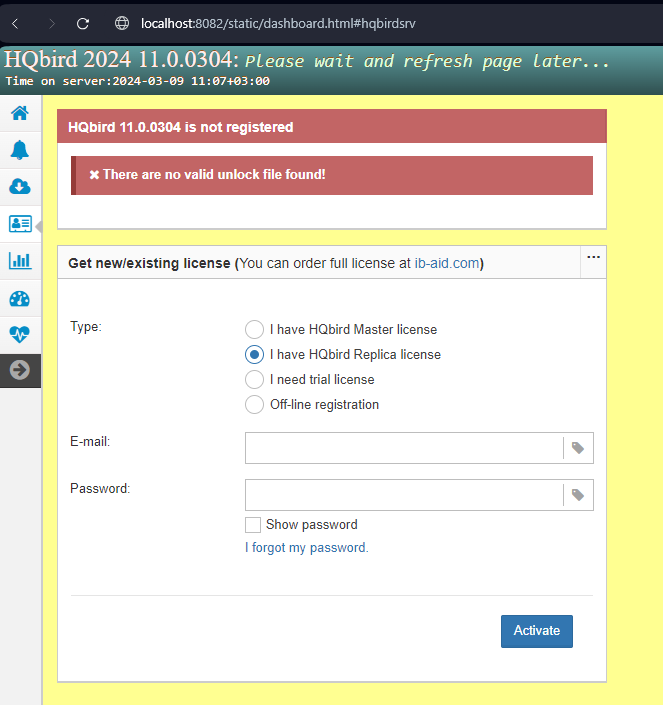
2.6.1. How to activate HQbird
To activate HQbird, you can either use a separate utility included in the server and administrator packages for Windows, or use the registration mechanism embedded into the HQBird Firebird DataGuard web interface (for Windows and Linux), or run any tool from the administrator software and use the built-in activation wizard.
The activation wizard looks and works the same in the tools and in the activation tool. It is enough to perform activation once on any computer that can connect to the server where HQbird ServerSide is installed.
You can launch the registration utility from the Start menu (IBSurgeon\HQbird Firebird Admin\HQbird):
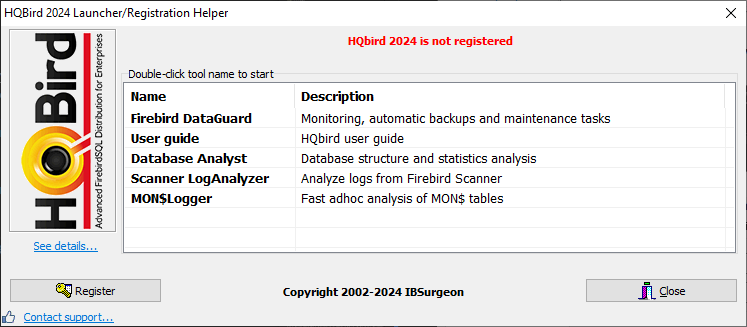
If you click the Register button (or Re-Register for repeated registration), you will see the activation wizard:
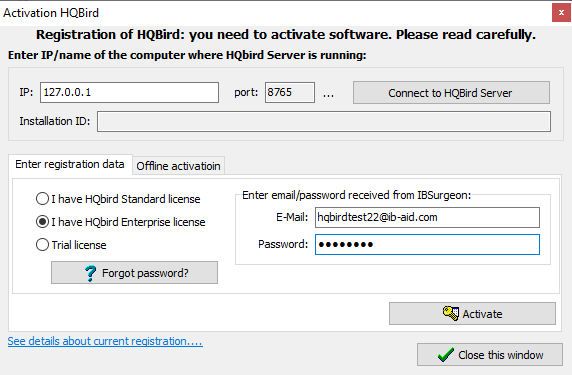
After that, specify the IP address or the computer name of the server HQbird is installed on in the upper input field and click Connect to HQbird Server. If you started registration utility on the same computer with HQbird Server, it will be “localhost”, otherwise — some remote address.
Then enter your registration data. If you have a license, enter your e-mail address and password that you used to register with the IBSurgeon Deploy Center and click Activate.
|
If you have no license, choose Trial license, specify your e-mail address and click Activate. You will be automatically registered and the password will be sent to your e-mail address. |
Right after you click Activate, the registration wizard will try to connect to the IBSurgeon Deploy Center () and obtain a license. If it succeeds, you will see the corresponding message. If there are any problems, you will see the error message.
If you forget the password, click the Forgot password… button and it will open the browser with the password recovery form.
If you need to purchase a new or additional license or renew your subscription, click Purchase.
Click Close this window after the registration is over.
Internet Activation via a Client Computer
If the server with HQbird Server does not have access to the Internet, you can still activate it via the Internet: you can install HQbird Administrator on any client computer with Windows that has both access to the Internet and access to the HQbird Server and perform activation.
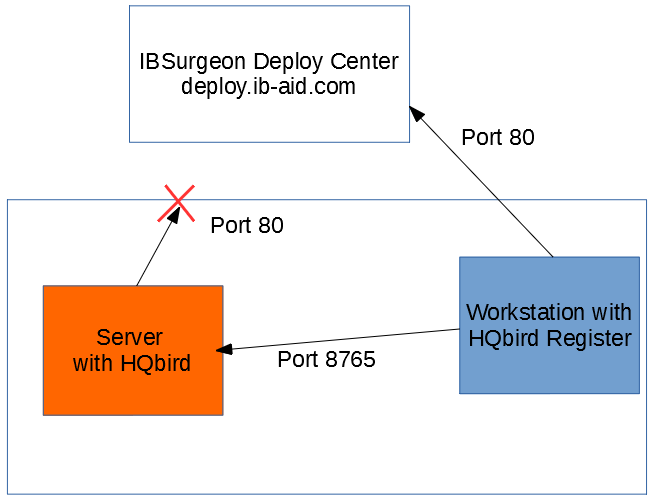
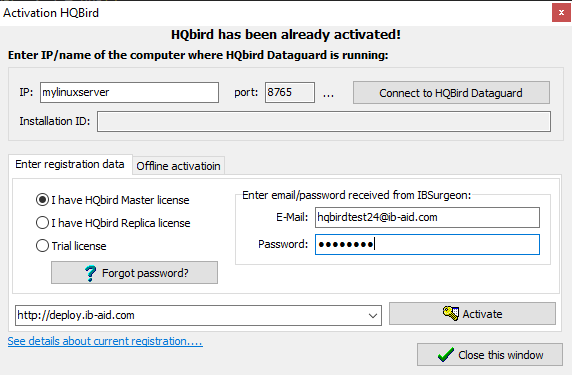
Run HQbird Register tool and enter there: IP address of your server (or, server name — for example, mylinuxserver), email and license, and click Activate:
2.7. Configuring firebird.conf for the best performance
HQbird includes set of optimized configuration files for all Firebird versions from 1.5 to 5.0 – they are located in HQbird\Configurations.
If you did not perform a justified tuning of firebird.conf or you are using default firebird.conf, consider to use one of the optimized files from this collection.
There are three variants of Firebird configuration files for every Firebird architecture: balanced, read-intensive and write intensive.
We always recommend to start with balanced firebird.conf.
Then we recommend to measure actual ratio between reads and writes using HQbird MonLogger tool (tab “Aggregated
Performance Statistics”). In 90% of cases there are much more reads than writes, so the next step is to try read-optimized firebird configuration file.
Firebird configuration greatly depends on the hardware, so if you want to tune Firebird properly, please also read “Firebird Hardware Guide”, it will help you to understand what parameters must be tuned.
For the deep tuning of high-load Firebird databases IBSurgeon offers Firebird Database Optimization Service: https://ib-aid.com/en/firebird-interbase-performance-optimization-service/
Also, HQbird FBDataGuard analyses the database health and sends alerts with intelligent suggestions to increase specific parameters in firebird.conf, like TempCacheLimit or LockHashSlots.
|
Attention!
If you have specified many page buffers in the header of your database and installed SuperClassic or Classic, it can affect Firebird performance.
To avoid the potential problem, set page buffers in the header of your database to 0, it will ensure that the value from gfix –buff 0 –user SYSDBA –pass masterkey disk:\path\database.fdb |
3. Jobs, monitoring and maintenance configuration in FBDataGuard
Please follow these steps:
-
Make sure that you have Firebird 2.5.5 or later, and it is working;
-
HQbird FBDataGuard service is installed and running
-
You can check it using Services applet in Control Panel (right-click on “My Computer”, choose “Manage”, then “Services and Applications”, “Services” and find in the list “FBDataGuard Agent”)
-
At Linux you can check it with command
ps aux | grep dataguard.
-
-
Make sure the FBDataGuard port is accessible (8082) and it is not blocked by firewall or any other antivirus tools. If necessary, adjust port in FBDataGuard configuration file (see Adjusting web-console port).
3.1. Launch web-console
To open web-console type in your browser http://localhost:8082 or use IP address of your server with installed HQbird ServerSide.
Or you can choose in “Start” menu .
3.1.1. Supported browsers
FBDataGuard web interface works correctly with Firefox, Chrome, Safari, Microsoft Edge and Internet Explorer 11.
3.1.2. Error message regarding webs-site certificate
If you have configured FBDataGuard to use https, the browser will indicate that this web-site is not safe, and it will recommend leaving web-site. This message is caused by the default security certificate for FBDataGuard web-console.
Please ignore this message and click to open FBDataGuard web-console.
It will ask you for username and password (login dialog can be different for Firefox, Safari or Chrome).
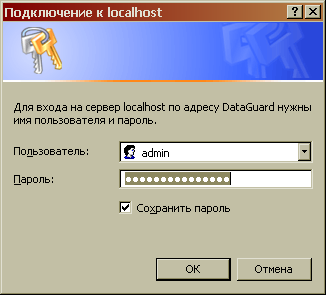
|
Attention!
Default username/password for HQbird FBDataGuard is "admin"/"strong password" (without quotes). |
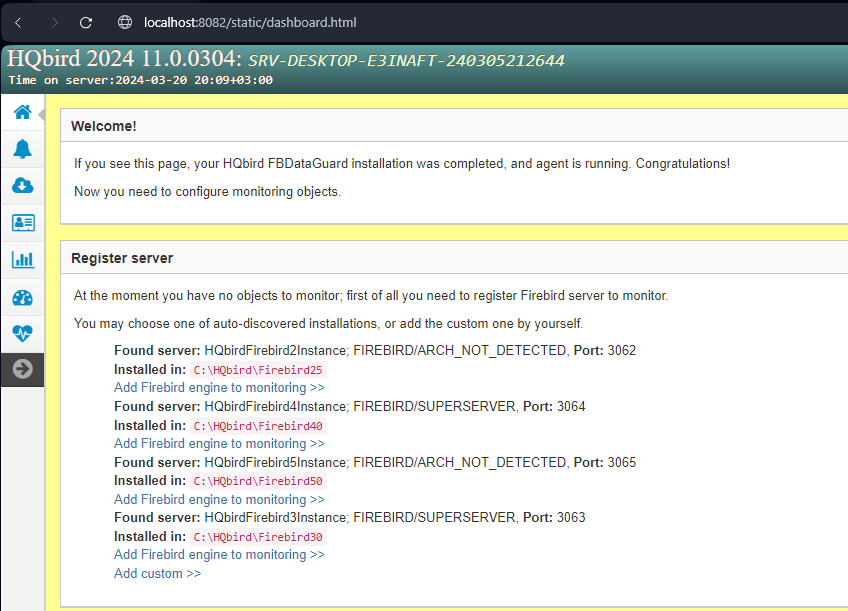
3.1.3. Auto discovery feature of FBDataGuard
At the first launch FBDataGuard will check computer for installed Firebird servers. FBDataGuard for Windows search registry for Firebird records, FBDataGuard for Linux checks default locations of Firebird installations.
FBDataGuard will show the list of all Firebird copies installed, but only the one instance of Firebird can be monitored by FBDataGuard. Choose it by clicking Add Firebird engine to monitoring >>
If you don’t see Firebird instance in auto discovery list, you can choose Add custom >> and configure instance parameters manually.
3.2. Overview of web-console.
3.2.1. Parts of web-console.
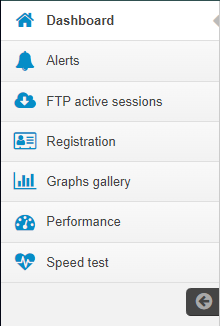
FBDataGuard Web-console contains 7 tabs (in the left side of the screen, usually they are collapsed):
-
Dashboard — it is the main tab where administrator can configure HQbird FBDataGuard and see server and databases statuses.
-
Alerts — contains the full list of alerts, generated by FBDataGuard.
-
FTP active sessions — display information about active FTP sessions.
-
Registration — license and registration/activation information.
-
Graphs gallery — performance graphs.
-
Performance — performance monitoring settings and performance reports.
-
Speed test
3.2.2. Jobs
Web-console is intended for easy configuration of activities (called “jobs”) which are fulfilled by HQbird FBDataGuard.
Almost all FBDataGuard jobs have 2 purposes: the first is to monitor for some values and to raise alerts if necessary, and the second is to store historical values into logs, so later it’s possible to see the dynamics of important parameters of Firebird server and database.
In this section we will consider general configuration of jobs parameters, but not an analysis of gathered logs.
3.2.3. Jobs widgets
General approach is the following: each activity is represented by a “widget”, which has the following parts:
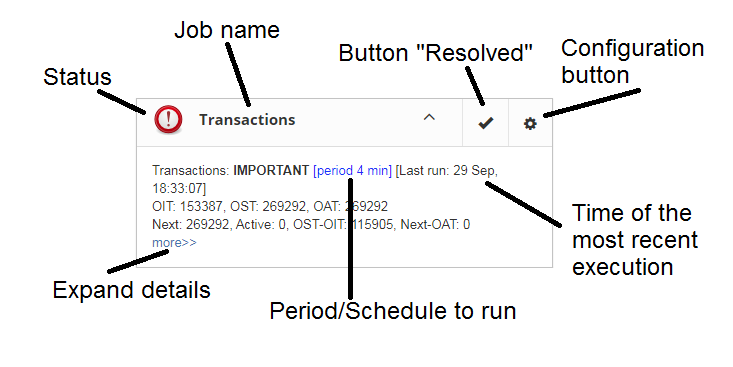
Status — it is indicated with color icon and name. Status of database is a summary of all included server-level jobs and databases' statuses, and, respectively, status of database is a summary of all database-level jobs.
3.2.4. Status types
CRITICAL means problems, OK means “Everything is fine”, WARNING means some issues which require attention, MAJOR means major issue, MINOR – minor issue, MALFUNCTION means that jobs was not succeeded (something prevents its execution), NOT_AVAILABLE means that job is not available in this server or database version.
OFF means that job is not active, UNKNOWN means that job is active but was not started yet, so actual results are unknown.
Job name indicates the name of activity.
-
 Configuration button opens configuration dialog, which is individual for each job.
 -
 Starts the job immediately.
 -
 Resolved is the link to flush the status to UNKNOWN and forgot errors which were discovered previously. The status will be updated according the current situation after the next execution of the job.
Last run shows the time after the last run of this job.
Period/Schedule to run shows how often or when the job will be started.
More>> is the link which opens the widget and shows more details and suggested action for administrator to resolve the situation.
All jobs in FBDataGuard have default settings, which are very close to recommended values for the 80% of Firebird installations, so after initial configuration server and database will be protected at pretty good level comparing with default installation, however, we recommend additional configuration and tuning for every job. In the next sections we will consider each job and its configuration.
3.3. Firebird server configuration in FBDataGuard
3.3.1. Firebird server registration
To register auto-discovered server, you need to click at Add Firebird engine to monitoring>> and then adjust auto-discovered settings.
|
Note: to use Windows Trusted Authentication (by default it’s off), you need to be sure that libraries |
When installing under Windows, if the option to automatically register the master/replica is selected, the server will be added automatically. In this case, you can skip this step.If the option to automatically register a replica is selected, then the database will be added in addition.
Let’s consider what can you see in the Server dialog (and, normally, you don’t need to change them):
| Installed in |
Firebird installation folder |
| Binary folder |
Firebird bin folder (for Firebird 3 or higher on Windows Binary folder is the same as the installation folder) |
| Log |
location of |
| Configuration file |
location of |
| Aliases |
location of |
| Host |
name of the server, usually |
| Port |
network port for Firebird, according |
| Use trusted auth |
use trusted authentication, by default it is off |
| SYSDBA login |
name of SYSDBA user, usually it is SYSDBA |
| SYSDBA password |
password for SYSDBA |
|
User for Services API
Password for Services API user Server authentication plugin list Output directory |
Folder where backups, statistics and gathered logs will be stored |
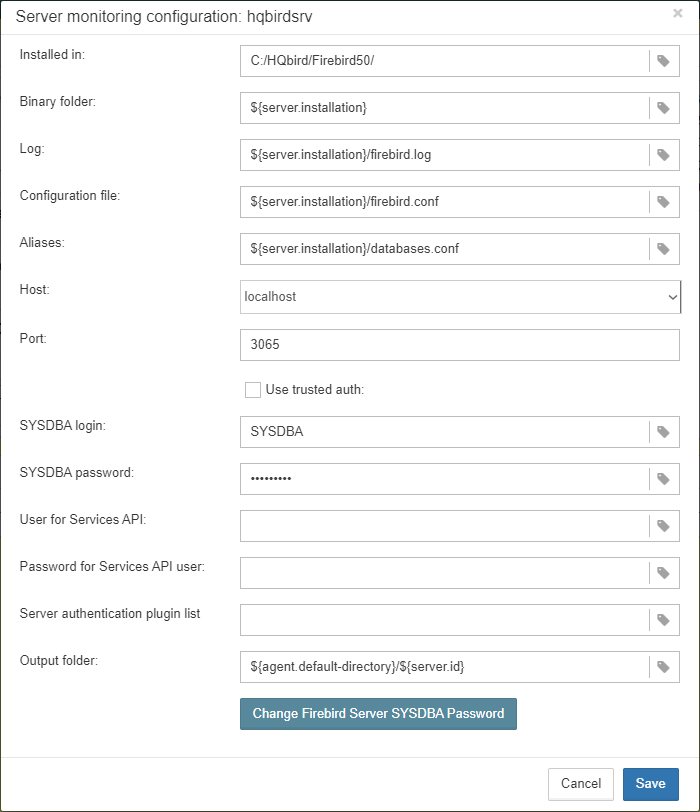
By default “Output directory” for Firebird server is ${agent.default-directory}/${server.id}, it corresponds to C:\HQbirdData in case of a default installation.
It can be not very convenient, so we recommend pointing FBDataGuard output directory to more simple path, usually located at disk where backups are intended to be stored, for example F:\myserverdata.
After clicking “Save” FBDataGuard will populate default configurations files and immediately start analysis of firebird.log. It can take a while (for example, 1 minute for 100Mb firebird.log). After that you will see initial web-console with registered Firebird server:
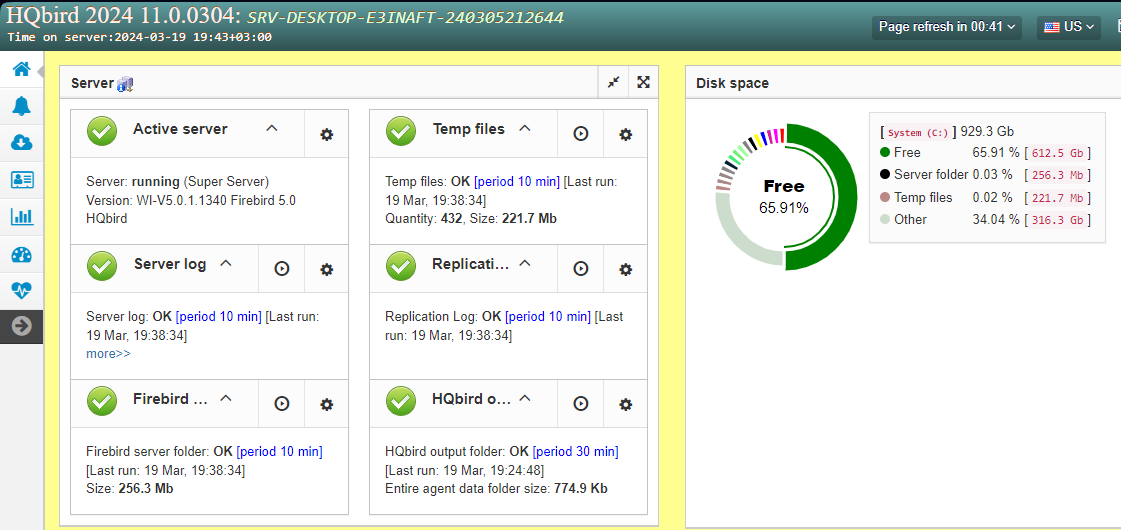
FBDataGuard shows alerts and statuses of monitored objects: if everything is fine, it shows green signs, otherwise there will be yellow or red notifications.
Below we will consider in details each monitored objects and its settings.
|
Note: you cannot delete registered Firebird server in FBDataGuard web-console. The only way to unregister server is to delete its configuration files. In general, there is no reason for deleting registered server, until you want completely uninstall FBDataGuard. |
3.3.2. Server: Active server
Server: Active server widget shows summarized status of all server-level jobs and statuses of monitored databases.
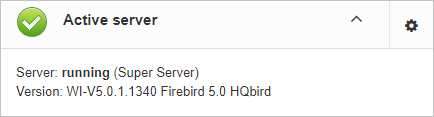
Server: Active server also indicates Firebird currently running or not and shows detailed version of Firebird and HQbird.
If you click on configure link, you will see the same dialog that we have used to register Firebird instance in FBDataGuard, and now it can be used for changing Firebird instance properties:

In general, there is no need to edit Firebird server details after the registration, until you are not reinstalling Firebird — but in this case we recommend reinstalling HQBird too.
3.3.3. Server: Replication Log

FBDataGuard check replication.log for errors. In case of error it sends an appropriate alert (by email) to the administrator.
To enable this job please check “Enabled”.
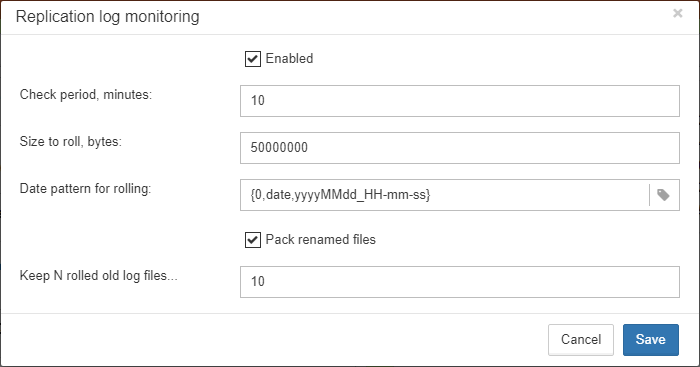
-
“Check period, minutes” — how often to check
replication.logfor changes -
“Size to roll, bytes” — if
replication.logwill exceed will value, it will be renamed according date-time pattern -
“Date pattern for rolling”-- how to rename
replication.log -
“Keep N rolled old log files” — how many errors will be stored in the list of the recent errors.
3.3.4. Server: Server log
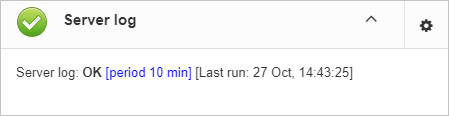
“Server log” job periodically checks firebird.log and if it detects that file was changed, log analysis starts. The embedded analytic engine checks each entry in firebird.log and categorizes them into several categories with different levels of a severity. According the severity of messages status of job is assigned and appropriate alerts are generated.
Once administrator has reviewed errors and alerts (and performed necessary actions to solve the reason of error), he need to click on “Resolved” link and FBDataGuard will forget old error messages in firebird.log.
In the configuration dialog of “Server log” you can enable/disable this job and set the check period (in minutes).
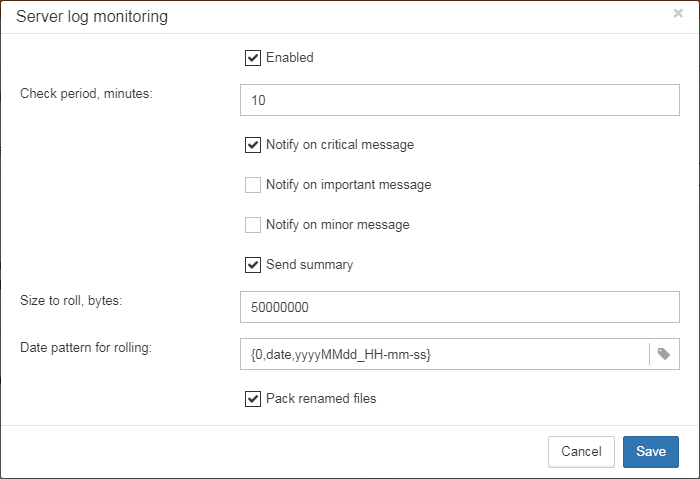
Also this job watches for the size of firebird.log and if its size exceeds “Size to roll”, FBDataGuard will split firebird.log and rename it according to the date-time pattern.
3.3.5. Server: Temp files
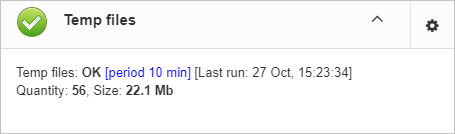
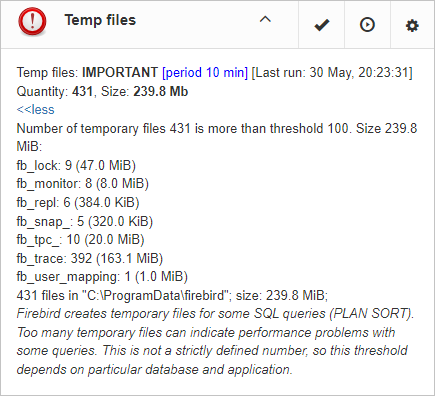
“Server: Temp files” job is useful to catch and solve performance problems with Firebird database.
While performing SQL queries Firebird stores intermediate results for sorting and merging data flows in temporary files, which are allocated in specified TEMP locations. FBDataGuard shows at “Server: Temp files” widget information about quantity and size of temporary files.
FBDataGuard recognizes locations of TEMP folders and monitors quantity and size of temporary files. Lack of space can lead to the performance problem or more serious errors, too many (or too large) temporary files can indicate problems with SQL queries quality.
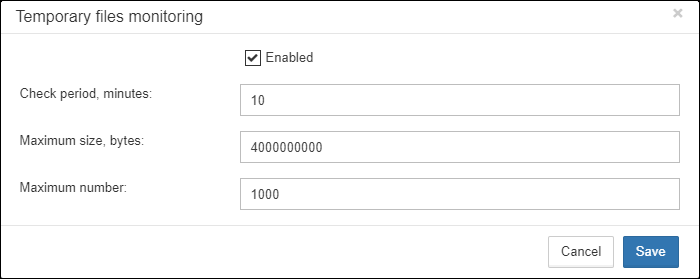
Using configuration dialog you can enable/disable this job, set period and thresholds to the maximum size of temporary files (size of all files) and quantity.
If you see that size of temp files is too high and if there is enough RAM on the server, increase TempCacheLimit parameter in firebird.conf to fit all temporary tables into RAM.
Also, HQbird checks other temp files used by Firebird — if you see extreme values (several Gb) for trace or monitor, the good idea will be check the FIREBIRD_TMP folder for outdated files (with old modification timestamps). Please note — the screenshot below is not a real alert (i.e., values are Ok), it was created to demonstrate the output in case of large temporary files.
3.3.6. Server: Firebird server folder
“Firebird server folder” jobs monitors size, occupied by Firebird installation. It’s enabled by default.
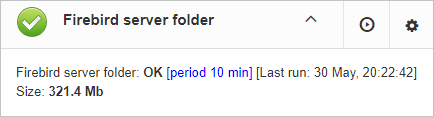
There are several threats prevented by this job: maladministration issues when database volumes or external tables are being created in %Firebird%\Bin folder, very big firebird.log which can exhaust all places at drive with Firebird installation, and some other problems.
Also this job monitors and analyses information, gathered by all space-related jobs (including database-level jobs). At the picture below you can see quick representation of space analysis for all drives where Firebird, databases and backups are stored.
Using configuration dialog you can enable/disable this job, set period of checking and thresholds for server folder size.
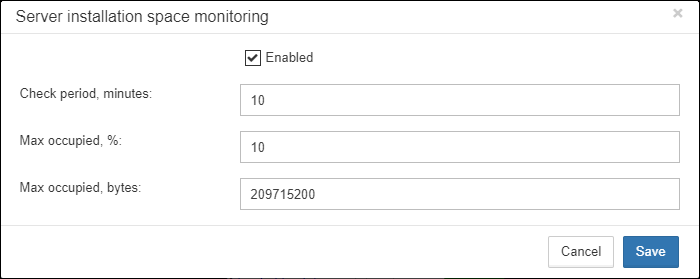
By default, we use 1 Gb is a standard setting for Firebird installation.
If the size of your Firebird is larger, please consider clean-up of old logs and other unwanted artifacts, or increase parameter Max occupied (in bytes) to prevent false alerts.
Note for Linux users: if you see red warning regarding the inconsistent space information, add locations with database and backups to Disk Space widget:
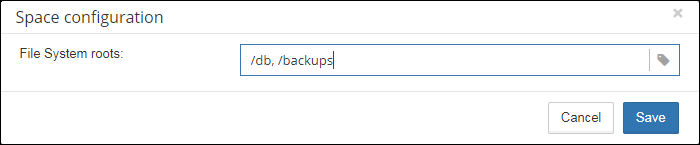
You can get idea where is your database and backup is actually located with command df -h.
3.3.7. Server: HQbird Output Folder
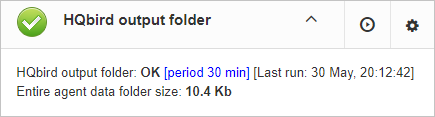
“HQbird output folder” monitoring is intended to watch space occupied by reports, logs, stats, metadata repository and other data, gathered and generated by HQbird — this folder by default is C:\HQbirdData\output.
For databases unattended for a long time (1-2 years) it is possible that FBDataGuard logs will occupy too much space and lack of space can lead to database outage. To prevent it for sure, “HQbird output folder” is watching for occupied space.
By default, “HQbird output folder” job is enabled.
Also, if someone has ignored recommendations to put backups’ folders to the explicit locations, it is possible that database backup will be created inside Agent folder. In this case you’ll see CRITICAL status immediately — FBDataGuard will recognize and warn you regarding wrong configuration.
And, this job is useful for bundles of FBDataGuard and third-party applications.
In the configuration dialog you can enable/disable this job, set check period (by default it is 10 minutes), and set thresholds for alerts.
Thresholds can be set in % of max size occupied by log or using the explicit size in bytes.
FBDataGuard checks both values and raises alert for the first threshold. If you wish to set % only, you need to set -1 as value to “Max occupied”.

3.4. Database configuration in FBDataGuard
3.4.1. Firebird database registration
The list of databases monitored by FBDataGuard is in the “Databases” section.
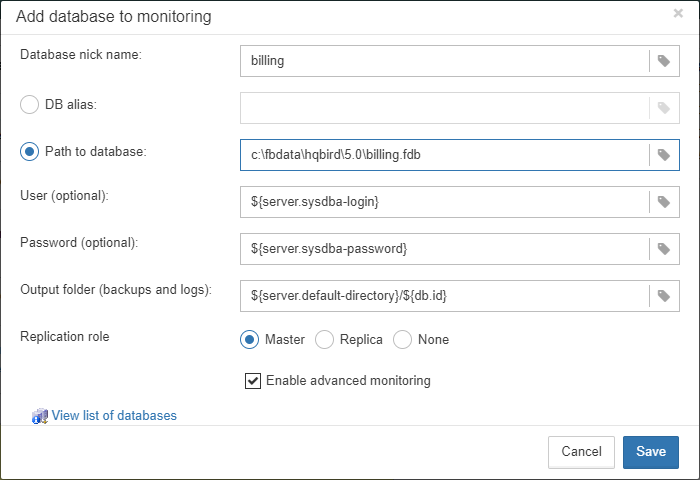
To register database in FBDataGuard, you need to click at the symbol “Plus” in the right corner of “Databases” (there will be a hint “Add database”) and fill the following form:
-
“Database nick name” is for your convenience, it is used to refer this database in alerts and email messages.
-
“DB alias” is a database alias from
aliases.confor indatabases.conf. If you specify both “DB Alias” and “Path to database”, “DB Alias” will be used. -
“Path to database” is the local path to database (remember that FBDataGuard should work at the same computer with Firebird). If you are putting database on external drive, it can raise error “File… has unknown partition”. To fix it you need to click on “Configure” at Server widget and click “Save” to make FBDataGuard re-read partitions.
-
“Output folder (backups and logs)” is the folder where FBDataGuard will store backups, logs and statistics for this database. If you do not select HQbirdData folder during the installation, and if you do not specify output folder for the server, it’s a good idea to specify “Output folder” to some explicit location like
F:\mydatabasedata. -
“Enable advanced monitoring” — see Advanced Monitor Viewer
|
You can specify exact absolute locations for backups and statistics later in appropriate dialogs. |
You can see the list of databases available for registration or their aliases by clicking on the link View database aliases.

After registration, FBDataGuard will populate database configuration with default values and then show web-console with registered database:

You can adjust database settings later; now let’s proceed with alerts setup.
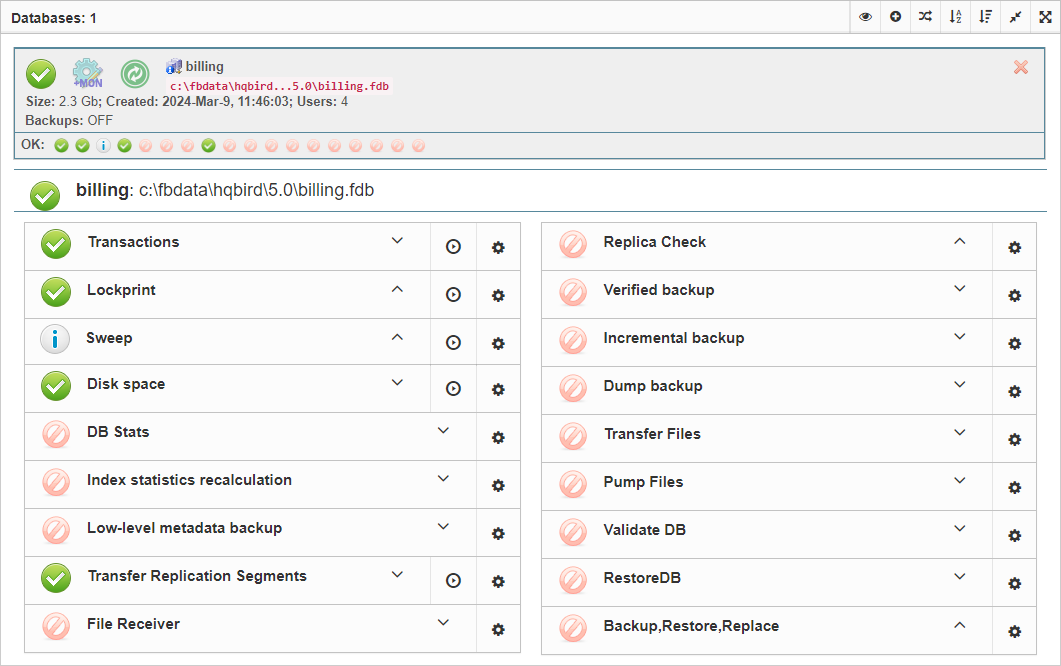
3.4.2. Database: Configure
FBDataGuard can monitor several databases at the single server (up to 80 databases). For each database the separate widget is created. At the top widget database status is shown, database nickname (it’s specified during database adding and can be changed). Also database widget shows the full path to the database, its size, status of backups and the number of currently connected users.

Using configuration dialog you can set database nickname, path to database and output folder for the database (to store logs and jobs results).
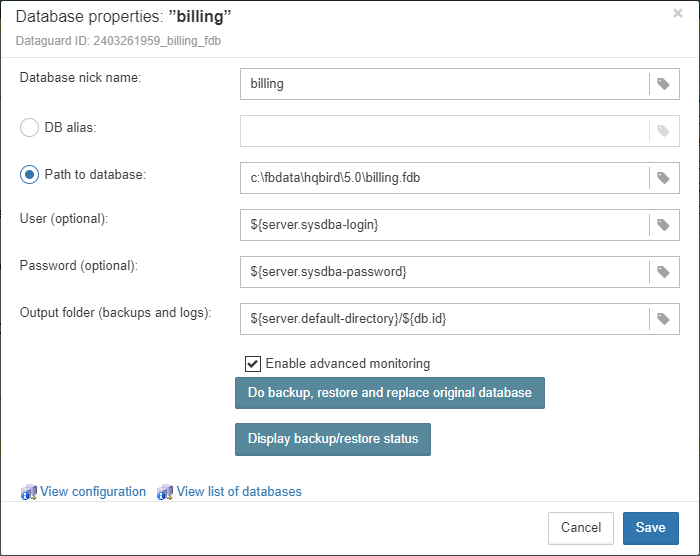
FBDataGuard checks the validity of path to database and it does not allow specifying the wrong path.
Also, for HQbird Enterprise, in the database widget you can see status of the replication and configure replication by clicking on the icon. Please read more details in the replication configuration section.
Since HQbird 2020, the database widget in HQbird also shows the encryption status of the database.
3.4.3. Database: Transactions
“Database: Transactions” job is intended to log transactions activity. It monitors 2 important intervals: difference between Oldest Active Transaction and Next transaction and gap between Oldest Snapshot and Oldest Interesting.
If these intervals are out of the frames of the specified threshold, it means problem with transactions management.
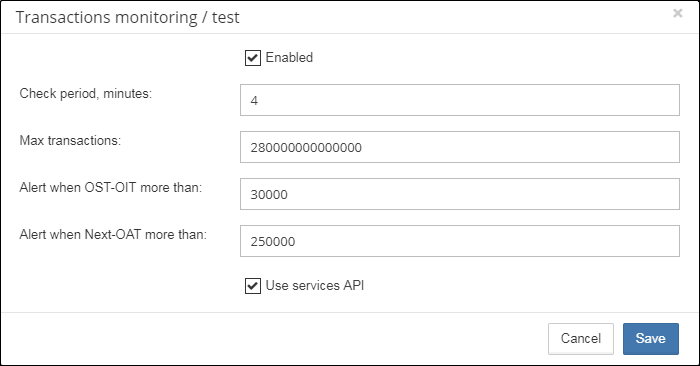
These logs can be analyzed to get helpful insight regarding database performance and application quality (see more information here http://ib-aid.com/en/articles/ibanalyst-what-you-can-see-at-summary-view/).
This job also monitors the implementation limit in Firebird: maximum transactions number in Firebird versions before 3.0 should be less than 231-1. Near this number database should be backup and restored. It will throw an alert if transaction number will be close to the restrictions.
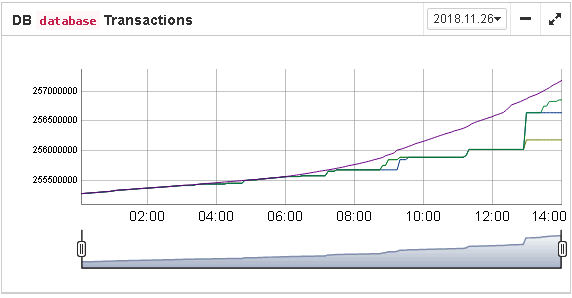
Also, the transaction dynamics is shown on the tab “Graphs gallery”:
3.4.4. Database: Lockprint
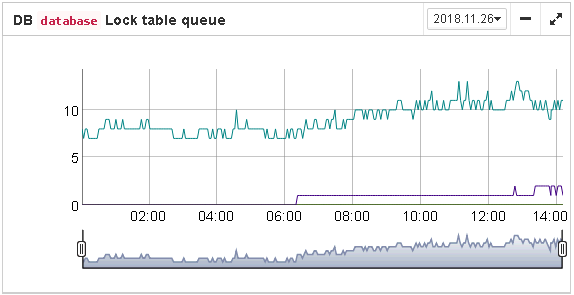
“Lockprint” job monitors the information from the lock table of Firebird. It is very important for architectures Classic/SuperClassic and useful for SuperServer.
The lock table is an internal Firebird mechanism to organize access to the objects inside Firebird engine. HQbird monitors the important parameters of the lock table:
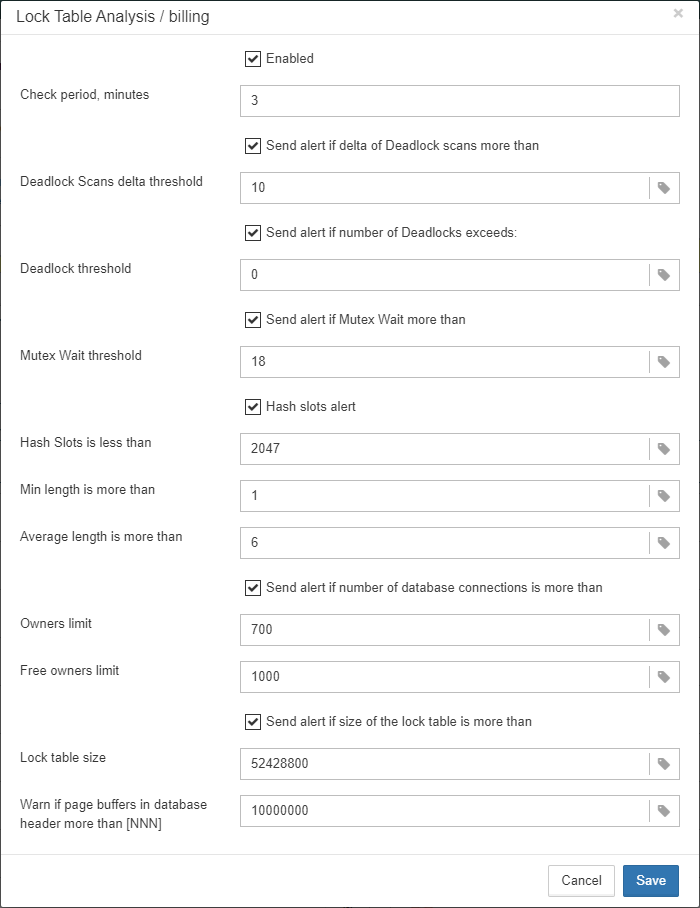
-
Check period, minutes — how often HQbird analyses lock table. 3 minutes is an optimal interval.
-
Deadlock Scans delta threshold — deadlock scan is a process, started by Firebird engine, in case of a long response delay from the one of the threads. If a number of deadlock scans is high, it means that Firebird is heavily loaded. The value is accumulated since the Firebird engine start. The default value is pretty big – 12345, so if it is exceeded, it means that database performance is poor.
-
Deadlock threshold — if Firebird engine finds the true deadlock during the deadlock scans, it increases this value. Please note: true deadlocks are very seldom. Don’t confuse them with transactions' conflicts (“deadlock. Lock conflict on nowait transaction” etc).
-
Mutex Wait threshold — Mutex Wait is a parameter of lock table which implicitly indicates the conflicts for the resources. The higher mutex wait, the more competition exists inside the engine for the resources. By default, the mutex wait threshold is set to 18%, but this value is not universal for all databases. The good approach is to watch for the mutex values during 1-2 weeks and then set the highest value seen during this period. Mutex wait graph is available in Mutex Wait gallery.

-
Hash slots alerts. Lock table header has a parameter “Hash lengths (min/avg/max): 0/0/4”, it shows the lengths in the lock table. It is important to keep these values as low as possible, so HQbird monitors them and suggest, how to improve the situation, if hash length is more than specified in this job.
-
Owners limit. “Owners” is a number of connections established to the specified database. In fact, this is the fastest way to get the actual number of connections to the database with the minimum load to the database — other ways like request to
MON$ATTACHMENTSorisc_tpb_databasehave various disadvantages. The limit here should be set according the actual peak number of connections. For example, if you are sure that peak number of the connections to your database is 500, set 550 as Owners limit, and if at some moment the load will increase, you will not miss that moment.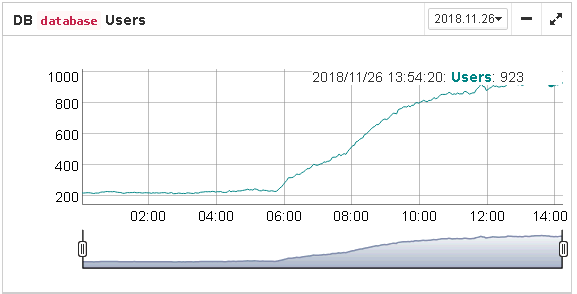
-
Free owners limit. “Free owners” is the value between the peak number of owners and current number of owners. If you see
Free owners = 0, it means that number of connections grows steadily since the Firebird start. If you see high number of Free owners, it can be sign that many connections were disconnected recently. -
Lock table size. The lock table size is an implicit indicator of the load to the system. Normally, lock table size should be stable. Also, it is recommended to set the initial lock table size to the value it has after some active work period — though the lock table is enlarged on demand, the re-allocation process is a heavy operation and can lead to micro-freezes in database responses. Lock table graph is useful to determine the proper initial value.

-
Lock table queue. Lock table queue does not have the explicit threshold in Lockprint job, but its values are collected and shown in “Graphs gallery”. Lock table queue is an indicator of a general load.
3.4.5. Database: Index statistics recalculation
“Database: Index statistics recalculation” is an important job which helps to keep performance of indices at optimal level, and performs additional checking of a database health.
“Database: Index statistics recalculation” allows to run re-computing of indices selectivity values. During this procedure Firebird quickly walks through leaf pages of indices, and renews statistics about selectivity. By visiting these pages Firebird also verifies their integrity and if index is corrupted, the warning will be thrown.
Also, this job verifies that all indices are active in database. Inactive or non-activated indices usually indicate corruption and lead to performance degradation.
By default this job is disabled, but we recommend enabling it after careful selecting of indices for the recalculation.
There are three modes in this job: AUTO, ALL, SELECTED.
ALL is the mode where all indices will be checked.
AUTO is the default mode. It is very similar to ALL, but it also checks the size of database and do not touch indices if database is bigger than 3.6Gb.
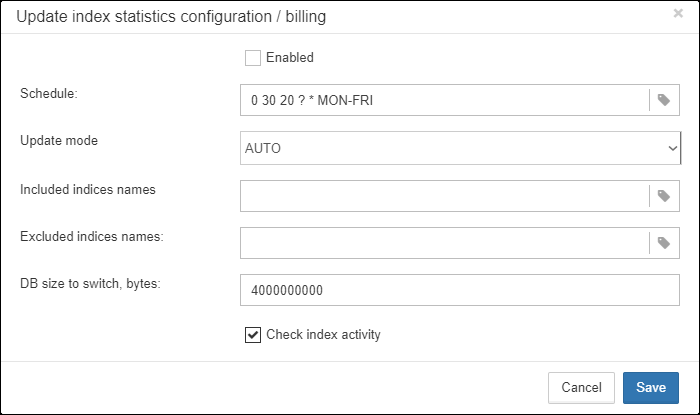
SELECTED is the recommended mode. It allows choosing of indices which should be recomputed or those which should be avoided.
To include indices into the list of recomputed, you need to specify indices names (divided by comma), and to exclude – perform the same in the appropriate field.
As you can see at configuration dialog screenshot, there are fields to enable/disable job, to set update mode, and to include or exclude indices. “DB size to switch, bytes” is to set limit where AUTO mode is working. “Check index activity” switch should be always on, until you are not performing special manipulations with inactive indices.
3.4.6. Database: Verified Backup
“Database: Verified Backup” is one of the key jobs to guarantee the safety of data stored in the protected database. During the development of HQbird we had in mind certain recovery scenario, and this scenario implies that the key goal of database protection is to minimize potential losses of data. If we have healthy backup, recovery can be concentrated on saving the most recent data (just entered into the database), and it greatly decreases the time of overall outage.
As you will see below, “Database: Verified Backup” is not just a wrapper for standard gbak functionality and scheduler, this is a smart job which has many built-in rules to prevent problems with backups and provide suitable interface for backups management.
|
“Database: Verified Backup” is disabled by default, but we strongly recommend reviewing of its settings immediately after HQbird setup. |
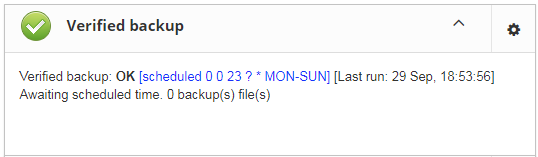
Initially “Database: Verified Backup” job is shown as Ok, though backup was not tried. In this case OK means that backup at least scheduled.
Also this job recognizes files according the name pattern (see below information regarding configuration), and shows the totals number of backups.
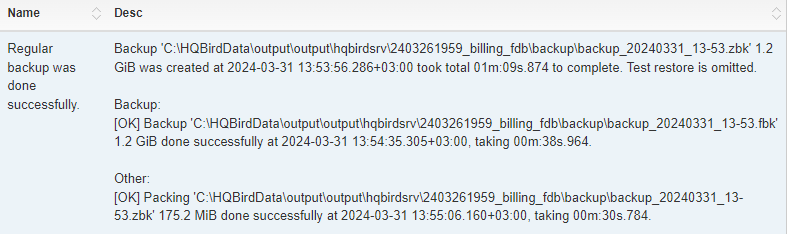
After the backup will be done, the widget information will be changed: creation time of last successful backup will be shown, and also the time took to actually perform the backup (only 1 minute 12 seconds at the screenshot with example).

Also, the detailed alert will be send to your email and/or HQbird Control Center:
“Database: Verified Backup” checks the free space at the drive with backup destination, and if it detects that there is not enough free disk space, CRITICAL alert will be sent, and current backup will be canceled (if necessary).
|
Be careful — by default backup time is set to 23-00 Monday-Sunday. By default, database backups will be stored into the output folder that you have specified during installation step! By default, it is It is very important to carefully review database backups settings and adjust them according the local configuration! |
Let’s consider the configuration dialog for backup in more details:
-
“Enabled” is obvious – it enables or disables scheduled backups
-
In the “Schedule” field you can set the time when backup should be run. Scheduler uses CRON expression and this is a right place to apply all the power of CRON (see CRON Expressions).
-
“Backups folder” specifies the folder to store backups. This folder should be at the same computer where database is. By default, it is situated inside database default directory. Usually it’s a good idea to set the explicit path to the folders with backups.
-
“Maximum number of backup files in folder” specifies how many previous backups should be stored. FBDataGuard stores backups in revolver order: when the maximum number will be reached (i.e., 5 backups will be created), FBDataGuard will delete the oldest backup and create the new backup. In combination with CRON expressions it gives a powerful ability to create necessary history of backups.
-
“Backup name pattern” specifies how backup files will be named. Also this name pattern allows FBDataGuard to recognize old backups with the same name pattern.
-
“Backup extension” is
.fbkby default. -
“Compress backups” specifies should FBDataGuard archive backups after regular Firebird backup. By default, this option is on, but you need to know that FBDataGuard will zip backups’ files which are less than 100 Gb in size. After that size, the backup compression will be automatically switched off. We recommend to turn this feature on for small databases only.
-
“Check restore” is an important option. If it is on (by default), FBDataGuard will perform test restore of fresh backup, in order to test its validity. It guarantees the quality of created backup and notifies administrator in case of any problems with test restore.
-
“Remove restored” specifies should FBDataGuard delete restored database. By default it is OFF, so you might want to turn it ON, but you need carefully consider – do you really need to keep the copy of test restored database. With each test restore this copy will be overwritten.
-
“Use multiple cores to backup and test restore” — this feature is for HQbird Enterprise only, it allows to backup database and restore test database using multiple CPU cores, so backup can be made 3-5 times faster. We recommend to allocate 1/2 of CPU cores.
-
“Send "Ok" report” — by default it is off, but it’s strongly recommended to turn it ON and start to receive notifications about correct backups. This feature will use email settings from alerts system
If we will click on button More>>, the advanced backup options will appear:
-
“Backup (gbak) timeout, minutes” — maximum time to complete only backup (
gbak -b) operation, otherwise alert will be generated. -
“Restore (gbak) timeout, minutes” — maximum time to complete test restore operation.
-
“Final destination folder for backups” — if you need to make backups into the one folder, and then move created backup to another folder (for long-term storage, for example), you can change the value of this parameter from
${backup-directory}to the folder where you will keep them. Backup files in both locations are watched by HQbird FBDataGuard, and included into the count of backup copies shown in the widget. -
“Copy backup” switch and “Copy backup to” path. If you have network location or plugged USB drive to store database where you want to store copy of backup (in addition to usual backups), FBDataGuard can copy the latest backup there: just turn on “Copy backup” switch and specify “Copy backup to” path. The copied files are not monitored and not included into the number of backup files shown in the widget.
-
“Execute shell command” switch and “Shell command” path. It is possible to specify custom script or executable after the general backup procedure will be complete. Shell command gets as the path to the fresh database backup as a parameter.
-
“Optional path to gbak executable” — it is possible to specify other gbak tool than standard
gbak. -
“Backups option for gbak” — if you need to add some specific options, add them here.
-
“Restore options for gbak” — if you need to add specific options for test restore, add them here.
|
If you are monitoring more than one database, it is highly recommended splitting the runtime of the restores. |
Important Note: Backup to the network locations
Please be aware that for creating and copying backup to the network locations Firebird and FBDataGuard services must be started under the account with sufficient rights. By default, Firebird and FBDataGuard are started under LocalSystem account, which does not have rights to access network location.
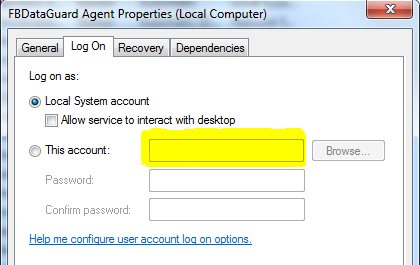
So, to store Firebird backups to the network location on Windows, run Services applet (services.msc) and on the tab Log On change “Log on as” to the appropriate account (Domain Admin should be fine).
For Linux — add necessary rights for “firebird” user.
3.4.7. Database: Incremental Backup
Incremental backup is a job to schedule and manage incremental backups in Firebird.
Please note that we recommend to use incremental backups only in combination with verified backups, since incremental backup performs coping of database pages changed since the last backup (in case of multilevel incremental backup).
HQbird FBDataGuard implements 2 types of multilevel incremental backup: Simple and Advanced incremental backups, and also Dump backup (see Database: Dump backup).
Multilevel backup in Firebird must follow the following steps:
-
Create initial backup (level 0) which essentially is the copy of the database at the moment of backup start and mark it with backup GUID.
-
Since Firebird marks each data page with a certain identifier at every change, it is possible to find data pages, changed from the moment of previous backup and copy only them to form backup of level 1.
-
It is possible to create several level of the backups – for example, the initial backup (full copy, level 0) is being created every week, every day we create level 1 (differences from the level 0), and at every hour we create level 2 backups (differences from daily level 1).
Incremental backup with simple schedule allows planning 3 levels of backups: weekly, daily and hourly.
You can see summary information for such incremental backup configuration at the following screenshot of its widget:
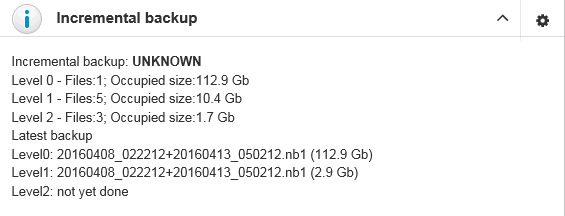
In order to setup Simple incremental backup, click on Settings “gear” of the widget and select “Simple schedule” (selected by default). The following dialog will appear:
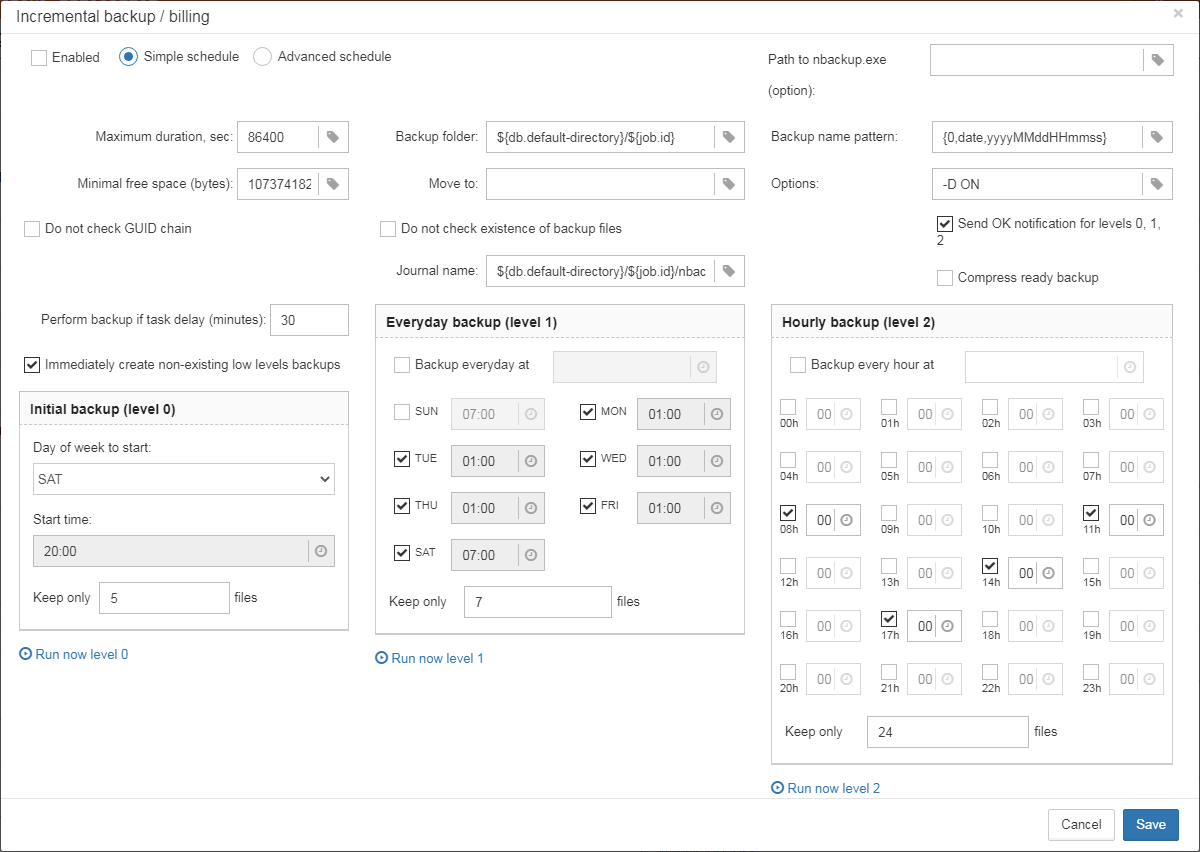
There are 4 main areas in this dialog, let’s cover them one by one.
The top area is devoted for general settings of the incremental backup – they are the same for Simple and Advanced schedules:
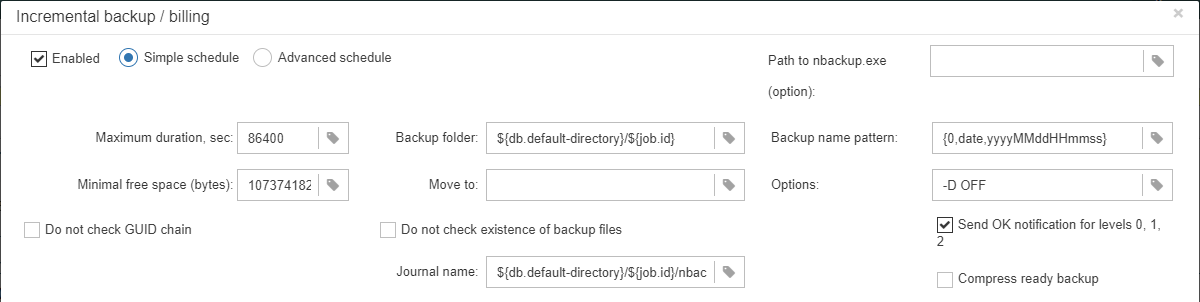
Max duration, sec — it limits the maximum duration of backup process, by default is 1 day (86400 seconds).
Minimum free disk space (bytes) — minimal size of free disk space to prevent backup to start, by default ~9Mb
Backup folder — where incremental backup for the selected database will be stored. It is necessary to store incremental backups for each database separately from backups of other databases: i.e., the separate folder for each database.
It is necessary to specify backup folder with enough free disk space to store all level of backups!
Journal name — file name details information about incremental backups files, for internal use only.
Path to nBackup — it is possible to specify other nbackup tool than standard nbackup (not recommended).
Backup name pattern — pattern for files of incremental backup (no need to change it).
Options — additional options for nbackup command line tool (no need to change it).
Do not check existence of backup files — this option should be checked if you plan to delete or more incremental backups to another location.
Do not check GUID chain — this option should be checked if you want to skip existence check of previous levels of incremental backups.
Immediately create non-existing low-level backups — by default this option is On. It means that if you have scheduled the initial start moment of level 1 backup earlier than the initial start moment of level 0 backup, DataGuard will automatically fix it and create level 0 backup right before level 1. The following backups of level 0 will be fulfilled according the regular schedule.
Send OK email for levels 0, 1, 2 — enable this option to receive notifications about incremental backups (highly recommended!)
After setting main set of parameters the schedule itself should be set. As you can see on the screenshot below, you need to specify day of the week and time to do level 0 (weekly) backup, days of week and time to start level 1 (daily) backups and hours and minutes of level 3 (hourly backups).
For each backup level you can specify how many files to keep in history.
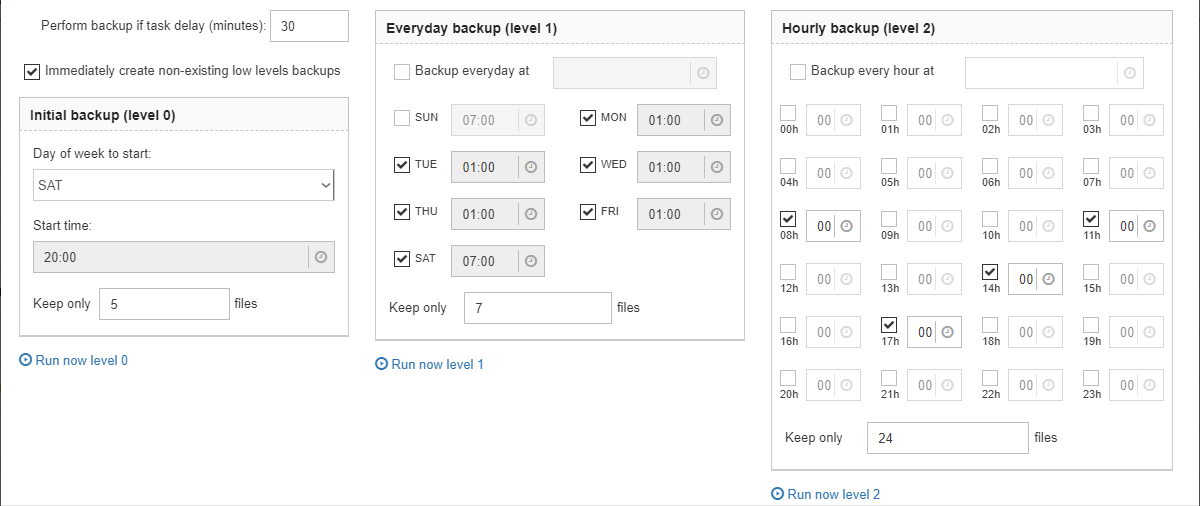
By default it is set to keep 5 weekly backups, 7 daily and 24 hourly backups.
However, sometimes more flexible schedule is required, for this purpose Incremental Backup widget has Advanced schedule:
As you can see, the upper part of the configuration screen is the same as in Simple schedule, and the difference is in the way how backup levels are scheduled.
Advanced schedule allows to setup up to 5 levels of backup, and plan them with flexible CRON expressions.
For example, you can setup it to create full copy (level 0) backup every 3 months, level 1 copy every month, level 2 — every week, level 3 every day and level 4 — every hour.
|
If you are monitoring more than one database, it is highly recommended splitting the runtime of the backups. |
3.4.8. Database: Dump Backup
This job also utilizes nbackup functionality in Firebird, but unlike multilevel backups, it always performs a full copy (level 0) of the database. Such job is useful to quickly create a copy of working database.
The configuration of “Database: Dump backup” is trivial:
You just need to setup when and where DataGuard should copy a full copy (level 0 incremental backup), and how many copies it should keep.
3.4.9. Database: RestoreDB
One of the often tasks of the database administrators is restoring database from the backup. There could be many reason to do restore, the most popular reasons are regular check of the stored backups and necessity to have fresh restored copy for quick rollback. HQbird FBDataGuard can automate restoring of backups (which were created with gbak or “Database: Verified” backup) with Database: RestoreDB job. Let’s consider the options and parameters of this job.
By default, restore is disabled — and, since restoring can be long and resource-consuming job, please plan when to restore carefully.
The database can be restored from different types of backups. To specify which types of backups are used during recovery, use the Restore Source switch.
Below you can see the configuration dialog for Database: RestoreDB in nbackup mode:

In gbak mode, the configuration dialog for Database: RestoreDB looks like this:

-
“Scheduled” field contains CRON Expressions which defines when to run restore.
-
“Get backup from folder” — specify the location of backup file(s) to be restored. If you are restoring backups at the same computer where they have been created, specify the same folder as it is in “Database: Verified backup” job. If you are restoring backups from the another computer, specify the folder where those backups are located.
-
“Take backup not older than, hours” — this parameter specifies the maximum age of backup to be restored. If the latest backup file will be older than specified number of hours, RestoreDB job will send the alert with warning that backup is too old. This is useful for automatic checking of backups created on the remote computer.
-
“Restore source” specifies what types of backups will be used to restore the database.
-
“Datatime pattern for nbackup” contains the template for backup names made with nbackup. It should be the same as Backup name pattern see Database: Incremental Backup.
-
“Template for gbak backup file name” contains the template for backup names. It should be the same as Backup name pattern see Database: Verified Backup.
-
“Backup gbak file extension” — by default it is
.fbk. -
“Use NN CPU cores to restore” — only available in gbak mode.
-
“Restore options” — only available in gbak mode.
-
“Restore to directory” — folder where FBDataGuard will restore backups.
-
“Restore with filename” — template for the restored database file. By default it contains the following parts
-
${db.id}_{0,date, yyyyMMdd_HH-mm}_testrestore.fdb -
db.id— internal identifier of the database (GUID) -
0,date, yyyyMMdd_HH-mm— timestamp -
testrestore.fdb— description (You can set there any filename you need).
-
-
“When existing database found” — if FBDataGuard will encounter a file with the same name as restored database in the destination folder, by default it will rename the existing file. If you want to replace old restored file with new one, choose “Replace existing file”.
-
“Append suffix to filename when rename” — if you have chosen “Rename existing file”, this suffix will be used to rename it.
-
“Execute command after restore” — in this field you can specify an optional path to the command file or another utility to be started after the restore. There will be 2 parameters passed: the first is the path to the backup which was just restored, and the second is the path to the restored file.
-
“Restore timeout, minutes” — here you can set the time limit for restore operation. If this limit will be exceeded, the warning will be sent, saying that restore takes too long.
-
“Check available space before restore (bytes)” — here you can set the limit for the minimal free space in the restore destination — if there is less free space than specified, restore will not start, and associated warning will be sent.
-
“Notify on successful restore” — send email about successful restore (by default it is off, only alerts about problems will be sent).
3.4.10. Database: Transfer Replication Segments
The purpose of "Transfer Replication Segments" job is to send replication segments produced by async replication from master to replica server. In the case of distributed environment of the asynchronous replication, when the network connection between master and replica server is unstable, or with high latency, or when servers are in the different geographical regions, the best way to transfer replication segments will be through FTP or FTP over SSH.
Below we will consider how to setup Cloud Backup for this task.
First, the asynchronous replication master should be configured to save replication segments into the some local folder — by default, it will be ${db.path}.LogArch — as it is shown in the example below:
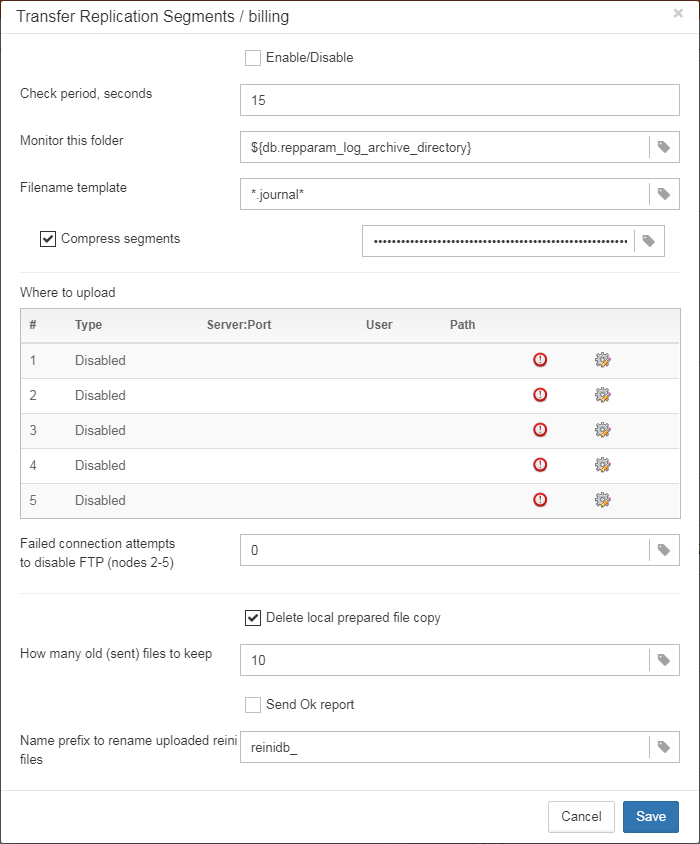
Then we can setup Transfer Replication Segments job to monitor this folder for the new replication segments and upload them to the remote FTP server.
As you can see at the screenshot above, Transfer Replication Segments job checks folder, specified in “Monitor this folder” with an interval, specified in “Check period, seconds”.
Please note — Transfer Replication Segments sends files in the order of their names, not dates.
To check that transferred files are valid replication segments, and to support automatic re-initialization of the replica databases, the checkmark “Enable/disable” must be enabled.
By default, Cloud Backup compresses and encrypts replication segments before send them. The default password is “zipmasterkey” (without quotes), which can be specified in the field next to the “Compress segments” checkbox. FBDataGuard creates the compressed and encrypted copy of the replication segment and upload it to the specified target server.
To disable packing and encryption, uncheck the “Compress segments” checkmark.
Checkbox “Send Ok report” — send email to the specified in Alerts address every time when replication segment is uploaded. By default it is off.
As a result, FBDataGuard will upload encrypted and compressed replication segments to the remote server. To decompress and decrypt them into the regular replication segments, another instance of HQbird FBDataGuard should be installed on the replica server, and Cloud Backup Receiver job should be configured — see more details in the section Database: File Receiver.
Next, let’s look at the settings for each file transfer protocol.
FTP/FTPS/FTPS over SSH
There are several types of target servers: FTP, FTP over SSL/TLS, FTP over SSH. When you select the necessary type, dialog shows mandatory fields to be completed.
You can select up to 5 simultaneous remote servers to upload backups. Below you can see the configuration dialog for FTP.
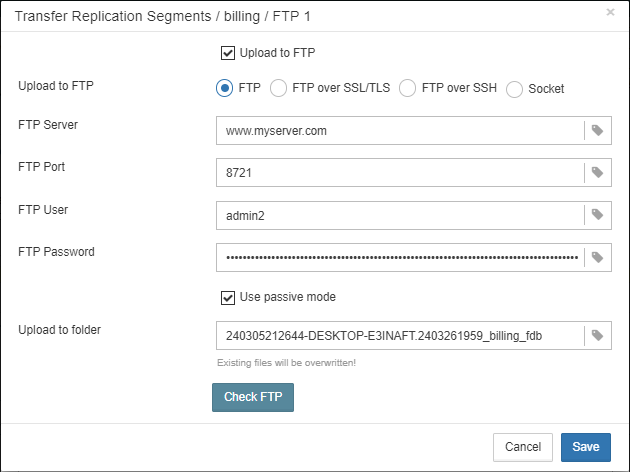
|
If you don’t have FTP installed on the target server with Windows, install Filezilla — it is very popular fast and lightweight FTP-server for Windows. |
|
Replication segments will be uploaded to the subdirectory specified in the “Upload to folder”. By default, this is |
FTP over SSL/TLS
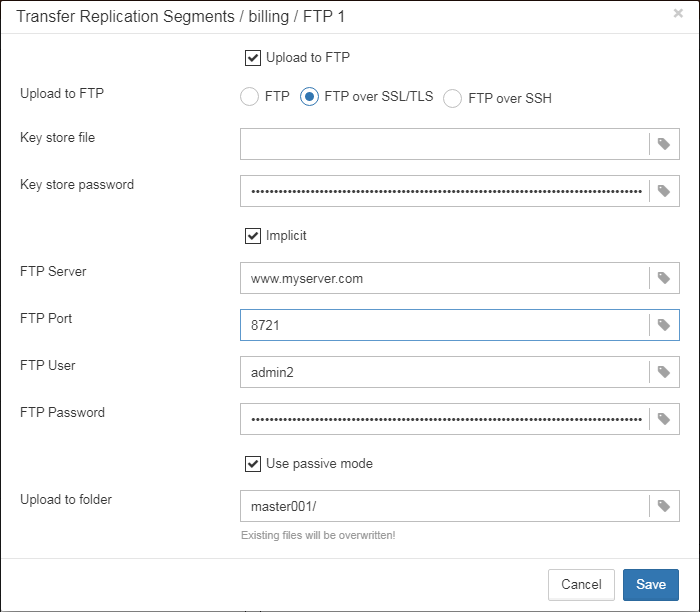
In order to send files to FTPS, it is necessary to create jks storage with private key file, and specify path to it in the field “Key store file” and password for it in “Key store password”.
See details and example how to create jks file and password here: http://xacmlinfo.org/2014/06/13/how-to-keystore-creating-jks-file-from-existing-private-key-and-certificate/
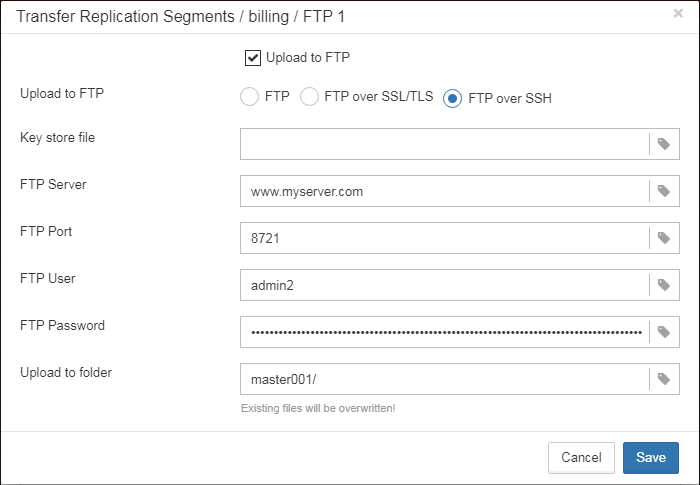
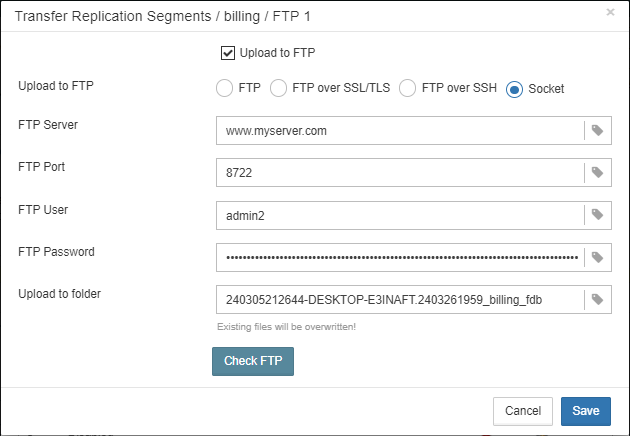
3.4.11. Database: Transfer Files
The purpose of "Transfer Files" job is to send backup files from master to replica server. In the case of distributed environment, when the network connection between master and replica server is unstable, or with high latency, or when servers are in the different geographical regions, the best way to transfer files will be through FTP or FTP over SSH.
Below we will consider how to setup "Transfer Files" for this task.
First, the database server should be configured to save backup files into the some local folder — by default, it will be ${db.default-directory}/backup — as it is shown in the example below:
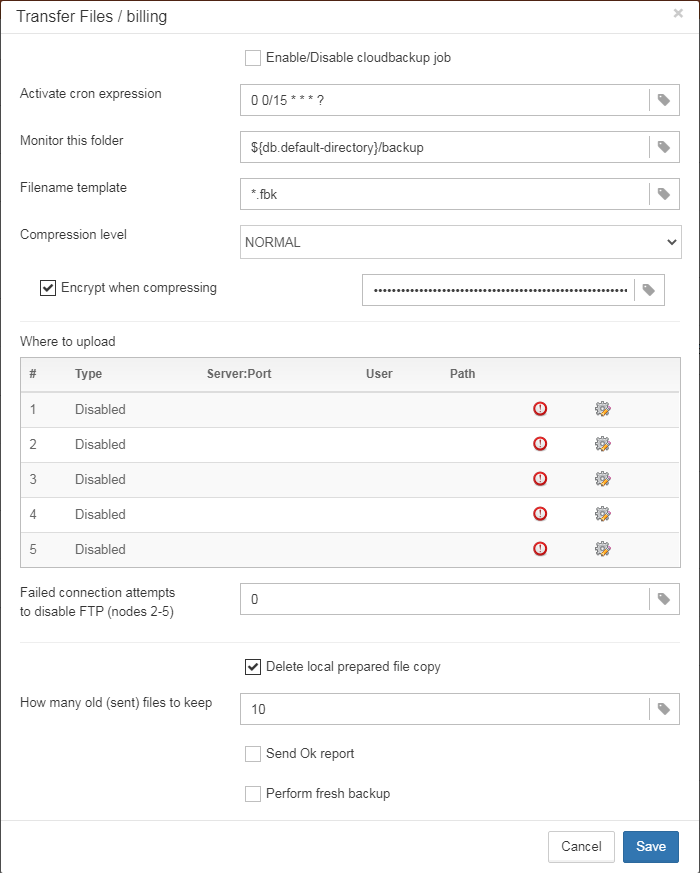
Then we can setup Transfer Files job to monitor this folder for the new backup files and upload them to the remote FTP server.
As you can see at the screenshot above, Transfer Files job checks folder, specified in “Monitor this folder” according to the schedule specified in “Activate cron expression”. Please note — Transfer Files sends files in the order of their names, not dates.
By default, “Transfer Files” compresses and encrypts backup files before send them. The default password is “zipmasterkey” (without quotes), which can be specified in the field “Encrypt when compressing”. FBDataGuard creates the compressed and encrypted copy of the backup and upload it to the specified target server.
To disable encryption, uncheck the “Encrypt when compressing” checkmark.
As a result, FBDataGuard will upload encrypted and compressed files to the remote server. To decompress and decrypt them into the regular files, another instance of HQbird FBDataGuard should be installed on the replica server, and File Receiver job should be configured — see more details in the section Database: File Receiver.
Next, let’s look at the settings for each file transfer protocol.
FTP/FTPS/FTPS over SSH
There are several types of target servers: FTP, FTP over SSL/TLS, FTP over SSH. When you select the necessary type, dialog shows mandatory fields to be completed.
You can select up to 5 simultaneous remote servers to upload backups. Below you can see the configuration dialog for FTP.
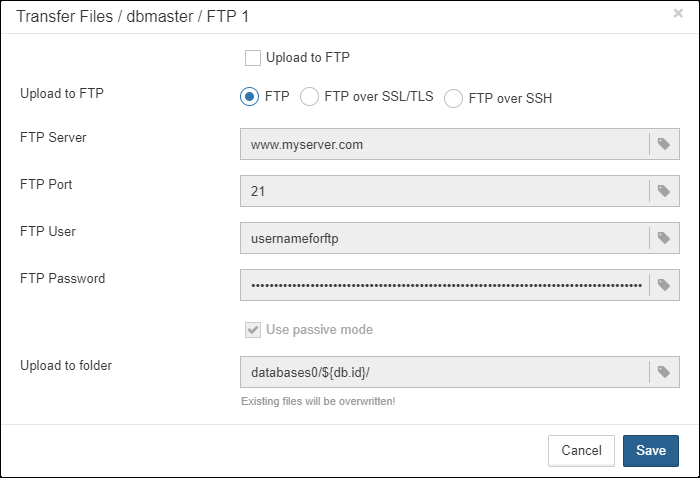
|
If you don’t have FTP installed on the target server with Windows, install Filezilla – it is very popular fast and lightweight FTP-server for Windows. |
|
Replication segments will be uploaded to the subdirectory specified in the “Upload to folder”. By default, this is |
FTP over SSL/TLS
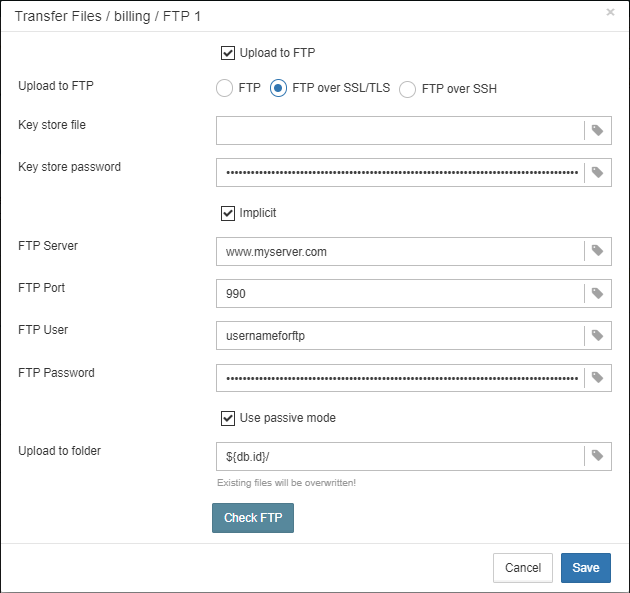
In order to send files to FTPS, it is necessary to create jks storage with private key file, and specify path to it in the field “Key store file” and password for it in “Key store password”.
See details and example how to create jks file and password here: http://xacmlinfo.org/2014/06/13/how-to-keystore-creating-jks-file-from-existing-private-key-and-certificate/
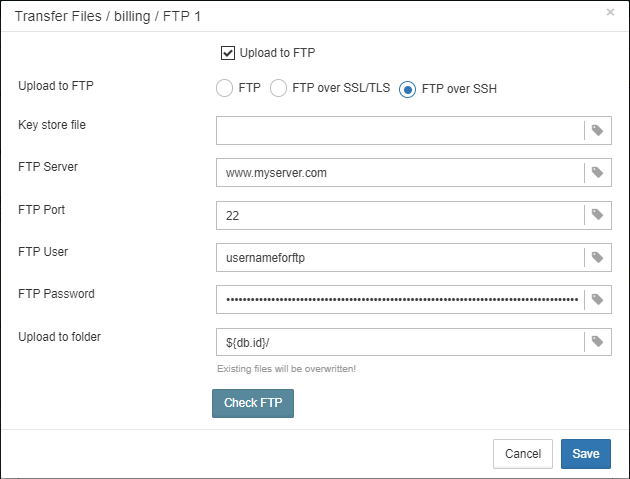
Sending verified and incremental backups through Cloud Backups
Cloud Backup also can be used to send any files to FTP/FTPS/etc. For example, you can setup Cloud Backup to look for FBK files, produces by Verified Backup Job, and schedule to upload to the remote FTP server.
It is necessary to remember that number of stored backups should be less than the number of files to be preserved by Cloud Backup (specified in the parameter “How many files to keep”. By default, Cloud Backup keeps 10 last sent files, and Verified backup has 5 most recent backup files, so it work Ok, but if you will reduce the number of kept files in Cloud Backup, it will delete extra files according “Filename template”.
The same can be done for incremental backups.
3.4.12. Database: Pump Files
The purpose of the “Pump Files” task is to transfer files from one directory accessible to the DataGuard to some other location, usually remote, with the possibility of using various methods that can be connected to the DataGuard in the form of plugins and selectable in the task configuration with the ability to set unique for each plugin parameters. HQbird includes two file transfer plugins: fpt and sftp. There are other file transfer plugins. Transfer plugins are jar files and are located in the Firebird DataGuard/plugins folder.
Let’s consider the options and parameters of this job.

-
Filemask to pump — whitelist, according to which files are selected for copying. Represent masks of file names. Must be separated by comma.
-
Exclude file-mask — blacklist is a mask of file names that should be excluded from the transfer. The blacklist takes precedence over the whitelist.
-
Pump method — file transfer method (plugin).
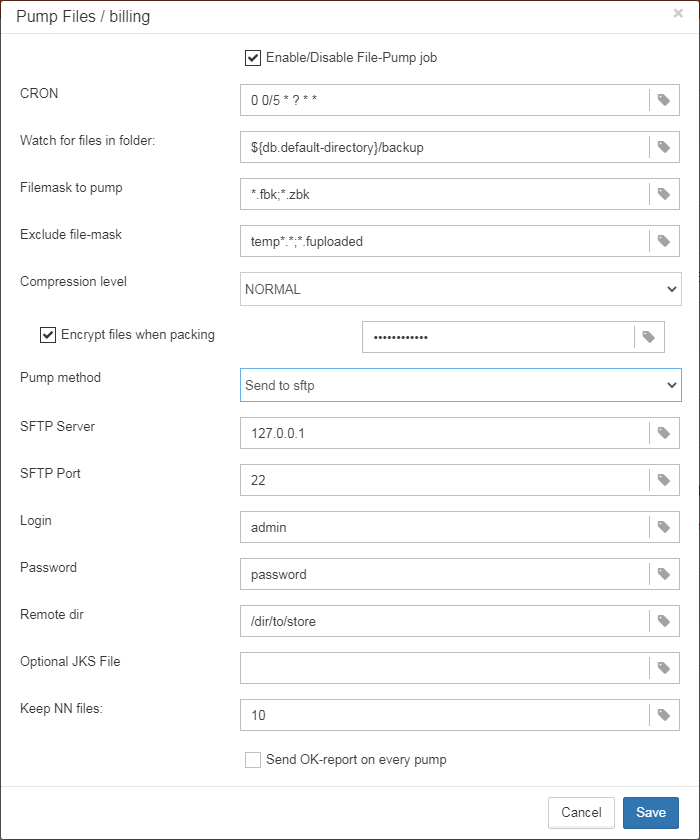
The algorithm of this task is as follows:
-
At each iteration of the task, a list of files is generated for the directory for monitoring files to be sent. Masks are used to select the list of files: "Filemask to pump" and "Exclude file-mask".
-
For each selected file (from the list from step 1, in ascending date order from the lastModified file), the following is performed:
-
If the packing option is set, the file is packed (if the file is not of zero size). The name of the packed file is formed by adding a hardcoded extension:
.zipfilepump. The file is packed in the same directory. If the file turns out to be of zero size, the algorithm will consider that the file has not been completed yet and will interrupt sending the rest of the files with a corresponding message. -
The file sending task is configured for one of several possible sending options using optional plugins (see below). Depending on whether the packing option was enabled or not, the original or packed file is sent using the specified algorithm (in the current version it is ftp or sftp).
-
After sending, if the packing option was selected, the packed file is deleted.
-
The original file is renamed by adding the extension
.fuploaded.
-
-
The algorithm proceeds to send the next file from the list. The total number of files sent during the iteration and their original (unpacked) size are summed up for display in the widget
-
Upon completion of sending all files from the generated list, the directory is revolving cleaned, from which files are deleted by mask
*.fuploaded. That is, a list of all such files is created, it is sorted by the time of the last modification, and all old ones are deleted, except for the last “Keep NN files”.Upon completion of sending, if the "Send OK-report on every pump" checkbox is checked, then the user will be sent a report on the number and size of files sent at the current iteration.
3.4.13. Database: File Receiver
In general, “File Receiver” is designed to decompress files from zip archives, and the most often it is used in the pair with “Transfer Replication Segments” to transfer archived replication segments.
“File Receiver” checks files in the folder specified in “Watch for incoming files in”, with interval equal to “Check periods, seconds”. Its checks only files with specified mask according “Filename template” (.journal* by default) and specified extension (.replpacked by default). If it encounters such files, it decompresses and decrypts them with the password, specified in “Decrypt password”, and copies to the folder, specified in “Unpack to directory”.
If the Monitor for reinitialization parameter is enabled, then the File Listener will also monitor files intended for replica reinitialization, such files have the prefix specified in “Prefix for incoming reini- files”.
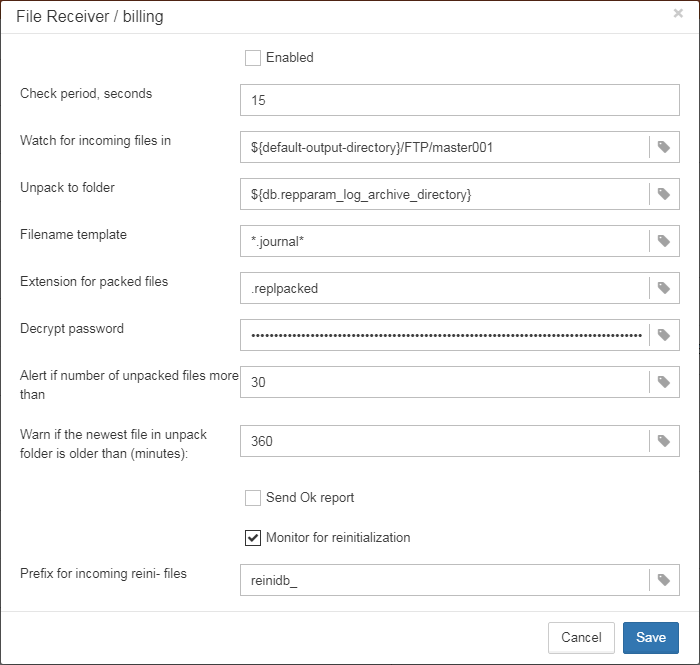
There are the following additional parameters:
-
Alert if number of unpacked files more than — by default is 30. If there is a long queue of replication segments to be unpacked, it can be a problem with a replica database, so HQbird sends alert to attract administrator’s attention.
-
Warn if the newest file in unpack folder is older than (minutes) — if the most recent file (usually, replication segment) is too old (more than 360 minutes), the replication process can be broken, and HQbird sends an appropriate alert.
-
Send Ok report — by default it is Off. If it is On, HQbird sends an email about each successful unpacking of the segment. It can be too often for replication segments, because they are arriving every 30-180 seconds, and Ok for normal files like verified or incremental backups.
After setup of Cloud Backup Receiver, configure the replica to look for replication segments: set in the “Log archive directory” the same path as in “Cloud Backup Receiver” → “Unpack to directory”.
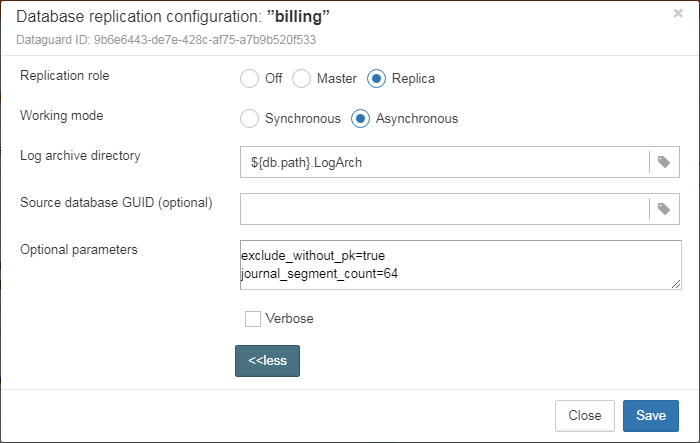
Embedded FTP server
HQbird has embedded FTP server, which is off by default. It is suitable to use embedded FTP server to receive replication segments.
In order to enable embedded FTP server, it is necessary to edit the ftpsrv.properties configuration file, which is located in C:\HQbirdData\config or /opt/hqbird/ftpsrv.properties
By default, it contains the following:
#path in ftpsrv.homedir must be escaped "ftpsrv.homedir=c:\\ftp\\pub"

# or backslashed for ex: "ftpsrv.homedir=c:/ftp/pub"

ftpsrv.enable = false

ftpsrv.port = 8721

ftpsrv.defuser=admin2

ftpsrv.defpsw=strong password2

ftpsrv.homedir=
It is necessary to change ftpsrv.enabled to true and specify the home directory for FTP in ftpsrv.homedir parameter. Also, it is recommended to use non-default username and password.
After that, restart FBDataGuard service, and check availability of the FTP.
|
Attention — Linux users!
On the Linux, FBDataGuard service runs under firebird user, so FTP home directory also should have permission for user firebird. |
3.4.14. Database: Low-level metadata backup
“Database: Low level metadata backup” is one of the key jobs of DataGuard, it ensures database protection at low level.
First of all, this job stores raw metadata in special repository, so in case of heavy corruption (due to hardware failure, for example) of database it is possible to use this repository to recover database.
The second purpose of this job is to constantly check all important system tables for consistency. Every 20 minutes it walks through all important system tables in the database and ensures that there are no errors at metadata level.
The third purpose is to warn administrator about too many formats for each tables.
There is an implementation limit in Firebird to have 256 formats per table, however even several formats can greatly increase a chance of hard corruption and can slow down the performance. It is recommended do not change tables structure at production database and keep only one format per each table. If it’s not possible, administrator should try to perform backup/restore more often to transform all formats into the single one.
3.4.15. Database: Validate DB
Validation of Firebird database requires exclusive access: i.e., no users should be connected during validation. “Database: Validate DB” job shuts down the database and performs validation of database, and then turns it on.
By default, this job is OFF.
Please consider carefully, is it possible to provide exclusive access for database. Validation can also take significant time.
Using configuration dialog, you can enable/disable this job, set time to run, set the shutdown timeout (time to wait before launch validation), and also shutdown mode (FORCE, ATTACH, TRANSNATIONAL). If you have no deep knowledge n what you are doing, it’s better to keep default parameters.
“Database: Validate DB” will send alert with critical status if there will be any errors.
Also, Firebird will write errors into firebird.log, and they will appear in the alerts generated by <<>> job.
3.4.16. Database: Sweep Schedule
FBDataGuard includes special job to run an explicit sweep, in case if automatic sweep was disabled. By default, job is disabled.

The recommendation is to schedule explicit sweep with disconnection of long-running transactions for all databases where such transactions are detected. The recommended period is once per day (usually during the night, after backup’s completing).
By default, sweep is set to 00-15, which can be not a good time, because default verified backup starts at the same time, so better change it.
Please note: by default, check mark “Disconnect connections with long-running active transactions before sweep” is enabled. It means that HQbird will find and disconnect long-running transactions (more than 300 minutes) before sweep — in order to make sweep efficient. If long-running active transactions will be not disconnected, sweep cannot clean old records versions.
“Do not disconnect processes with name pattern” — in this parameter specify SIMILAR TO expression for processes names which will be not disconnected.
By default, we exclude gfix, gbak, gstat and fbsvcmgr processes.
“Disconnect processes older than (min)” — HQbird will disconnect processes which have long-running active writeable transactions, by default threshold is 300 minutes. The practical upper limit for this parameter is 1440 minutes (it is highly unlikely that transaction does something useful more than 1 day).
“Use NN CPU cores to sweep” — HQbird Enterprise can use multiple cores to perform sweep operation, in order to make sweep 4-6 times faster. We recommend to specify no more than 1/2 CPU cores in case of the single database on the server, or 1/4 of CPU cores if there are several databases. For example, if you have 16 cores and 1 big database, set this parameter to 8, if there are several big databases, set 4.
3.4.17. Database: Disk space
This job watches for all objects related with database: database files (including volumes of multi-volume database), delta-files, backup files and so on.
“Database: Disk space” job analyzes the growth of database and estimate will there be enough free space for the next operation like backup (including test restore) on the specific hard drive.
It generates several types of alerts. Problems with disk space are in the top list of corruption reasons, so please pay attention to the alerts from this job.
This job also contributes data to the server space analysis graph.
By default, this job is enabled.
Using configuration dialog, you can specify check period and thresholds for free space. The first reached threshold will be alerted. To set threshold only in % of disk space, you need to set explicit space in bytes to 0.
If you are using incremental backups (or Dump backup), this job is critically important. It watches for delta-files lifetime and size, and warns if something goes wrong. Forgotten delta-files are the often reason of corruptions and significant losses of data.
This jobs finds all delta files associated with database and check their age and size. If one of these parameters exceeds thresholds “Maximum delta size” or “Maximum delta age”, administrator will receive the alert and database status will be set to CRITICAL.
|
If delta file of the protected database was corrupted, it is possible to extract data from it using metadata from the original database file or repository from Database: Low-level metadata backup job. |
3.4.18. Database: Database statistics
This job is very useful to capture performance problems and perform overall check of database at low-level without making backup.
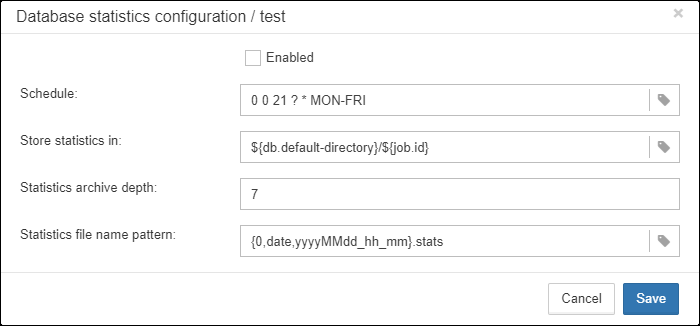
We recommend running this job every day and storing a history of statistics report.
Then, with HQbird Database IBAnalyst it is possible to find problems with database performance and get useful recommendations how to fix them.
|
As a useful side effect, |
3.4.19. Database: Replica Check
This task allows you to check the availability of the replica database. After a specified period, it changes the value of the specified generator and compares the value of the generator on the replica side and the master database.
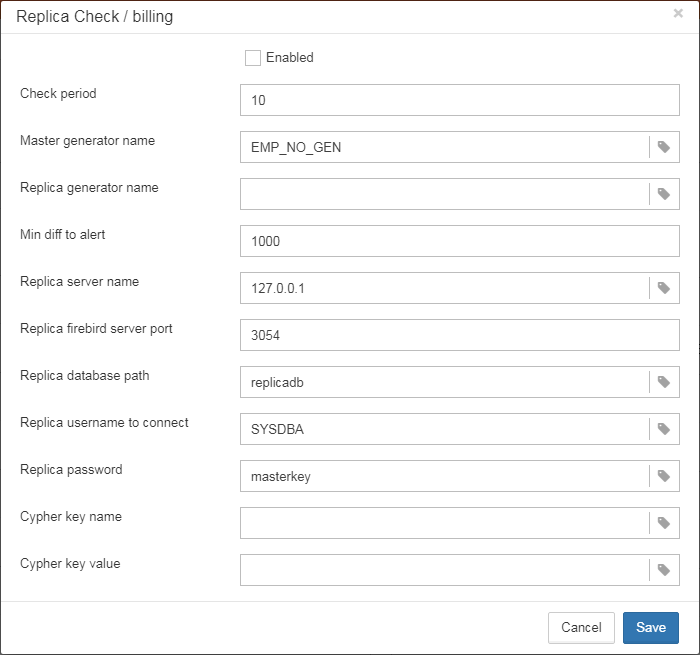
Min diff to alert — the difference between the values of the generator on the master and replica side, after which alter are sent.
3.4.20. Database: Backup,Restore,Replace
Many administrators use the following pattern to solve performance problems — backup-restore-replace. This is usually necessary if the application does not manage transactions well, which leads to garbage accumulation. With proper application design, there is no need to constantly perform backup and restore with replacement. Nevertheless, HQbird provides the ability to automate this process and run it both manually (via the Web console) and automatically (according to a schedule).
The backup-restore-replace pattern consists of the following steps:
-
executing the copy command
gbak -b -g … database.fdb backup.fbk -
executing the restore command to a new DB file
gbak.exe -c … backup.fbk database_new.fdb -
renaming
database_new.fdbto the original database name
However, there are many pitfalls in this seemingly simple process:
-
Insufficient Disk Space: There’s a risk of depleting disk space during backup or restore operations.
-
Unexpected Interruptions: Server reboots, often triggered by Windows updates, can disrupt backup or restore tasks at any time.
-
Corruption of Original Database: If the original database is damaged, it may render the backup incomplete.
-
Corruption Post-Restoration: Various issues, such as inadequate space for sorting large indexes, can lead to corruption of the restored database.
-
Performance Issues: Backup and restore procedures may suffer from severe slowdowns due to neglected maintenance, hardware malfunctions, or concurrent tasks like full VM backups.
-
Access Control: It’s crucial to block user write operations to the original database once the backup-restore process begins to ensure changes post-backup are not omitted in the restoration.
In case of any of the above problems, it is necessary to cancel the backup-restore process, that is, a rollback to the original state of the database is required.
HQbird fully automates the process and avoids most problems. It monitors disk space, disconnects active users before starting backup, and monitors the performance and integrity of the backup and restored database.
Running Backup/Restore in one click
To start backup-restore immediately, open dialog Properties for database – click on the appropriate icon:
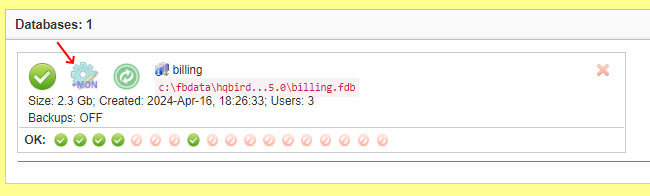
After that, the “Database properties” dialog will appear:
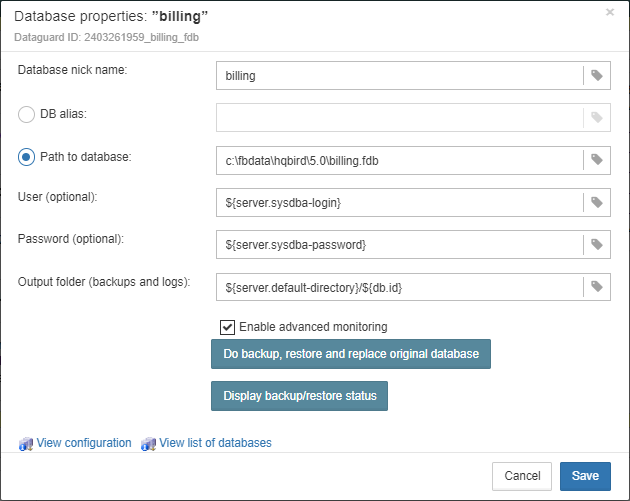
Click button “Do backup, restore and replace original database”, it will open the following dialog.
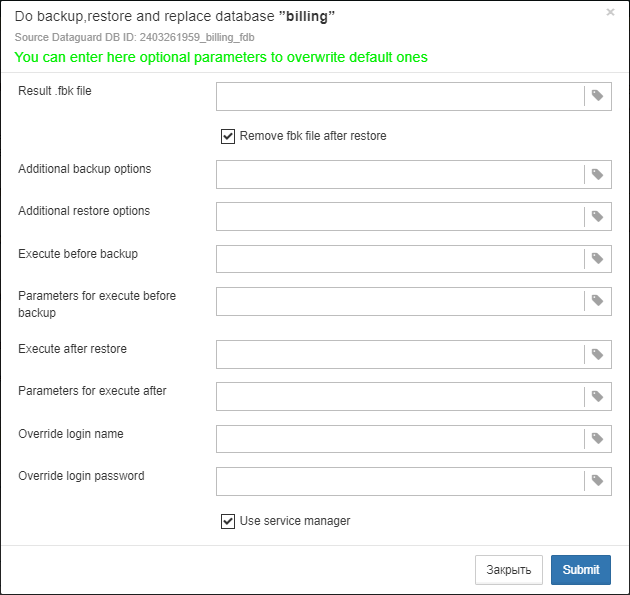
All parameters are optional:
-
Remove fbk file after restore — by default it is enabled, keep it, unless you want to keep intermediate
fbkfile. -
Additional backup options — add some standard backup option, for example, to exclude some tables from backup.
-
Additional restore options — standard restore options, for example, to set new page size.
-
Execute before backup — specify an executable (
cmdfile,shfile,exe), to be executed right before the backup process. -
Parameters for execute before backup — specify parameters for executable above.
-
Execute after restore — specify an executable (
cmdfile,shfile,exe), to be executed right after the restore process. The path to restore database is set as first parameter. -
Parameters for execute after — These are the arguments or settings that will be passed to the executable file or script that is scheduled to run after the restoration process is complete. They help in customizing the behavior of the post-restore actions according to the specific needs of the environment or the database. For example, you might have a script that needs to know the path of the restored database or requires certain flags to be set for its operation. These details would be provided through these parameters.
-
Override login name — use another Firebird user instead of user name specified in HQbird.
-
Override login password – use another Firebird password instead of password specified in HQbird.
You can skip all these parameters and just click Submit to proceed. The process will start immediately. HQbird will do all necessary checks, and start process. In case of any error, the process will be stopped, and original database will be put back.
As a result, HQbird generate the following report:
gbakreplace: backup, restore and replace database is complete
task files are:
Original database file: "C:\HQbird\Firebird40\examples\empbuild\EMPLOYEE.FDB" (2834432)
Replication operational log directory: ""
Replication archive log directory: ""
Temporary renamed original database file: "C:\HQbird\Firebird40\examples\empbuild\EMPLOYEE.FDB.Apr-08--14-32-06.ORIGINAL.FOR_MAINTAIN"
Resulted fbk file: "C:\HQbird\Firebird40\examples\empbuild\EMPLOYEE.FDB.Apr-08--14-32-06.FBK" (80896)
Temporary restored database file: "C:\HQbird\Firebird40\examples\empbuild\EMPLOYEE.FDB.Apr-08--14-32-06.restored" (2834432)
backup log: "C:\HQbird\Firebird40\examples\empbuild\EMPLOYEE.FDB.Apr-08--14-32-06.bkp.log"
restore log: "C:\HQbird\Firebird40\examples\empbuild\EMPLOYEE.FDB.Apr-08--14-32-06.rst.log"
Stage report file: "C:\HQbird\Firebird40\examples\empbuild\EMPLOYEE.FDB.Apr-08--14-32-06.hqbirdgbakreplace.report"
Scheduled Backup,Restore,Replace
Also, it is possible to schedule backup-restore as any desired time, and optionally perform the replication initialization immediately after that. In order to schedule it, click on setting for widget Backup, Restore, Replace.

The following dialog will appear:
As you can see, the dialog closely mirrors that of an immediate backup-restore. However, it additionally incorporates steps for the automatic reinitialization of replicas post-restore. This is essential due to the change in database GUID upon restoration. With active replication in place, HQbird will seamlessly reinitialize replicas following a successful restore.
3.5. Group jobs
Group jobs are useful when a single server handles multiple databases. In this case, instead of setting up individual jobs for each database, you can set up common jobs for all databases located in a specific directory and its subdirectories.
3.5.1. Server: Group sweep
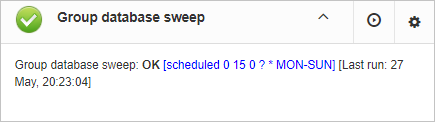
The “Group sweep” task allows you to perform an intelligent sweep for all databases located along the specified path, including subfolders.
In the dialog “Group sweep” it is possible to specify where databases are situated, configure include and/or exclude mask to perform sweep only for intended databases, and configure time when the process should start.
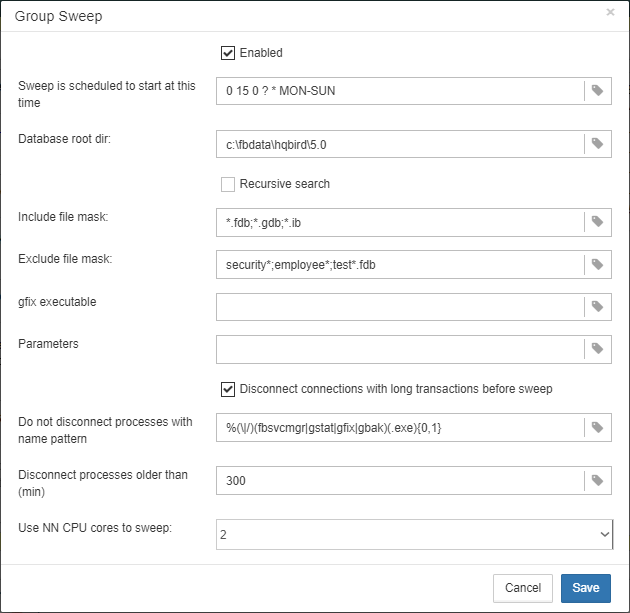
The “Group sweep” job has the same parameters as [hqbird-config-sweep], plus the following additional parameters:
-
“Database root dir” — specifies the root directory in which to search for databases to perform sweep.
-
“Recursive search” — if this checkbox is checked, then the database search occurs recursively in all subfolders of the root folder.
-
“Include file mask” — regular expression for including a database file in the group sweep list.
-
“Exclude file mask” is a regular expression for excluding a database file from the group sweep list.
3.5.2. Server: Group master replication
The “Group master replication” task is intended to simplify the setup of replication of many databases (can reach several hundred). This set of databases (as a group) is integrated into DataGuard, preserving the current functionality of DataGuard and its individual database settings (their individual replication settings and maintenance tasks). “Individual” databases registered with DataGuard are considered to be “very important databases” (VID), and for databases registered with "Group master replication" only the tasks of transferring replication segments to other servers are performed.
One of the reasons for creating a separate “Group master replication” task is that the current implementation of DataGuard has limitations on the number of databases it can process. This limitation is mainly due to limitations in the browser handling web console logic. No such restriction was found for “Group master replication”. Another reason is the complexity of setting up multiple databases when registering them individually.
Setting up the “Group master replication” task consists of several parts.
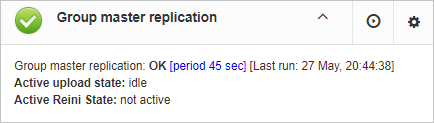
First of all, you need to set general parameters for all tasks: where the databases are located, what template to use to search for suitable databases, where and how to send their segments (sending protocol, addresses, encryption) and how often to scan directories with segments.
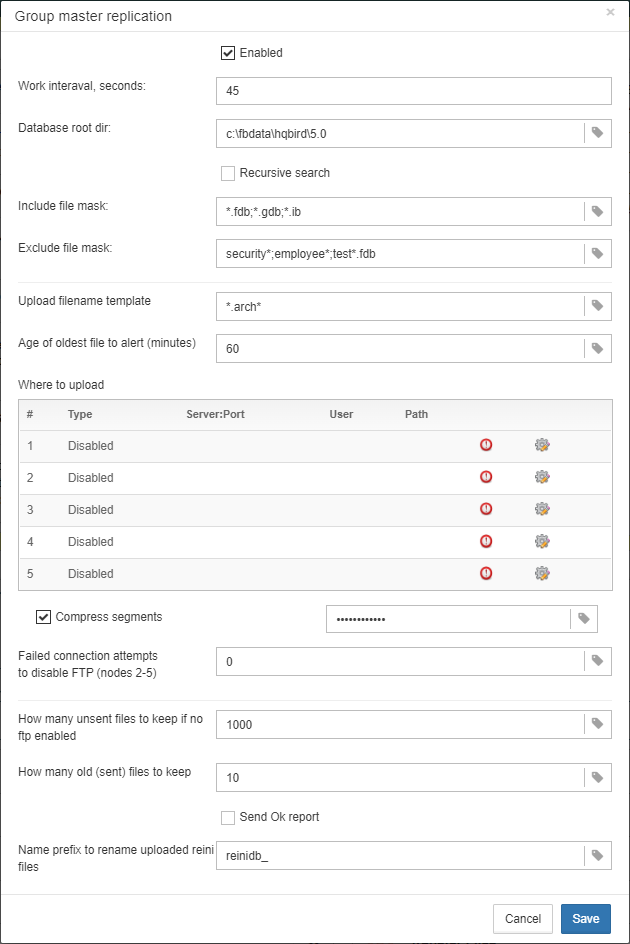
You can specify up to five different nodes — for each node, typical parameters (as in the task of sending segments) are specified:

Notes:
-
There can be one replica node, and several master servers. Therefore, in order to avoid overwriting segments with absolutely identical paths and database names, but coming from different master nodes on the replica, the root download folder for the master node is selected and created (by default) as the agent name (macro substitution). The administrator is free to change it, but must take into account the need to preserve uniqueness if there are several master nodes.
-
DataGuard multi-replica can itself “resolve” multiple sources in its FTP/Socket directory and can pull in and automatically register newly appeared databases (to facilitate subsequent maintenance, also using the sending node name identifier).
-
DataGuard multi-master for each database sent will create files on the replica nodes in accordance with the location of the source databases, and if the database file on the master has the same name, but is located in different directories, this will not create a problem.
As with a regular database, if FTP upload is not configured (but the database is already in the wizard, which means it generates segments), then the restriction filter comes into effect — how many “unsent” segments are allowed to be stored on disk. Segments over the limit will be deleted at each iteration of the task. This is done so that you can turn on the database as a master without fear of the disk being full, and then configure unloading (and finally re-initialize it to send it to a replica).
To obtain the initial list of databases for batch processing, click the button “Rescan folders and recreate databases list and replication config”.
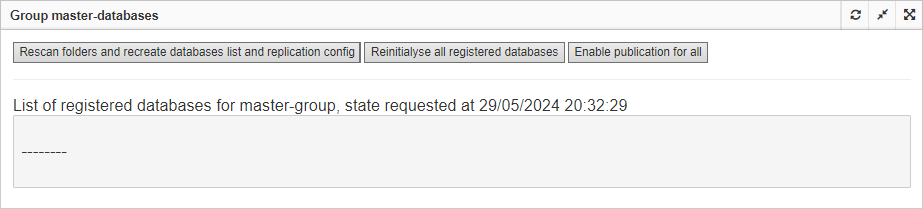
DataGuard traverses the directory and reconstructs the list of databases (in accordance with the task settings — patterns, excludes, recursion). The list includes only those databases that are not registered in DataGuard as “individual” (VID). If the user has registered a database in DataGuard, then it does not need to be included in the task exclusion template; it will be excluded automatically.

In the same section there are additional buttons for group reinitialization of all registered databases and for setting publishing flags for all databases (relevant for Firebird versions 4.0 and higher).
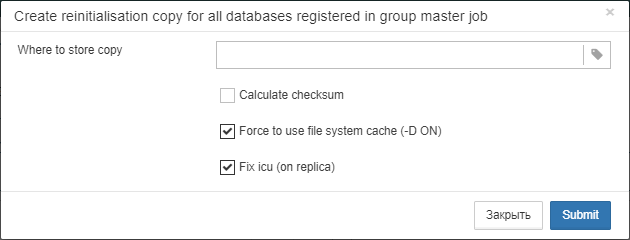
3.5.3. Server: Group database backup
The “Group verified backup” task allows you to perform backup and test recovery for all databases located at the specified path, including subfolders.
In the dialog “Group verified backup” it is possible to specify where databases are situated, configure include and/or exclude mask to perform backup only for intended databases, and configure time when the process should start.
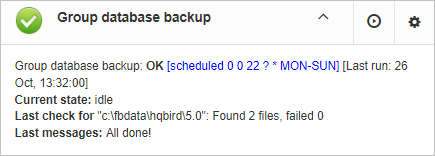
The “Group verified backup” job has the same parameters as Database: Verified Backup, plus the following additional parameters:
-
“Database root dir” — specifies the root directory in which to search for databases to perform backup.
-
“Recursive search” — if this checkbox is checked, then the database search occurs recursively in all subfolders of the root folder.
-
“Include file mask” — regular expression for including a database file in the group backup list.
-
“Exclude file mask” is a regular expression for excluding a database file from the group backup list.
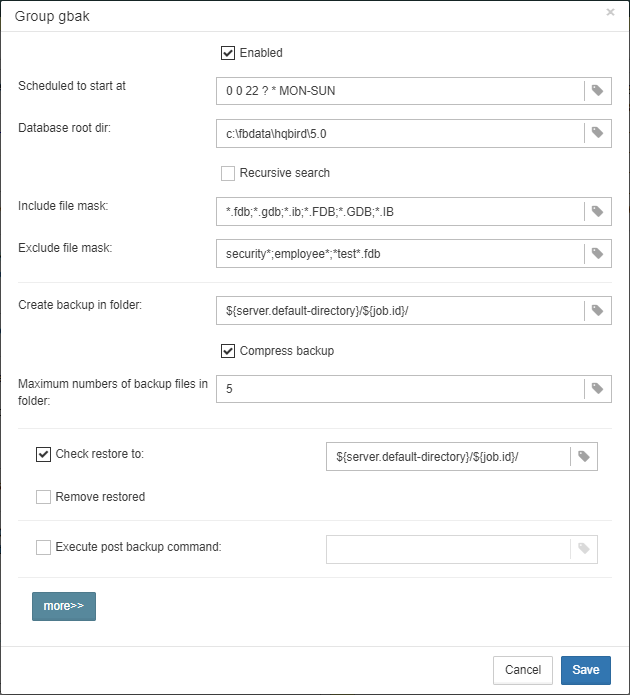
If you click the More>> button, advanced backup options will appear:
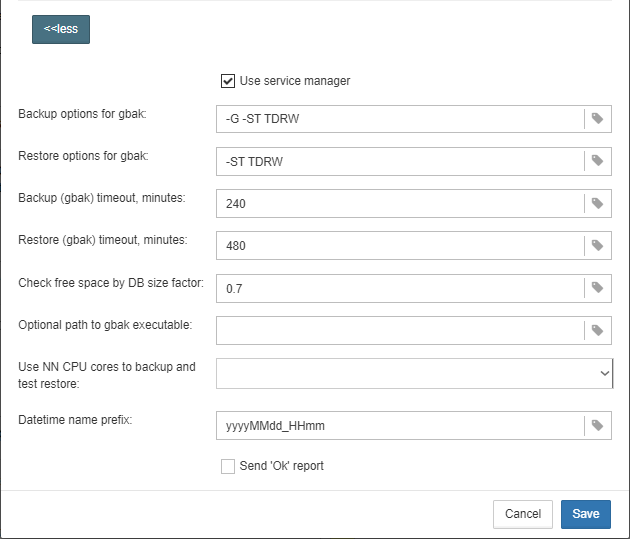
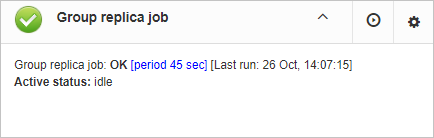

3.5.5. Server: Group dump backup
The “Group dump backup” task allows you to perform backup for all databases located at the specified path, including subfolders.
In the dialog “Group dump backup” it is possible to specify where databases are situated, configure include and/or exclude mask to perform backup only for intended databases, and configure time when the process should start.
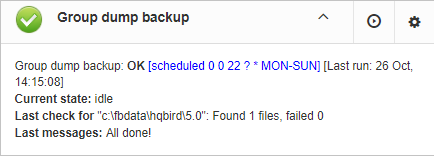
The “Group dump backup” job has the same parameters as Database: Dump Backup, plus the following additional parameters:
-
“Database root dir” — specifies the root directory in which to search for databases to perform backup.
-
“Recursive search” — if this checkbox is checked, then the database search occurs recursively in all subfolders of the root folder.
-
“Include file mask” — regular expression for including a database file in the group backup list.
-
“Exclude file mask” is a regular expression for excluding a database file from the group backup list.
3.5.6. Server: Group Update Indexes Statistics
The “Group Update Indexes Statistics” task allows you to update index statistics for all databases located at the specified path, including subfolders.
In the dialog “Group Update Indexes Statistics” it is possible to specify where databases are situated, configure include and/or exclude mask to perform backup only for intended databases, and configure time when the process should start.
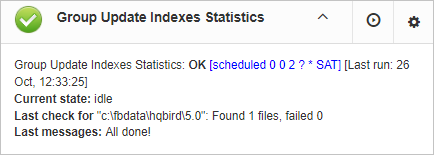
The “Group Update Indexes Statistics” job has the same parameters as [hqbird-config-db-update-stat], plus the following additional parameters:
-
“Database root dir” — specifies the root directory in which to search for databases to perform update index statistics.
-
“Recursive search” — if this checkbox is checked, then the database search occurs recursively in all subfolders of the root folder.
-
“Include file mask” — regular expression for including a database file in the group update index statistics list.
-
“Exclude file mask” is a regular expression for excluding a database file from the group update index statistics list.
3.6. Email alerts in HQbird FBDataGuard
FBDataGuard can send alerts by email to administrator(s): such alerts contain information about successful backups and potential and real problems with databases.
General properties for notifications can be set by clicking on the server name (or computer name) at the top of the web-console:

After that you will see the configuration dialog for common alerts settings:
Descriptions of some of the properties you can set here:
-
“Installation name” is some readable name for your convenience; it will be referred in emails and alerts.
-
“Installation GUID” is a service field; there is no need to change it.
-
“Web console background color” — often it is useful to adjust the color of HQbird web interface to distinguish them easily.
It’s a good idea to enable setup email alerts. To do this you need to click on the envelope button in the top of the web-console:

After that you will see the configuration dialog for alerts:
First of all, you need to enable alerts sending by enabling checkbox “Send alerts by e-mail”.
-
“Send alerts by email” — enable email alerts and configure email settings below.
-
“Send alerts to” specify where to send emails.
-
“From field” is what will be set as sender in the email.
-
“SMTP server address”, “SMTP server port”, “SMTP server login” and “SMTP server password” are data which will be used to send emails.
Before saving the settings, you can click the "Send Test Message" button, if the settings are correct, you should receive a letter to the specified address.
In order to limit the number of letters, you can collect messages into groups and send them in batches. To do this, set "Group notifications in emails" checkbox. It will also help bypass some of the atni-spam systems that can blacklist you due to too frequent send emails.
Click “Save” to save email alerts settings.
3.7. FBDataGuard tips&tricks
FBDataGuard allows changing its setting not only through web-console, but also using direct modification of configuration files. This can be useful when you need to install FBDataGuard in silent mode (no interaction with user), to bundle it with third-party software, or to perform some fine configuration adjustments.
3.7.1. Path to FBDataGuard configuration
During the start FBDataGuard looks for in registry for configuration and output paths:
These values specify the paths to FBDataGuard configuration and output folder — these values are chosen during installation.
3.7.2. Adjusting web-console port
One of the most frequently asked questions is how to adjust port for web-console application (by default it is 8082). It can be done by changing port setting in file %config%\agent\agent.properties (%config% is C:\HQbirdData\config or /opt/hqbird/conf).
server.port = 8082 #change it
%config% — folder to store configuration information, it is specified in .
3.7.3. How to change password for Admin user
You can specify its password in the file access.properties (in C:\HQbirdData\config or /opt/hqbird/conf)
access.login=admin

access.password=youradminpasswordforhqbird
After setting the password, restart FBDataGuard, and new password will be encrypted and applied.
4. Native replication configuration in HQBird
HQbird is the advanced distribution of Firebird for big databases with monitoring, optimization and administration tools, it also includes the plugin for native master-slave replication and various performance improvements.
In HQbird, built-in replication is available starting from version 2.5. In "vanilla" Firebird, it appeared later and is available starting from version 4.0.
HQbird Enterprise is 100% compatible with Firebird 2.5, 3.0, 4.0 and 5.0 — no changes in ODS are needed. To switch to HQbird and back no backup/restore is required, just stop/start Firebird and replace binaries. The replication is possible between nodes with the same version, i.e., not possible between 3.0 and 2.5.
4.1. How the replication works
HQbird replication works on the logical level: it replicates DML statements (INSERT/UPDATE/DELETE, EXECUTE PROCEDURE, etc) and DDL (CREATE/ALTER/DROP) changes; no additional triggers needed. The only requirement for the current version of replication is to have unique or primary keys for all tables that need to be replicated.
In order to use the replication, you need to install HQbird, register it (with trial or with the full license) and configure replication. HQbird should be running on the master server and on all replica servers.
Below we will consider how to setup Firebird replication with HQbird.
You can use HQbird on Windows and Linux, with Firebird 2.5, 3.0, 4.0 and 5.0, 32 bit and 64 bit.
4.2. Installation
Please install HQbird from the supplied distributive. If you have other version of Firebird (2.5, 3.0) installed, uninstall it first.
To enable replication you need to have working and registered (trial or full) copy of HQbird on your master and replica servers.
Please refer to the section 2 of this guide for details of HQbird Server installation.
4.3. Asynchronous replication for Firebird
HQbird supports 2 types of replication: asynchronous and synchronous. In the case of an asynchronous replication, the master server stores committed changes from the master database to the files (replication segments), which can be consumed asynchronously by one or more replica servers.

How the asynchronous replication works:
-
Changes on the master side are journaled into the replication log files
-
Journal consists of multiple segments (files)
-
Replication (archived) segments are transferred to the slave and applied to the replica in the background
-
Replica can be created and recreated online (without master’s stop)
Important things to consider:
-
Practical delay between master and replica is configurable, can be set to 15-30 seconds (default is 90 seconds)
-
Delay between master and replica can grow in case of heavy load (due to the delayed processing of replication segments)
-
Replica can be switched to the master (i.e., normal) mode with 1 command
Asynchronous replication is the recommended choice for HQbird:
-
it provides stability and anti-corruption protection of Firebird database;
-
it can be configured quickly and easily;
-
it does not require downtime to setup;
-
it has online re-initialization;
-
it is suitable for distributed environments (when the replica is located in the cloud or at the remote location).
The following steps will be required to setup the asynchronous replication:
-
Configure HQbird for replication at the master
-
Create a copy of master database file
-
Setup database for replication at the replica(slave) server
4.3.1. Step 1: Configure HQbird for replication at the master
To setup replication, open HQbird FBDataGuard: run modern browser (Chrome, Firefox, etc) and open this local URL: http://127.0.0.1:8082 (port if configurable in HQBird ini files)
Enter default name and password: admin/strong password.
Register Firebird server, and the following picture will appear:
Check that you are actually connected to the correct Firebird version — in the upper left corner in “Active server” widget should be version “… Firebird 2.5 HQbird” or “… Firebird 3.0 HQbird” or “… Firebird 4.0 HQbird”.
After that click “Add database” in the right bottom corner and configure nick name and path to the database which will be master:
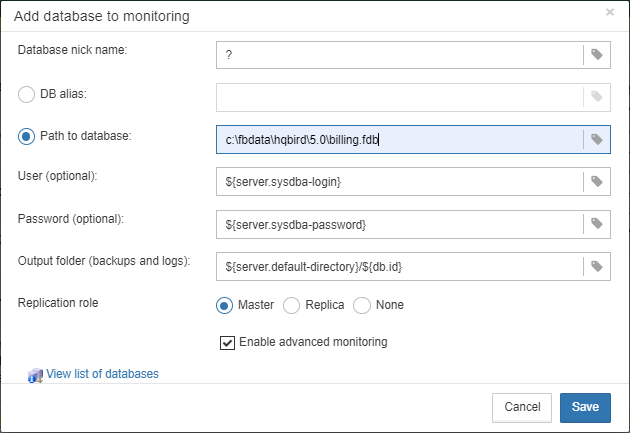
|
Please note that database should be registered with its explicit path, not with the alias — the replication will not work with the alias. |
After the successful registration of the database click on the icon in the header of database to setup replication:

After that the main configuration dialog for master and replica databases will appear.
When replication is not configured, this dialog is almost empty:
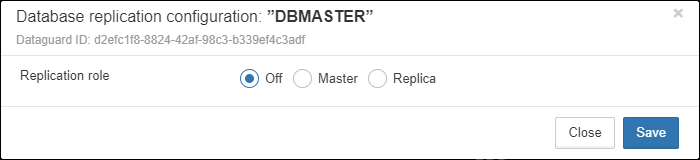
Asynchronous replication at master
Asynchronous replication writes all changes in the master database to the replication log: the set of files called “replication segments”. Replica server pulls these segments and inserts into the replica database.
Previously we have registered H:\dbwmaster.fdb, it is the master database in this example. To configure the asynchronous replication on the master side: select replication role: “Master”, then “Asynchronous”, and click “Save”.
Starting with Firebird 4.0, you need to enable publication at the database level. Clicking on the "Enable publications (and grant it for all tables)" button enables publication and adds all tables to the list for publication. The list of tables for publication can be manipulated in SQL using the following statements:
ALTER DATABASE INCLUDE {TABLE <table_list> | ALL} TO PUBLICATION

ALTER DATABASE EXCLUDE {TABLE <table_list> | ALL} FROM PUBLICATION

<table_list> ::= tablename [, tablename ...]
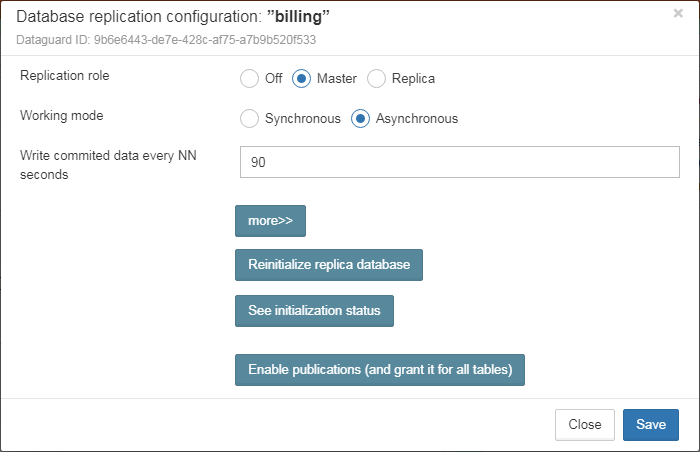
The only parameter you can change is “Write commited data every NN seconds”, it specifies how often we should move committed data to the archived replication segments.
By default, it is set to 90 seconds.
There are several optional parameters which you can change if you open detailed dialog with button more>>:

Let’s consider all parameters in this dialog — just to give you idea what they do, no need to change them:
-
“Log directory” — folder where operational logs will be stored. It is a system folder, completely operated by Firebird. By default, no need to change its default value
${db.path}.ReplLog(db.pathis where the database is located). -
“Log archive directory” — folder, where archived logs will be stored. According the default value
${db.path}.LogArch, HQbird will create folderDatabaseName.LogArchin the folder with the database, so there is no need to change this parameter. -
The third parameter (“Override log archive command”) is optional, leave it empty.
|
Please note that replication parameters are initialized at the first connection to the database. That’s why you need restart Firebird service (or all connections in case of Classic) after the replication configuration — such restart ensures that replication will start properly. |
In this case, the replication log segments will be written first to ${db.path}.ReplLog (db.path is where the database is located — in our example it will be H:\DBWMaster.fdb.ReplLog), and after reaching the maximum segment size, or commit, or another trigger, the default archive command will be started – it will copy archived replication segments to ${db.path}.LogArch (in our example it will be H:\DBWMaster.fdb.LogArch).
After replication’s start, you should be able to see replication segment files in the folder specified in “Log directory” immediately after any operation at master database:

The operational segments are rotated by the engine, and once each segment is completed, it is copied to archive log. Default segment size is 16Mb.
Please note — you don’t need to do anything with operational segments!
After the commit and/or specified timeout of committed data, you will see archived segments in the folder, specified by “Log archive directory”.
Archive replication log is essentially the chronologically ordered list of completed operational segments. These files should be imported by replica server into the replica database.
|
Important!
For Linux users — make sure that folder with the database is owned by |
How to copy replication segments from master server to the replica server?
There are 2 popular ways to copy archived segments from the master server to the replica server(s): through network share and using job Database: Transfer Replication Segments on master and Database: File Receiver on replica.
Network share
You can share the folder with archived segments as a network share. In this case, Firebird service should have enough rights to read, write and delete files on that network share. Normally Firebird and HQbird services are started under LocalSystem account, which do not have access to the network shares. Change it to some powerful account (like Domain Admin).
Transfer Replication Segments/File Receiver
We recommend using HQbird FBDataGuard to send replication segments from the master server to the replica through FTP: it compresses, encrypts and uploads segments to the specified FTP server. On that server, another HQbird FBDataGuard unpacks segments and copies to the necessary folder for further consumption by the replica.
|
Please read about Database: Transfer Replication Segments job for more details how to setup transfer of archived segments between master and replica(s). |
4.3.2. Step 2: Create a copy of master database
To start replication we need to create an initial copy of the database file, which will be used as a target for the replication process. Let’s refer to such database file as “replica”.
Starting with HQbird 2018 R2, the replica will be created automatically in the folder which will you specify in the dialog after clicking on “Reinitialize replica database”.
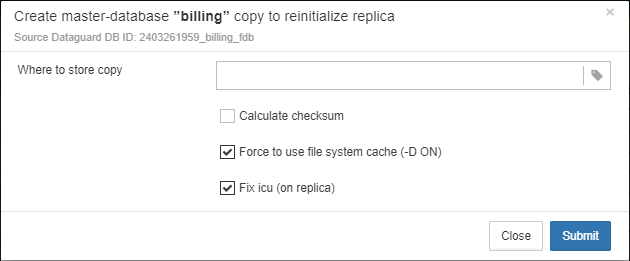
If you have enough space in the folder with the database, just leave the path empty, and click Submit, and replica will be created near the database. Or, you can specify other destination on the local drives with enough free space.
|
Important!
If there will be not enough free space (less than 105% of the database size), HQbird will not create replica copy — there will be an appropriate error message. |
If you click Submit, HQbird will start the process of replica creation. There will be an appropriate message about it:
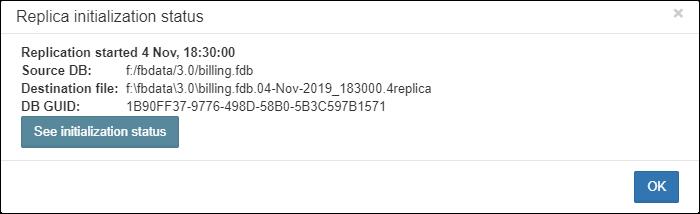
In case of default action, the resulted database will be in the same folder with the database. The name of the replica will be DATABASE_NAME.EXT.DD-MMM-YYYY_NNNN.4replica — for example, employee30.fdb.17-Apr-2018_142507.4replica
|
Please note — creating of replica may take significant time in a case of the big database! |
All stages of replica creation are listed as alerts in HQbird (also sent by email):
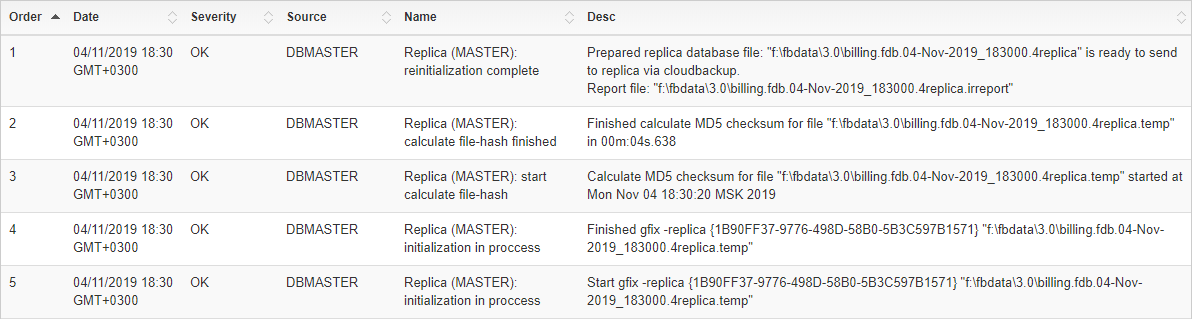
|
Please make sure that replica creation process was completed successfully — check “Alerts” tab! |
4.3.3. Step 3: Setup database for async replication at the replica(slave) server
After completing the configuration of asynchronous replication on the master server, we need to configure it for the replica database at the replica server instance.
First of all, we assume that you have successfully installed HQbird on the replica server. We recommend to use on replica server SuperClassic for Firebird 2.5 and SuperServer for Firebird 3.0 (these are default configurations of HQbird).
Firebird Classic Linux users: If you run Firebird on replica server in Classic mode on Linux, you need to run additional Firebird replicator process with the command fb_smp_server -r.
Second, the replica database should be registered in HQbird FBDataGuard. If you intend to use automatic re-initialization, you can register some small database (employee.fdb) with the required name, and the do re-initialization: as a result, replica database will be automatically transferred from the master server.
Third, we assume that you have managed to setup transfer of logs with Database: Transfer Replication Segments/Database: File Receiver, or with network share.
|
Please note: the database should have replica database GUID before the registration! This GUID is created automatically if you have used link “Reinitialize replica database”, but if you are performing manual re-initialization, don’t forget to set it, otherwise will be an error about missing database GUID. |
Then complete the replication setup — the only required parameter is a path to the folder with archived replication segments, and by default it is already set — HQbird will create folder with logs near the database:
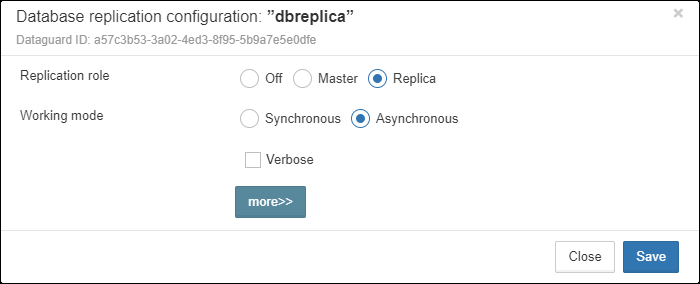
So, no need to change anything here, just click Save.
Assuming the replica database is configured in D:\DATABASE\DBWREPLICA.FDB, the HQBird will create folder D:\DATABASE\DBWREPLICA.FDB.LogArch, and replica will import replication segment files from it.
Click Save and restart Firebird service (to ensure that replication parameters were applied).
After restart, the replica server will start to consume the replication segments from the folder — please note, after the import all processed segments will be deleted.
Also, it will create file with the name {DATABASE-GUIDE} — Firebird stores there some internal information about replication progress.
|
It is not recommended to store archived replication segments from the different databases into the same folder! Always allocate the separate folder for each pair of master-replica databases! |
4.4. Automatic initialization and re-initialization of replica
We recommend using Database: Transfer Replication Segments on the master and Database: File Receiver on the replica to implement the transfer and check integrity of the replication segments through FTP. In this case, it is also possible to implement 1-click re-initialization for the replica database.
If Database: Transfer Replication Segments and Database: File Receiver have the following options enabled (by default), HQbird perform the re-initialization automatically, including restart of replica database:
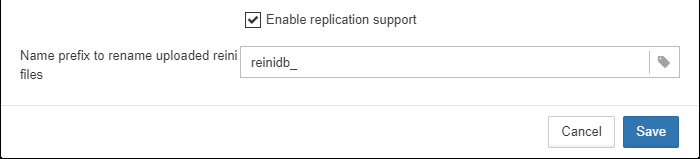
Parameter “Prefix to name uploaded reini files” should be changed if you intend to initialize several copies of the master database through the single folder — in this case set it should be unique for each database.
In case of the single database, no changes are required.
4.4.1. How re-initialization works
If Database: Transfer Replication Segments/Database: File Receiver are configured, it is possible to perform the complete re-initialization with 1 click to “Reinitialize replica database”.
Once clicked, the master HQbird will do the following:
-
Ask you where to store copy of the database (by default it is near the master database, click Submit to store database there).
-
Master database will be copied (with
nbackup) -
The created copy of the database will be set to the replica mode
-
md5 hash-sum will be calculated for the copy
-
According the settings in Database: Transfer Replication Segments (Enable replication should be Enabled), master HQbird will upload database to the specified FTP
Next steps will be done by replica HQbird instance:
-
Once replica HQbird will notice the reini* files in the incoming FTP folder, Database: File Receiver will start the procedure of re-initialization.
-
Processing if usual arch-segments will be stopped
-
The arrived database will be checked — md5 hash-sum will be calculated and compared with the value in the accompanied report file.
-
The existing replica database will be shutdown to disconnect all users
-
New replica database will be copied over the existing database
-
The replica server may require restart to see new replica.
Replica is back to the normal mode.
4.4.2. Troubleshooting asynchronous replication
If you have setup asynchronous replication, but it does not work, the first thing is to enable job Server: Replication Log on the master and on the replica. This job parses replication.log files, and if there are errors, creates the appropriate alert.
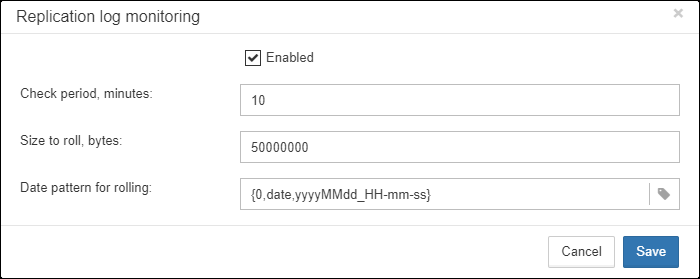
Also, the good thing is to enable “Verbose” option on the replica, and restart Firebird. Verbose will make Firebird to write a lot of details about replication into the replication.log file (near firebird.log).

Usually the text of the error is self-explanatory, but since there are some popular questions which occur regularly, we decide to create the table with the list of main problems with asynchronous replication and ways to resolve it.
| Problem | Possible reasons and how to resolve |
|---|---|
Master part of replication was configured, but folders for operational or archived segments ( |
HQbird creates these folders automatically, but it requires permissions. On Windows: these folders should be on local drives, or HQbird and Firebird services must run with “Run As” with the powerful account (Domain Admin?). On Linux: folders must have permissions for “firebird” user. |
Master part of replication was configured; folders for |
Firebird does not see the replication configuration. Restart Firebird service (all connections in case of Classic) to make read the new configuration. |
Master part of replication was configured; there are files |
It means that there is no permission for Firebird to access the If |
“Verbose” option on replica is enabled, but |
Sometimes Firebird cannot create |
Master part of replication is Ok, but replica does not consume replication segments. |
Replica did not read the new replication configuration. Restart Firebird. |
Master part of replication is Ok, but replica does not consume replication segments. |
Replica does not have enough permissions to read from the |
Replica has errors in |
Check is there such segment on the replica side, and if it is on the master size. If segment has size = 0 on replica, copy it manually or use “Perform fresh backup” checkmark in Database: Transfer Replication Segments. |
Replica has errors in |
It means that replica copy is desynchronized, so some records do not have the appropriate values in referenced tables for the specified Foreign Key. Replica should be reinitialized. If you see this errors often, please contact IBSurgeon support. |
4.5. Synchronous replication for Firebird
In case of synchronous replication, master server directly inserts committed changes of the master database to one or more replicas databases:
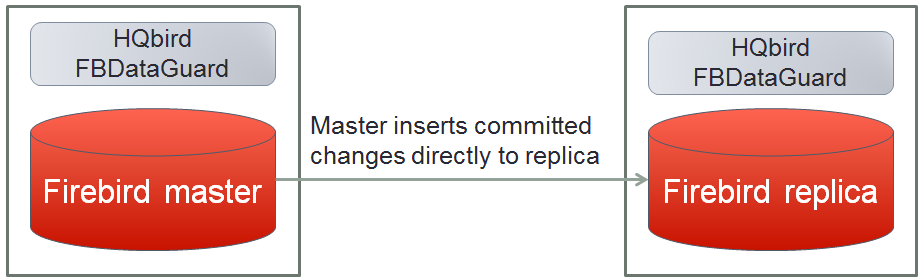
The main features of the synchronous replication are the following:
-
Changes are buffered per transaction, transferred in batches, synchronized at commit
-
Practical delay is below1 second
-
Follows the master priority of locking
-
Replication errors can either interrupt operations or just detach replica
-
Replica is available for read-only queries (with caveats)
-
Automatic fail-over can be implemented (with HQbird Cluster Manager)
Issues to be considered
-
Additional CPU and I/O load on the replica side
-
Requires direct and permanent network connection from master to replica(s), 1+Gbps recommended
-
Replica can be recreated online, re-initialization of synchronous replication requires stop of master
When to use synchronous replication:
-
Custom fail-over cluster solutions with 3+ nodes (especially for web applications)
-
Scale performance by moving reads to the separate replica server (report servers, data marts or read-only web representation)
-
In combination with asynchronous replication for performance scaling
4.5.1. Steps to setup synchronous replication
-
Stop Firebird
-
Create a copy of master database file, switch it to replica mode and copy it to the replica server(s)
-
Setup replica server(s) and database(s) for replication with HQbird FBDataGuard
-
Start replica server(s) — before master server!
-
Setup master server and master database for replication with HQBird FBDataGuard
-
Start master server
As you can see, the downtime required for initialization the synchronous replication is bigger than downtime to configure asynchronous replication, because replica database must be online before master’s start.
4.5.2. Synchronous replication at master and replica
Synchronous replication is designed to write changes from the master database directly to the replica database. The big advantage of synchronous replication that replication delay can be very small, but the disadvantage is that in the case of the lost connection between master and replica servers there will be gaps in transmitted data.
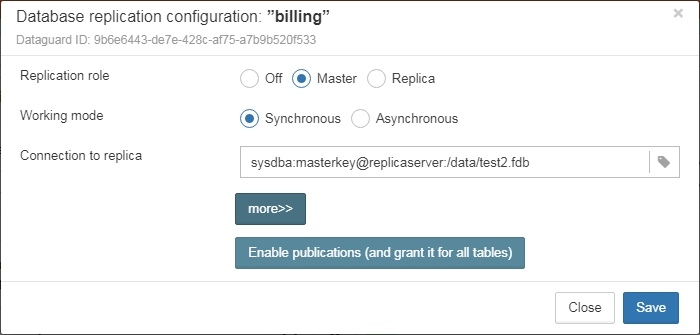
In this example, the synchronous replica database is on the remote server with IP address replica server and path /data/test2.fdb.
No setup is necessary for synchronous replication on the replica server, except gfix –replica <master-guid> for the replica database to switch it to the replica mode.
4.5.3. Replication parameters for testing synchronous replication
In the case of testing synchronous replication of HQbird on the production system, we recommend setting parameter disable_on_error to true.
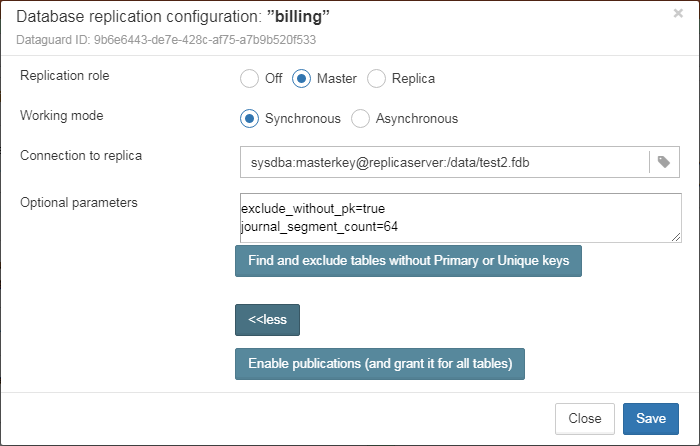
It will switch off replication in case of replication error, and the master server will continue to work without replication.
To reinitialize replication the replication log should be analyzed and all initialization steps should be done again.
Also, please enable job “Replication log” in HQbird FBDataGuard to monitor replication log for errors and warnings:
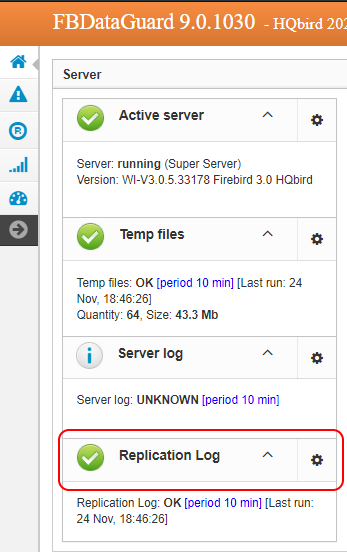
4.6. How to manually create replica of the database?
Of course, it is always possible to create replica with the simple copy process: stop Firebird on master, copy database file, complete setup of replication on the replica, then start Firebird. However, HQbird supports online replica creation — see details below.
If, for some reason, you cannot use the automatic replica creation, you can create replica copy of the master database manually.
Starting with HQbird 2018, it is possible to create replica file without stopping the master server, with nbackup. It is easy for asynchronous replication, and it also makes possible to create additional replicas online — i.e., without stopping a master.
4.6.1. Creating copy online (with nbackup)
Let’s consider how to create replica for asynchronous replication using nbackup:
-
apply
nbackuplocknbackup –l database_path_name -user SYSDBA –pass masterkey
-
copy locked database file to create a replica
copy database_path_name replica_path_name
-
unlock master database
nbackup –n database_path_name -user SYSDBA –pass masterkey
-
Fixup replica database
nbackup –f replica_path_name_name
-
Switch database to replica mode
for Firebird 2.5 and 3.0
gfix replica_path_name –replica {DATABASEGUID} –user SYSDBA –pass masterkeyfor Firebird 4.0
gfix replica_path_name –replica <replica_mode> –user SYSDBA –pass masterkey

<replica_mode> ::= read_only | read_write
4.6.2. What is {DATABASEGUID}?
Database GUID is the unique identifier of a master database.
To find out {DATABASEGUIDE}, run command gstat –h:
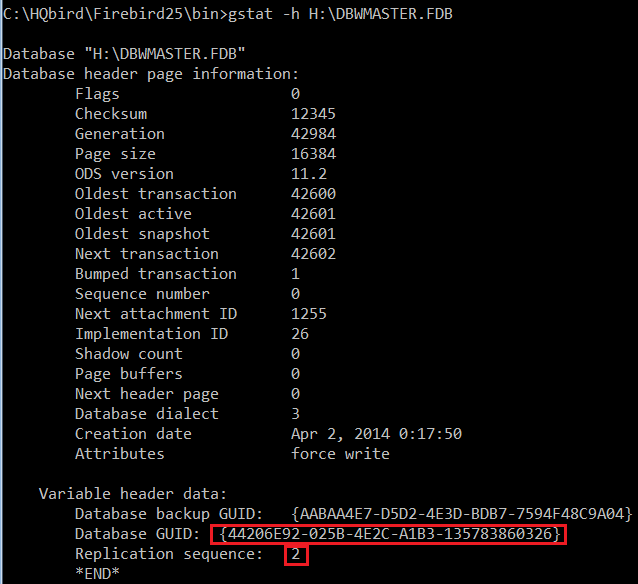
To switch database to the replica mode run the following command:
gfix disk:\path\mydatabase.fdb -replica {guid} -user SYSDBA -pass masterkey
|
If you don’t see Database GUID in |
4.6.3. How to set replica database to the master mode
To switch database to the normal (master) mode run the same command with the empty {} instead of database GUID:
for Firebird 2.5 and 3.0
gfix disk:\path\mydatabase.fdb -replica {} -user SYSDBA -pass masterkey
for Firebird 4.0
gfix replica_path_name –replica none –user SYSDBA –pass masterkey
4.7. How to distinguish master database from replica
4.7.1. Using gstat -h
If you run gstat –h database_name, the output will contain the keyword “replica” in Attributes section for database configured as replica:
Database "D:\O30.FDB"
Gstat execution time Mon Nov 26 17:47:07 2018

Database header page information:
Flags                   0
Generation              187842
System Change Number    15
Page size               8192
ODS version             12.0
Oldest transaction      173630
Oldest active           185440
Oldest snapshot         185440
Next transaction        185441
Sequence number         0
Next attachment ID      24975
Implementation          HW=AMD/Intel/x64 little-endian OS=Windows CC=MSVC
Shadow count            0
Page buffers            0
Next header page        0
Database dialect        3
Creation date           Jan 11, 2017 15:12:20
Attributes              replica

Variable header data:
Database backup GUID:   {37E7918F-5478-43CF-E3B2-D80B0E7D3F63}
Sweep interval:         0
Database GUID:  {BBBD2881-ACDE-4636-CEB2-7EE31AF66CC3}
Replication master GUID: {BBBD2881-ACDE-4636-CEB2-7EE31AF66CC3}
*END*
Gstat completion time Mon Nov 26 17:47:07 2018
For master database there is no special marks in Attributes.
4.7.2. With SQL query to the context variable
In Firebird 2.5 and 3.0, there is a context variable REPLICA in the SYSTEM area that contains information about database status:
SQL> select RDB$GET_CONTEXT('SYSTEM', 'REPLICA') from rdb$database;

RDB$GET_CONTEXT
================================================================
FALSE
In Firebird 4.0 use another context variable REPLICA_MODE:
SQL> select RDB$GET_CONTEXT('SYSTEM', 'REPLICA_MODE') from rdb$database;

RDB$GET_CONTEXT
================================================================
READ-ONLY
Also in Firebird 4.0 you can use the MON$DATABASE monitoring table:
SQL> SELECT MON$REPLICA_MODE FROM MON$DATABASE;

MON$REPLICA_MODE
================
               1
Database replica mode:
-
0 — not a replica
-
1 — read-only replica
-
2 — read-write replica
4.8. Optional parameters for replication
It is possible to specify several additional parameters for fine tuning of the replication process. These parameters can be specified in the “Optional parameters” of replication setup dialog.
-
Size of the local buffer used to accumulate replication events that can be deferred until the transaction commit/rollback. The bigger this value the less network round-trips between master and slave hosts are performed. However, it costs longer replication “checkpoints” (time to synchronize the original database with its replica).
buffer_size = 1048576
-
If enabled, any error during replication causes the master to stop replicating changes and continue working normally. Otherwise (the default behavior), the master reports an error.
disable_on_error = false
-
If enabled, replicated records are RLE-compressed before transmission and decompressed on the slave side. It reduces the traffic and (indirectly) a number of round-trips at the cost of extra CPU cycles on both sides.
compress_records = false
-
If enabled, conflicting records in the target database are modified to match records in the master database. In particular:
-
if there’s an insert and the target record exists, it gets updated;
-
if there’s an update and the target record does not exist, it gets inserted;
-
if there’s a delete and the target record does not exist, it gets ignored.
-
master_priority = false
-
Pattern (regular expression) that defines what tables must be included into replication. By default, all tables are replicated.
include_filter
-
Pattern (regular expression) that defines what tables must be excluded from replication. By default, all tables are replicated.
exclude_filter
-
If enabled, tables without primary key (or unique index) excluded from replication. By default, all tables are replicated.
exclude_without_pk = false
-
Program (complete command line with arguments) that is executed when the current replication session notices a critical error. This command is executed once per every failed replication session. Please note that the program is executed synchronously and the server is waiting for its completion before continuing its operations.
alert_command
-
Prefix for replication log file names. It will be automatically suffixed with an ordinal sequential number. If not specified, database filename (without path) is used as a prefix.
log_file_prefix
-
Maximum allowed size for a single replication segment. It must at least double the specified buffer_size.
log_segment_size = 16777216
-
Maximum allowed number of full replication segments. Once this limit is reached, the replication process is delayed for log_archive_timeout seconds (see below) to allow the archiving to catch up. If any of the full segments is not archived and marked for reuse during the timeout, the replication fails with an error.
Zero means an unlimited number of segments pending archiving.
log_segment_count = 8
5. Performance enhancements
5.1. Pool of external connections
HQbird supports a pool of external connections for Firebird 2.5 and Firebird 3. The standard build of Firebird 4.0 and higher supports the creation of external connection pools out of the box.
An external connection pool allows execute EXECUTE ON EXTERNAL statements with less overhead in reconnecting to the external database.
|
Please note — this pool is allocated per Firebird instance. |
The feature is managed in the firebird.conf:
# ============================
# Settings of External Connections Pool
# ============================

# Set the maximum number of inactive (idle) external connections to retain at
# the pool. Valid values are between 0 and 1000.
# If set to zero, pool is disabled,
# i.e. external connection is destroyed immediately after the use.
#
# Type: integer
#
#ExtConnPoolSize = 0

# Set the time before destroying inactive external connection, seconds.
# Valid values are between 1 and 86400.
#
# Type: integer
#
#ExtConnPoolLifeTime = 7200
From the application point of view, no additional steps are required to use or do not use — it is enabled or disabled in the server configuration, and absolutely seamless for the applications.
The following commands exist to manage pool:
-
changes the pool size
ALTER EXTERNAL CONNECTIONS POOL SET SIZE NExample — this command sets the size of a pool to 190 connections.
ALTER EXTERNAL CONNECTIONS POOL SET SIZE 190 -
changes the lifetime of the pooled connection
ALTER EXTERNAL CONNECTIONS POOL
SET LIFETIME N {SECOND | MINUTE | HOUR}
Example — this command limits the lifetime of a connection in the pool to 1 hour.
ALTER EXTERNAL CONNECTIONS POOL SET LIFETIME 1 HOUR -
clear all pooled connections
ALTER EXTERNAL CONNECTIONS POOL CLEAR ALL -
clear the oldest connection in the pool
ALTER EXTERNAL CONNECTIONS POOL CLEAR OLDEST
To get information about pool status, new context variables were introduced. The following example demonstrates their usage
SELECT
  CAST(RDB$GET_CONTEXT('SYSTEM', 'EXT_CONN_POOL_SIZE') AS INT) AS POOL_SIZE,
  CAST(RDB$GET_CONTEXT('SYSTEM', 'EXT_CONN_POOL_IDLE_COUNT') AS INT) AS POOL_IDLE,
  CAST(RDB$GET_CONTEXT('SYSTEM', 'EXT_CONN_POOL_ACTIVE_COUNT') AS INT) AS POOL_ACTIVE,
  CAST(RDB$GET_CONTEXT('SYSTEM', 'EXT_CONN_POOL_LIFETIME') AS INT) AS POOL_LIFETIME
FROM RDB$DATABASE;
5.2. Cached prepared statements
HQbird has the feature to improve the performance of Firebird (versions 4.0 and 5.0) engine in case of the many frequent and fast SQL queries: server-side cache of prepared SQL statements. Starting with Firebird 5.0, this feature is available in the standard out-of-the-box build.
5.2.1. Cached prepared statements in Firebird 3.0 and 4.0
This feature can be enabled in firebird.conf with the parameter DSQLCacheSize:
# Size of DSQL statements cache.
# Maximum number of statements to cache.
# Use with care as it is per-attachment and could lead to big memory usage.
# Value of zero disables caching.
# Per-database configurable.
# Type: integer
#DSQLCacheSize = 0
The number specifies how many recent queries for each database connection to cache.
To apply the new value, Firebird restart is required.
By default, cache of prepared statements is 0, it means OFF. We recommend to carefully enable it: start with values like 4, 8, 16, to find the best performance effect.
|
Please note: enabling cache of prepared statements increases the memory usage. |
5.2.2. Cached prepared statements in Firebird 5.0
In Firebird 5.0, the prepared statement cache was redesigned and included in the "vanilla" build.
The cache of prepared statements is controlled by the MaxStatementCacheSize parameter in firebird.conf.
# ----------------------------
# Maximum statement cache size
#
# The maximum amount of RAM used to cache unused DSQL compiled statements.
# If set to 0 (zero), statement cache is disabled.
#
# Per-database configurable.
#
# Type: integer
#
#MaxStatementCacheSize = 2M
By default, the prepared statement cache is enabled. To disable it, you need to set the MaxStatementCacheSize parameter to 0.
5.3. TempSpaceLogThreshold: monitoring of big sorting queries and BLOBs
HQbird has a new parameter in firebird.conf in Firebird 2.5, Firebird 3.0, Firebird 4.0 and Firebird 5.0:
TempSpaceLogThreshold=1000000000 #bytesWhen Firebird sees this parameter, it starts to log to firebird.log queries which produce large sortings: queries with GROUP BY, ORDER BY, etc.
When such query creates the sorting file which exceeds the specified threshold, the following message will appear in firebird.log:
SRV-DB1	Wed Nov 28 21:55:36 2018
	Temporary space of type "sort" has exceeded threshold of 1000000000 bytes.
	Total size: 10716980736, cached: 1455423488 bytes, on disk: 9263120384 bytes.
	Query: select count(*) from (select lpad('',1000,uuid_to_char(gen_uuid())) s
	       from rdb$types a,rdb$types b, rdb$types c  order by 1)
- Total size
-
the total size of sorting file
- Cached
-
the part of sorting which had fit into temporary space (specified by
TempCacheLimitparameter) - On disk
-
the part of sorting which was stored to the temporary file, which can be cached in the OS memory, or stored on disk (in the folder specified by
TempDirectoriesparameter, or in the default temp folder)
For very big BLOBs the following message will appear in the firebird.log
SRV-DB1	Tue Nov 27 17:35:39 2018
	Temporary space of type "blob" has exceeded threshold of 500000000 bytes.
	Total size: 500377437, cached: 0 bytes, on disk: 501219328 bytes.
Use TempSpaceLogThreshold to find the non-optimized queries with big sortings and big BLOBs.
Starting with Firebird 3.0 it will also report large hash tables (those caused by HASH JOINs).
If you encounter such queries, optimize them either with redesign of SQL query itself, or try to enable parameter SortDataStorageThreshold.
5.4. SortDataStorageThreshold: REFETCH instead SORT for wide record sets
HQbird supports the new REFETCH optimization method. The standard build of Firebird version 4.0 and higher supports this optimization algorithm out of the box.
HQbird has a new parameter SortDataStorageThreshold in firebird.conf (Firebird 3.0+):
SortDataStorageThreshold=16384 # bytes|
Since version 4.0 this parameter has been renamed to |
If the size of the record, returned by SQL query, will be more than specified threshold, Firebird will use the different approach for sorting record sets: REFETCH instead of SORT.
For example, we have the following query
select tdetl.name_detl
    ,tmain.name_main
    ,tdetl.long_description
from tdetl
join tmain on tdetl.pid=tmain.id
order by tdetl.name_detl
with the following execution plan:
Select Expression
    -> Sort (record length: 32860, key length: 36)
        -> Nested Loop Join (inner)
            -> Table "TMAIN" Full Scan
            -> Filter
                -> Table "TDETL" Access By ID
                    -> Bitmap
                        -> Index "FK_TABLE1_1" Range Scan (full match)
In this case, the size of each record to be sorted is 32860+36 bytes. It can lead to the very big sort files, which will be written to the disk, and the overall query can slow.
With parameter SortDataStorageThreshold=16384 or InlineSortThreshold=16384, Firebird will use plan REFETCH, where only key is sorted, and data are read from the database:
Select Expression
    -> Refetch
        -> Sort (record length: 76, key length: 36)
            -> Nested Loop Join (inner)
This approach can significantly (2-5 times) speed up queries with very wide sorted record sets (usually, heavy reports).
|
Please note!
It is not recommended to set |
5.5. Multi-thread sweep, backup, restore
In HQbird, the possibility of multi-threaded execution of sweep, backup and restore has appeared, which speeds up their work from 2x to 6 times (depending on the specific database). Multi-threaded operations work in HQbird for Firebird 2.5, 3.0 and 4.0, in any architectures — Classic, SuperClassic, SuperServer. For Firebird 5.0, multi-threaded operations are available in the "vanilla" version out of the box.
To enable multi-threaded execution, the gfix and gbak command-line utilities have the –par n option, where n is the number of threads that will be involved in a particular operation. In practice, choosing the number n should be correlated with the number of available processor cores.
For example
-
gfix –sweep database –par 8 … -
gbak –b database backup –par 8 … -
gbak –c backup database –par 8 …
Also, to control the number of threads and set their default number in firebird.conf, two new parameters
are introduced that affect only sweep and restore, but not backup:
# ============================
# Settings for parallel work
# ============================
#  Limit number of parallel workers for the single task. Per-process.
#  Valid values are from 1 (no parallelism) to 64. All other values
#  silently ignored and default value of 1 is used.
MaxParallelWorkers = 64
Example: if you set MaxParallelWorkers = 10, then you can
-
run
gfix –sweep database –par 10 -
run
gfix –sweep database –par 5andgbak –c –par 5 …
That is, no more than 10 threads will be used in total. In case of exceeding (for example, if you set 6 threads for sweep and 6 threads for restore), for a process that exceeds the limit, the message “No enough free worker attachments” will be displayed).
Thus, to enable the multi-threaded capabilities of sweep and restore, you must set the MaxParallelWorkers parameter in firebird.conf
MaxParallelWorkers = 64
and then restart Firebird.
The ParallelWorkers sets the number of threads used by sweep and restore by default if the –par n option is not specified.
#  Default number of parallel workers for the single task. Per-process.
#  Valid values are from 1 (no parallelism) to MaxParallelWorkers (above).
#  Values less than 1 is silently ignored and default value of 1 is used.
#
ParallelWorkers = 1
For example, if ParallelWorkers = 8, then starting
gfix –sweep
without the –par n option will use 8 threads to execute sweep in parallel.
|
For restore, filling tables from backup is always performed in one thread, and only creating indexes is parallelized.
Thus, the acceleration for restore depends on the number of indexes in the database and their size.
Also, the |
As mentioned above, these options do not affect backup.
The multi-threading of backup is regulated only by the –par n parameter in the command line:
-
gbak –b –par 6 … -
gbak –b –par 8 –se …
|
If the database is in shutdown single state, when only 1 connection is allowed to the database, then in version 2.5 both sweep and backup with
This is due to the fact that for these operations an appropriate number of database connections is required, more than 1. In 3.0, only backup will throw an error “ERROR: database … shutdown”, sweep will work. Multi-threaded restore, Firebird 2.5, 3.0 and 4.0, creates the database in shutdown multi mode, so such errors do not occur. However, there is a risk of connecting other applications from SYSDBA or the owner to the database in the restore process. |
|
Notes
|
5.6. BLOB_APPEND function
Regular operator || (concatenation) with BLOB arguments creates temporary BLOB per every pair of args
with BLOB. This could lead to the excessive memory consumption and growth of database file. The BLOB_APPEND function is designed to concatenate BLOBs without creating intermediate BLOBs.
In order to achieve this, the result BLOB is left open for writing instead of been closed immediately after it is filled with data. I.e. such blob could be appended as many times as required. Engine marks such blob with new internal flag BLB_close_on_read and closes it automatically when necessary.
Available in: DSQL, PSQL.
BLOB_APPEND(<blob> [, <value1>, ... <valueN]>
| Parameter | Description |
|---|---|
blob |
BLOB or NULL. |
value |
Any type of value. |
Return type: BLOB, temporary, not closed (i.e. open for writting), marked by flag
BLB_close_on_read.
Input Arguments:
-
The first argument is BLOB or NULL. The following options are possible:
-
NULL: creates new temporary blob, not closed, with flag
BLB_close_on_read -
permanent BLOB (from table) or temporary already closed BLOB: will create a new empty unclosed BLOB with the flag
BLB_close_on_readand the contents of the first BLOB will be added to it -
temporary unclosed BLOB with the
BLB_close_on_readflag: it will be used further
-
-
other arguments can be of any type. The following behavior is defined for them:
-
NULL ignored
-
non-BLOBs are converted to string (as usual) and appended to the content of the result
-
BLOBs, if necessary, are transliterated to the character set of the first argument and their contents are appended to the result
-
The BLOB_APPEND function returns a temporary unclosed BLOB with the` BLB_close_on_read` flag.
This is either a new BLOB or the same as in the first argument. Thus, a series of operations like blob = BLOB_APPEND (blob, …) will result in the creation of at most one BLOB
(unless you try to add a BLOB to itself).
This BLOB will be automatically closed by the engine when the client tries to read it, assign it to a table, or use it in other expressions that require reading the content.
|
Testing a BLOB for NULL value using the |
execute block
returns (b blob sub_type text)
as
begin
  -- will create a new temporary not closed BLOB
  -- and will write to it the string from the 2nd argument
  b = blob_append(null, 'Hello ');
  -- adds two strings to the temporary BLOB without closing it
  b = blob_append(b, 'World', '!');
  -- comparing a BLOB with a string will close it, because for this you need to read the BLOB
  if (b = 'Hello World!') then
  begin
  -- ...
  end
  -- will create a temporary closed BLOB by adding a string to it
  b = b || 'Close';
  suspend;
end|
Use the |
Let’s say you need to build JSON on the server side. We have a PSQL package JSON_UTILS with a set of functions for converting primitive data types to JSON notation.
Then the JSON building using the BLOB_APPEND function will look like this:
EXECUTE BLOCK
RETURNS (
    JSON_STR BLOB SUB_TYPE TEXT CHARACTER SET UTF8)
AS
  DECLARE JSON_M BLOB SUB_TYPE TEXT CHARACTER SET UTF8;
BEGIN
  FOR
      SELECT
          HORSE.CODE_HORSE,
          HORSE.NAME,
          HORSE.BIRTHDAY
      FROM HORSE
      WHERE HORSE.CODE_DEPARTURE = 15
      FETCH FIRST 1000 ROW ONLY
      AS CURSOR C
  DO
  BEGIN
    SELECT
      LIST(
          '{' ||
          JSON_UTILS.NUMERIC_PAIR('age', MEASURE.AGE) ||
          ',' ||
          JSON_UTILS.NUMERIC_PAIR('height', MEASURE.HEIGHT_HORSE) ||
          ',' ||
          JSON_UTILS.NUMERIC_PAIR('length', MEASURE.LENGTH_HORSE) ||
          ',' ||
          JSON_UTILS.NUMERIC_PAIR('chestaround', MEASURE.CHESTAROUND) ||
          ',' ||
          JSON_UTILS.NUMERIC_PAIR('wristaround', MEASURE.WRISTAROUND) ||
          ',' ||
          JSON_UTILS.NUMERIC_PAIR('weight', MEASURE.WEIGHT_HORSE) ||
          '}'
      ) AS JSON_M
    FROM MEASURE
    WHERE MEASURE.CODE_HORSE = :C.CODE_HORSE
    INTO JSON_M;

    JSON_STR = BLOB_APPEND(
      JSON_STR,
      IIF(JSON_STR IS NULL, '[', ',' || ascii_char(13)),
      '{',
      JSON_UTILS.INTEGER_PAIR('code_horse', C.CODE_HORSE),
      ',',
      JSON_UTILS.STRING_PAIR('name', C.NAME),
      ',',
      JSON_UTILS.TIMESTAMP_PAIR('birthday', C.BIRTHDAY),
      ',',
      JSON_UTILS.STRING_VALUE('measures') || ':[', JSON_M, ']',
      '}'
    );
  END
  JSON_STR = BLOB_APPEND(JSON_STR, ']');
  SUSPEND;
END
A similar example using the usual concatenation operator || is an order of magnitude slower and does 1000 times more disk writes.
5.7. Transform LEFT joins into INNER
HQbird allow transform LEFT joins into INNER ones if the WHERE condition violates the outer join rules.
|
Starting with Firebird 5.0, this functionality is available in the “vanilla” version of Firebird. |
Example:
SELECT *
FROM T1 LEFT JOIN T2 ON T1.ID = T2.ID
WHERE T2.FIELD1 = 0
In this case the condition T2.FIELD1 = 0 effectively removes all the "fake NULL" rows of T2, so the result is the same
as for the INNER JOIN. However, the optimizer is forced to use the T1→T2 join order while T2→T1 could also be
considered. It makes sense to detect this case during join processing and internally replace LEFT with INNER before optimization starts.
This is primarily intended to improve "ad hoc" and machine-generated (e.g. ORM) queries.
|
This optimization will not be enabled if a NULL value is checked, for example or SELECT * FROM T1 LEFT JOIN T2 ON T1.ID = T2.ID WHERE T2.ID IS NOT NULL |
6. Monitoring
6.1. Monitoring with HQbird FBDataGuard
6.1.1. Overview
HQbird monitors all aspects of Firebird server and database functioning, and includes continuous monitoring and detailed monitoring.
The continuous monitoring is performed by HQbird FBDataGuard. It is low-invasive, but very effective monitoring which can help to find and resolve the majority of issues with databases performance and stability.
FBDataGuard performs the following monitoring activities:
-
Optional performance monitoring with TraceAPI and MON$
-
Monitoring of transactions markers dynamics (Next, OAT, OIT, OST, active transactions)
-
Monitoring of lock table activity (queues, deadlocks, mutexes)
-
Monitoring of Firebird log (errors, warnings, messages)
-
Number of connected users
-
Free space monitoring for server, databases and their backups
-
Health monitoring through analysis of database metadata and general availability of server and databases
-
Number and size of Firebird temporary files (sorting, etc)
-
Indices monitoring: health and activity check
-
General validation of Firebird database
-
Backups statuses monitoring
-
Replica availability monitoring
FBDataGuard can graphically represent information gathered during the monitoring, for example, transactions and number of users:
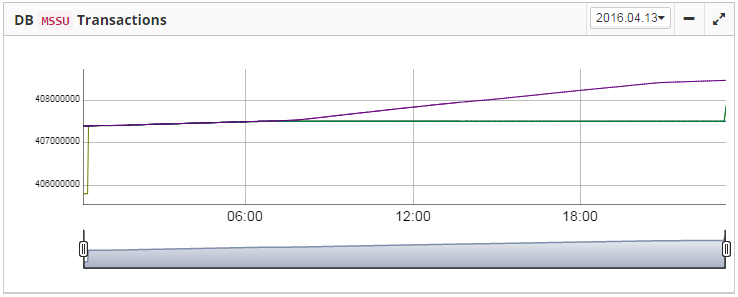
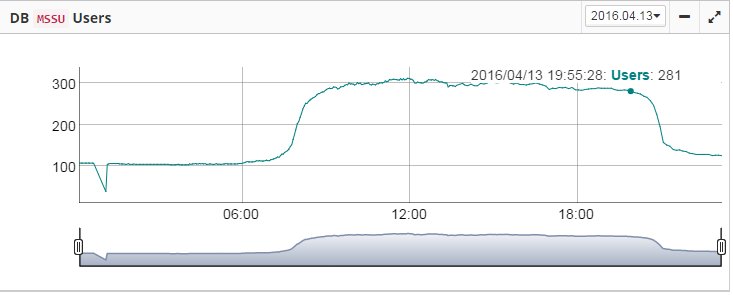
6.1.2. Automatic monitoring with FBDataGuard (Trace API and MON$)
In the version 2020, HQBird introduces the new approach for the automatic performance monitoring with Firebird MON$ tables and TraceAPI.
Now it is possible to schedule the regular check of database performance in less than 1 minute.
For this just open tab Performance and setup monitoring for transactions and queries:

In order to setup Performance monitoring, specify its mandatory parameters in the dialog:
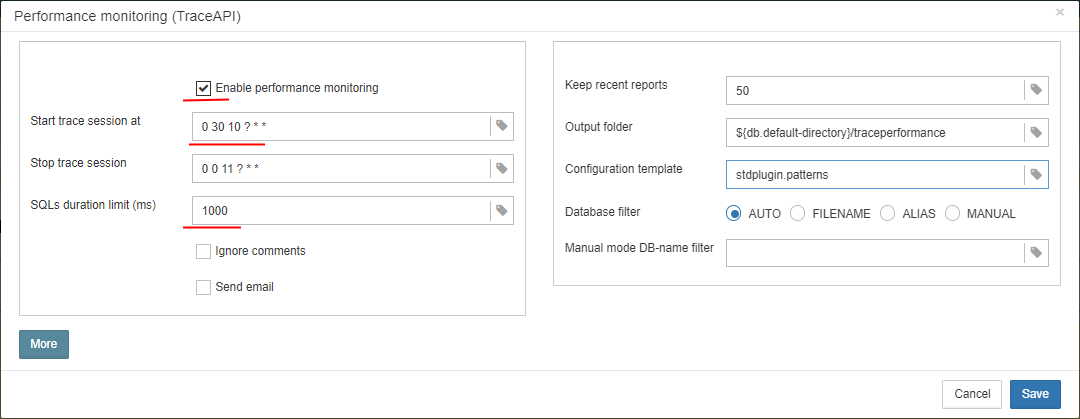
The first mandatory parameter is “Enable performance monitoring” — it must be enabled to run traces by schedule.
The next important parameters are “Start trace session at” and “Stop trace session”. They contain CRON expressions which specify when tracing starts and stops.
By default, trace is set to start at 10-30 and to end at 11-00. It is recommended to adopt tracing schedule for your needs. Below you can see the table with some popular options.
CRON expression for |
Description |
|
|---|---|---|
Start |
End |
|
0 0 * ? * * |
0 10 * ?* * |
Run trace every hour from 0 to 10 minutes |
0 0 8 ? * * |
0 0 17 ?* * |
Run trace every day from 8-00 to 17-00 |
0 30 10,13,15 ? * * |
0 0 11,14,16 ? * * |
Run trace sessions every day from 10-30 to 11-00, 13-30 to 14-00 and from 15-30 to 16-00 |
The next important parameter is time threshold for the slow queries, it is set in the field “Log SQLs with execution time more than”. In this field you need to set time threshold (in milliseconds), after exceeding it logs will be stored and analyzed.
By default, the time is set to 1000 milliseconds, or 1 second. It means, that only queries which take more than 1 seconds, will be logged and analyzed.
We recommend keeping 1000 ms as a basic value, until your database is very slow: in this case 3000-5000 ms can be a good start.
“Send email” check mark indicates if there necessity to send the performance report. The email settings from Alerts configuration will be used to send performance report.
For more advanced settings, “Performance Monitoring” dialog has additional parameters (normally, you don’t need to adjust them).
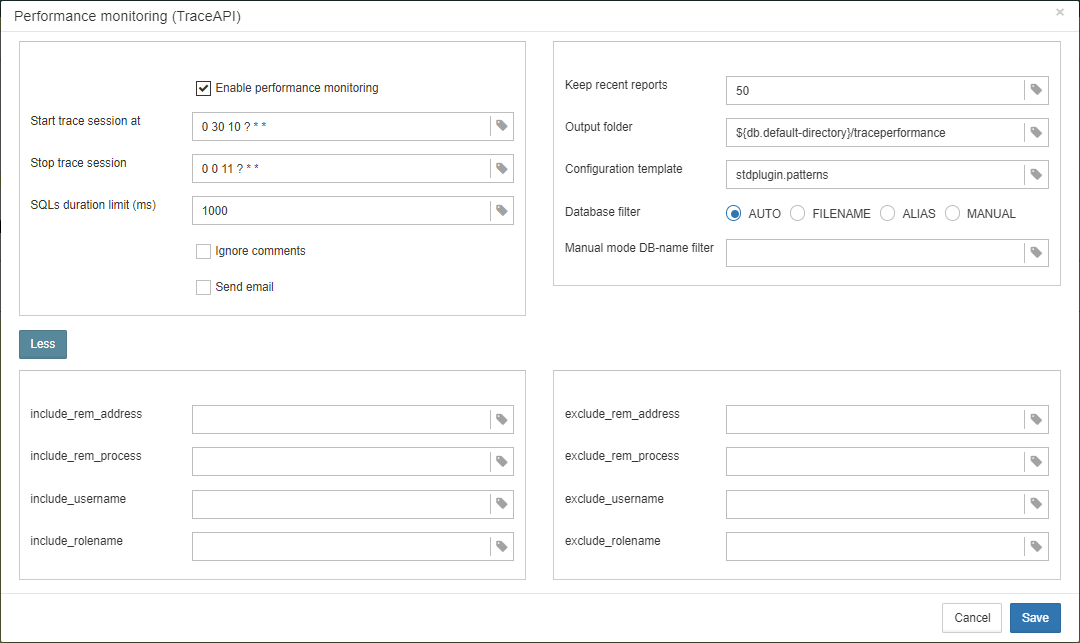
-
“Configuration template” — name of the configuration template file which should be used for trace settings
-
“Database filter” — how the database should be identified. Usually “AUTO” is enough, it will trace specified database. In case of “FILENAME” or “ALIAS” it will use filename or alias to filter database events. “MANUAL” provides an ability to set any regular expression, to trace several databases, for example, or more than one alias for the single database.
-
“Database name filter” it is used in case of “MANUAL” selection.
-
“Keep recent reports” — it specifies how many reports should be kept in the “Output folder” for possible retrospective usage.
As a result of this job, HQbird will generate the performance report, which will be stored in the Output folder as a file with the extension html, and it will be sent by email (in case if “Send email” is enabled). Also the most recent performance is available for review and download in the HQBird interface.
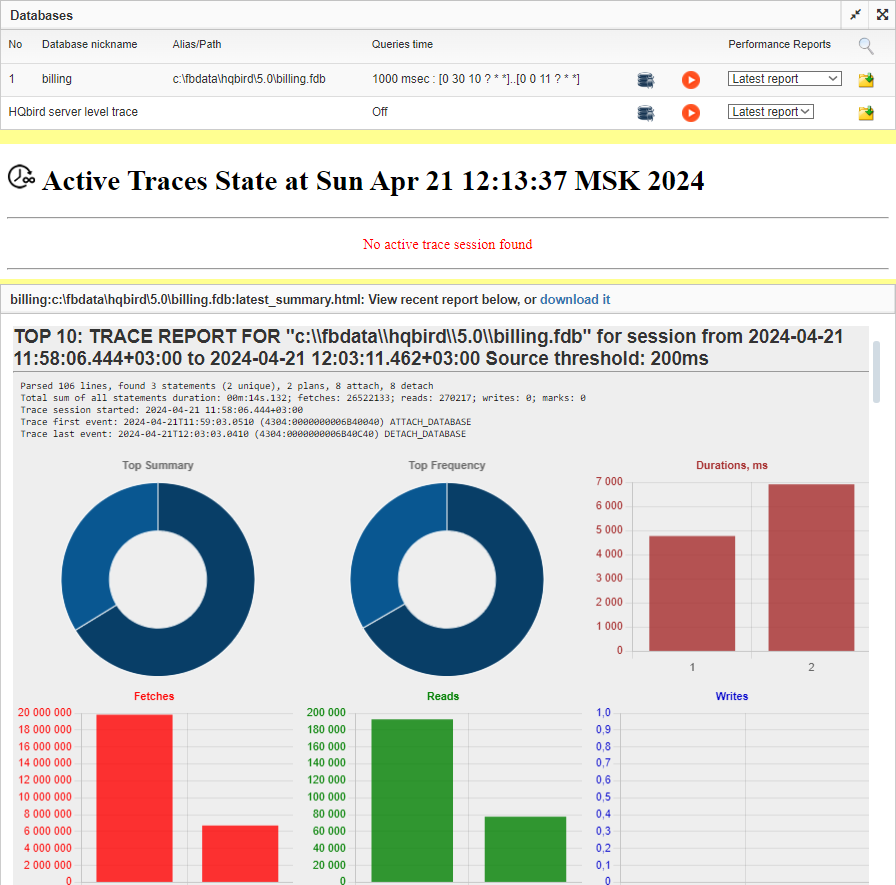
6.1.3. What can we see in the performance report?
The HQbird FBDataGuard performance analysis provides 3 types of reports:
-
list of queries sorted by their time — “Sort by duration”;
-
list of queries sorted by its frequency — “Sort by frequency”;
-
list of queries sorted by the total time (i.e., summary execution time for queries with the same text and various parameters) — “Sort by summary”.
In the beginning of the report you will see the graphical representation of most problematic SQL queries:
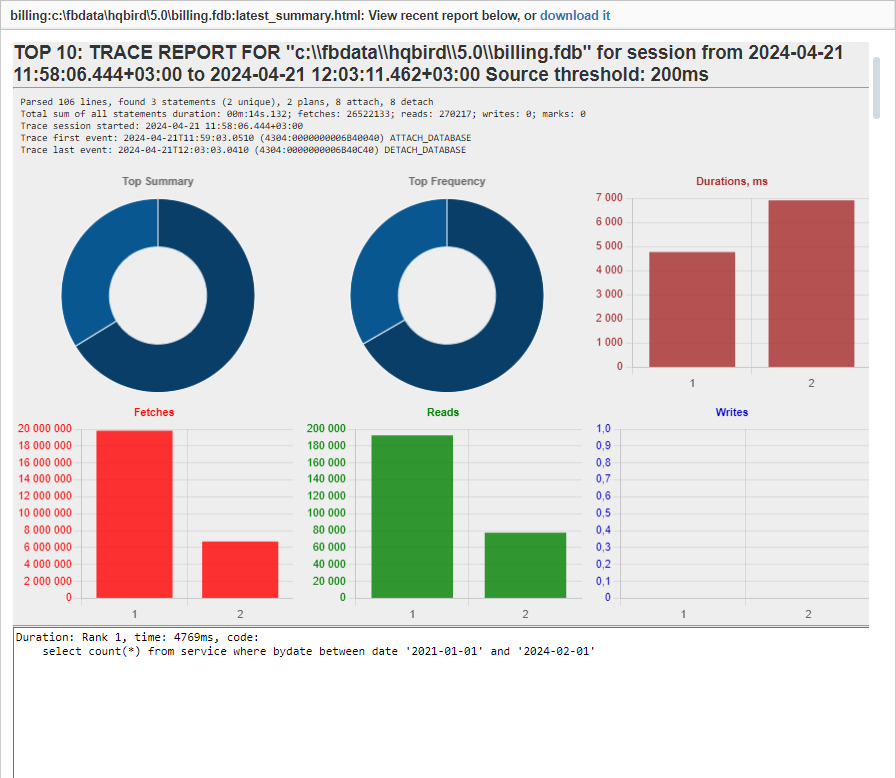
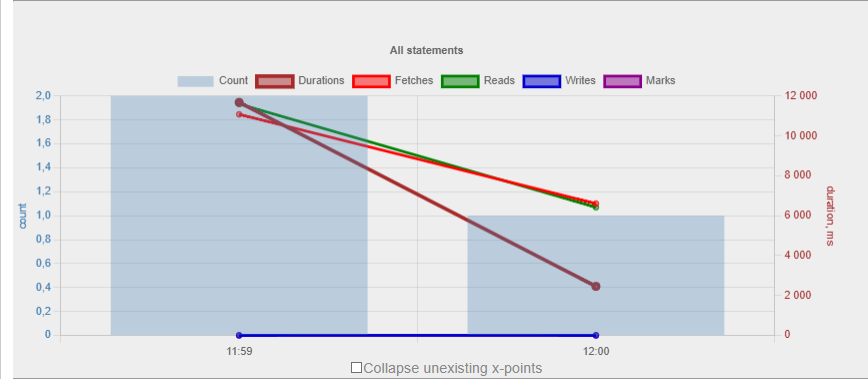
When you click “Sort by duration” (it is a default option), you will see SQL queries and stored procedures which took the longest time to execute first.
Normally there will be long-running reports and other big SQLs.
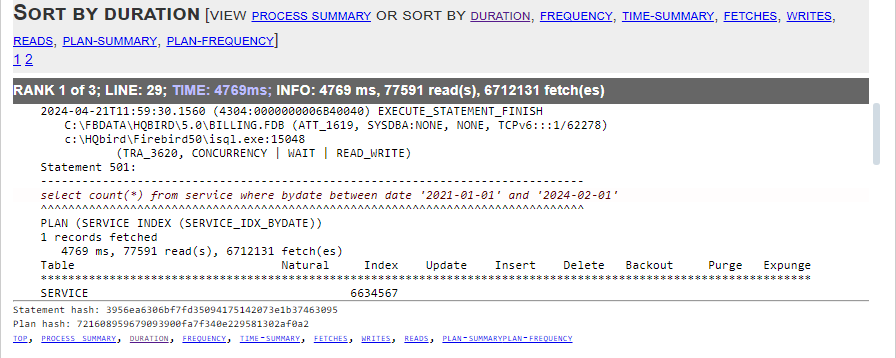
When you click on “Sort by frequency” link in the header of the report, you will see most frequent queries: i.e., those queries which started frequently (among logged queries).
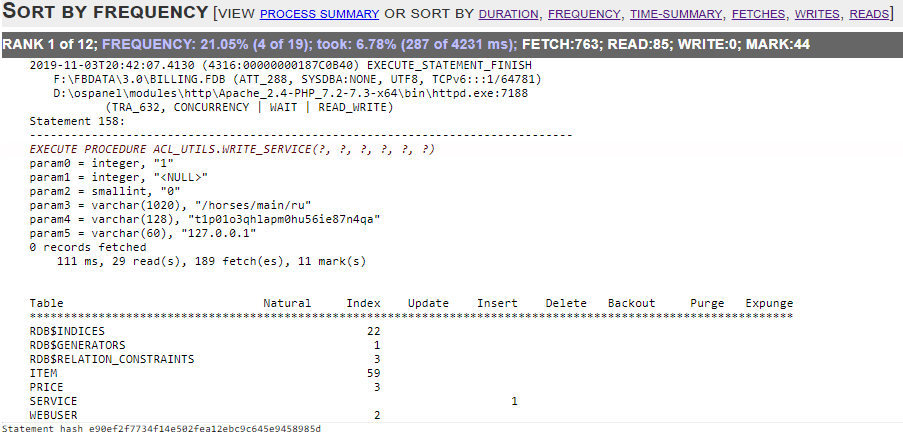
For example, in this case the statement SP_GET_INVOICE_REPORT was run 46 times. It means that this query heavily affects the overall performance, and it should be optimized first.
When you click on “Sort by summary”, you will see the queries which took the most part of the time (among logged queries). These queries usually are the best candidates for the optimization.
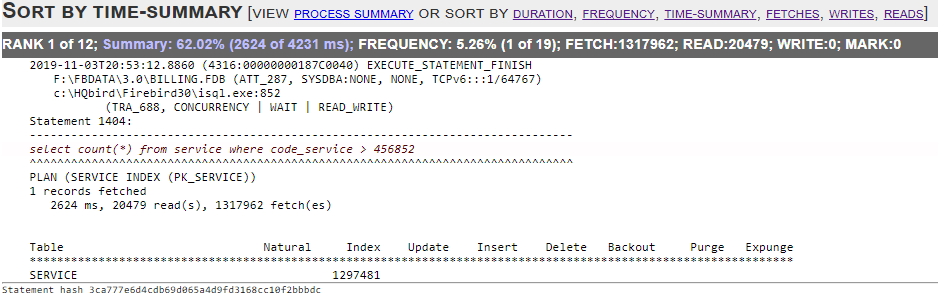
Detailed information for the problematic SQL queries
To see details of the most frequent query, click in the link “View details” in the bottom of the query text:

As a result, you will see the longest query among the queries with the same SQL text, with its execution plan, execution statistics and input parameters.
This information is enough to analyze and optimize SQL query in Firebird SQL Studio or other developer IDE.
6.1.4. How to select a tool for detailed monitoring
FBDataGuard is the first line of a defense for Firebird database; once FBDataGuard encounters something suspicious inside the monitored areas, it sends an alert with description of the issue.
|
Important!
If you have several Firebird servers, we offer HQbird Control Center application which gathers alerts data from the Firebird servers and databases and shows them at the single screen. Contact our for more details. |
After receiving such alert from FBDataGuard the database administrator should proceed with detailed investigation of the problem.
The choice of tool for detailed monitoring depends on the type of detected problem.
If FBDataGuard reports long-running active transaction (Next-OAT), it is necessary to use HQbird Mon$Logger to detect the source of currently running active transaction.
If stuck of oldest interesting transaction is reported, database administrator must plan an explicit sweep to clean uncollected garbage with FBDataGuard sweep job (if it is necessary) and then plan tracking of forced rollbacks with Performance Monitoring in FBDataGuard.
If users report slowness problem with some queries, it is necessary to configure Performance Monitoring and use Advanced Performance Monitoring.
The problems with general database performance and occasional or periodic slowness require an analysis of database structure, which can be done only with HQbird Database Analyst.
Below we will consider how to work with HQbird monitoring tools in more details.
6.2. Monitoring with MON$ tables: HQbird MonLogger
HQbird MonLogger is a tool to analyze monitoring tables output in Firebird and find problems with slow SQL queries, wrongly designed transactions (long-running transactions, transactions with incorrect isolation level, etc) and identify problematic applications.
MonLogger can connect to Firebird database with performance problems and identify what is the reason of slowness: is it some user attachment, slow SQL query or long-running transaction?
MonLogger supports Firebird 2.1, 2.5, 3.0, 4.0 and 5.0 — for older Firebird versions or InterBase please use FBScanner (it is not included in HQbird, should be purchased separately).
MonLogger can show you:
-
Top attachments with highest number of IO operations, non-indexed and indexed reads
-
Top SQL statements with highest number of IO operations, non-indexed and indexed reads
-
Problematic transactions: long-running transactions, transactions with erroneous isolation level, read/write transactions, and related information: when they started, what applications started these transactions, from what IP address, etc
-
Attachments and statements with the most intensive garbage collection actions
-
Read/write ratio, INSERTS/UPDATE/DELETE ratio, and more.
After connection to the database where you want to find performance problems, several snapshots of monitoring tables should be done — click on “Get Snapshot” to take snapshot.
6.2.1. Aggregated performance statistics for users attachments
At the first screen we can see aggregated statistics for database connections, and identify connections with the biggest problems:
Sequential reads / Indexed reads
“Sequential reads / Indexed reads” shows us total ratio between sequential (non-indexed) reads and indexed reads in application. Usually number of non-indexed reads should be low, so big percent of sequential reads is sign that many SQL queries have NATURAL execution plans, and they could be a reason of slow response time.
Click on record in “TOP attachments: sequential/indexed reads” will bring you to tab “Attachments”, where you can see more details about Attachment, and then jump to tab “Transactions” or “Statements”, where you will see transactions and statements linked with selected attachment (if checkmark “Link to selected attachment” is on, otherwise all transactions/statements for all attachments will be shown).
Write details
“Write details” gives you an overview of write operations: ratio between INSERTs/UPDATEs/DELETEs among all database attachments. In the table of top writers you can see attachments with the biggest number of write operations. It is useful to identify applications or software modules which performs excessive number of update or deletes (which are the most dangerous operations in terms of garbage collections).
Garbage collection details
What garbage collection operations mean?
-
Purge — engine removes back-versions, only primary version is in database.
-
Expunge — both primary version and all back-versions were deleted.
-
Back-out — remove only primary version (due to rollback).
Usually we can associate purge with UPDATE operation, Expunge with DELETE, and Backout with rollback of INSERT or UPDATE. Many backouts could mean that there is a problem with transaction management in the application.
Memory usage
“Memory usage” graph shows us total memory used by all active attachments now, and peak of allocated memory for them in the past.
List of top attachments by memory usage shows us the biggest memory consumers among your attachments. It is useful to find applications or software modules with excessive memory usage.
6.2.2. Aggregated performance statistics for statements
At the second tab you can find aggregated performance statistics for statements.

This statistics better reflects the momentary situation in the database — since monitoring tables collect information since the beginning of each object life, statements you can see here are those which were running during the moment when snapshot was taken.
Sequential reads / Indexed reads
In this list we can see top statements which perform many sequential reads from the database. Usually such statements require SQL tuning — either through indices tuning, or through SQL query redesign.
To tune the query, check its execution plan: usually it is possible to improve query speed by eliminating NATURAL in plans with new indices or query redesign. Click on the statement in this list to open tab “Statements”, where you can find more details about selected statement, and jump to associated transaction or attachment.
Page reads/page writes
This graphs and list shows brief information about top statements which perform many reads — it means that they consume significant IO and can affect performance of other queries. SQL statements with peak values should be carefully checked for optimal performance.
Write details for statements
At this graph you can see what writing SQL statements were doing at the moment when snapshot of monitoring tables was taken, and identify UPDATES and DELETEs which made many changes in the database.
6.2.3. Attachments
The third tab is “Attachments”. You can open this tab directly to jump there by clicking one of the records at “Aggregated performance statistics”.
“Attachments” shows the list of users connected to the Firebird database, with many useful details: USER and ROLE of attachment, start time and ID of attachment, is there garbage collection enabled for the attachment, name of remote process which established an attachment, and several accumulated performance counters for the attachment: number of sequential reads (done by attachment since its start), number of indexed reads, number of inserts, updates and deletes, as well records backouts, purges and expunges.
By default, some of columns of attachment are switched off, to show only most important information.
Of course, every time you click on attachment, you can jump to transactions running inside it, and then to statements. There is a checkbox in the left upper corner of “Transactions” and “Statements” tabs, which controls the behavior — when checked, only transactions and statements marked by selected attachment ID, will be shown.
6.2.4. Transactions
Tab “Transactions” shows active transactions at the moment when snapshot was taken.
If checkbox “Link to selected attachment” is enabled, only transactions for selected attachment will be shown, otherwise all transactions are shown.
One of the most important characteristics is a lifetime of transactions: since Firebird is designed to work with short write transactions, it is important to keep them as short as possible. MonLogger highlights transactions with isolation modes and read-write settings which hold Oldest Active transaction and therefore provoke excessive record versions to be not cleared. If you see such transaction and it started a while ago, it means that it can be responsible for excessive records versions.
Sort on “started at” column and look for old transactions, marked in red: all writeable transactions and read only snapshots stuck Oldest Active Transaction and provoke excessive record versions to be hold. Identify where these transactions started (right-click and select “View parent attachment”) and fix your code to commit this transaction earlier.
6.2.5. Statements
Tab “Statements” shows statements active at the moment of snapshot: if you need to catch all statements, configure Performance Monitoring and use Advanced Performance Monitoring.
If “Link to selected attachment” is enabled, only statements for specific attachment will be shown, otherwise all active statements are in the list.
Some statements have no associated transaction id (=0): these queries are prepared, but not executed.
6.3. Advanced Monitor Viewer
Advanced Monitor Viewer allows graphical display of additional performance counters. They are based on both trace data and data from monitoring tables, plus additional system utilities such as wmic (Windows) are used.
To launch the “Advanced Monitor Viewer” click on the corresponding item of the Start menu or run the script AVM/quick_start.cmd.
After successful launch, the page http://127.0.0.1:8083 will open in your default browser.
You will be prompted to log in:
The default login and password are the same as for DataGuard: "admin / strong password".
After successful authentication, a page will open with a panel on which various graphs are located, displaying the system load at different points in time.
On the left side of the page, you will see two buttons: “Properties” and “Databases”. The first one opens a context menu for selecting counters that will be displayed on the charts. The second, opens the context menu in which you can select the database for which these counters are displayed. The database must be registered for monitoring with DataGuard.
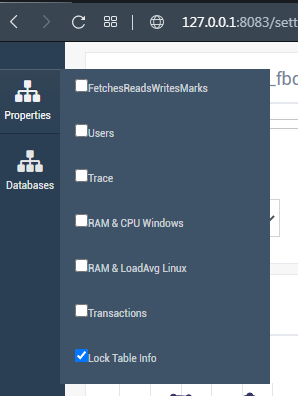
At the top of the page, the name of the database, bookmarks with dates are displayed, as well as the time interval for which the performance counters are displayed. You can change the viewing date and select the desired interval.

The following counters can be displayed graphically:
6.3.1. Fetches, Reads, Writes, Marks
The graph displays the performance counters Fetches, Reads, Writes, Marks based on monitoring tables. You can drill down to each time point by clicking on it or selecting "Data for time" from the list.
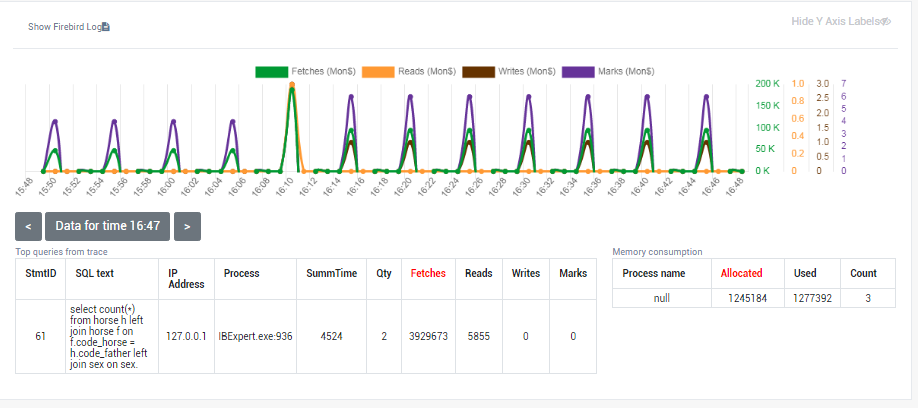
6.3.2. Users
The graph displays the number of active users and requests, as well as the ping time. You can drill down to each time point by clicking on it or selecting "Data for time" from the list.
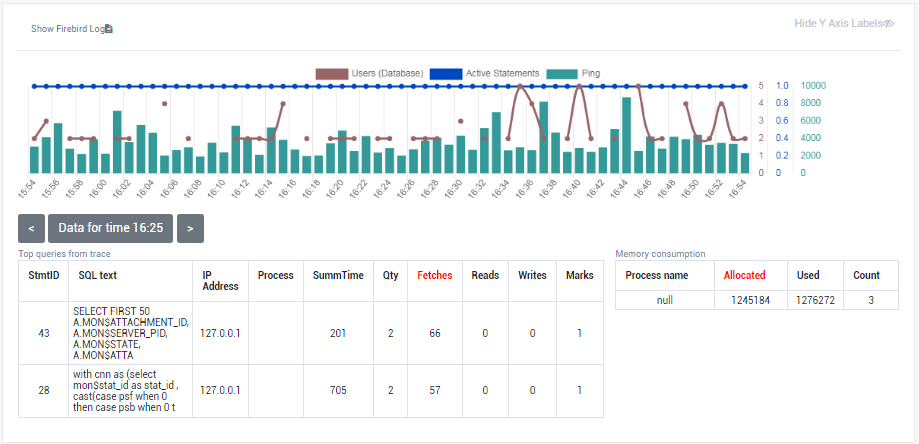
6.3.3. Traces
The graph displays the performance counters Fetches, Reads, Writes, Marks and statement execute time based on data from trace logs. You can drill down to each time point by clicking on it or selecting "Data for time" from the list.
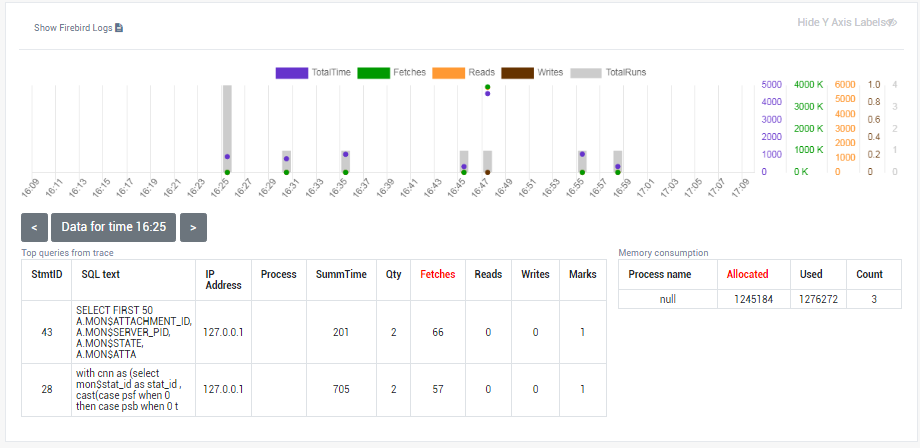
6.3.4. RAM and CPU Windows
The graph displays the consumed memory, as well as the processor load based on tracking by the wmic utility.
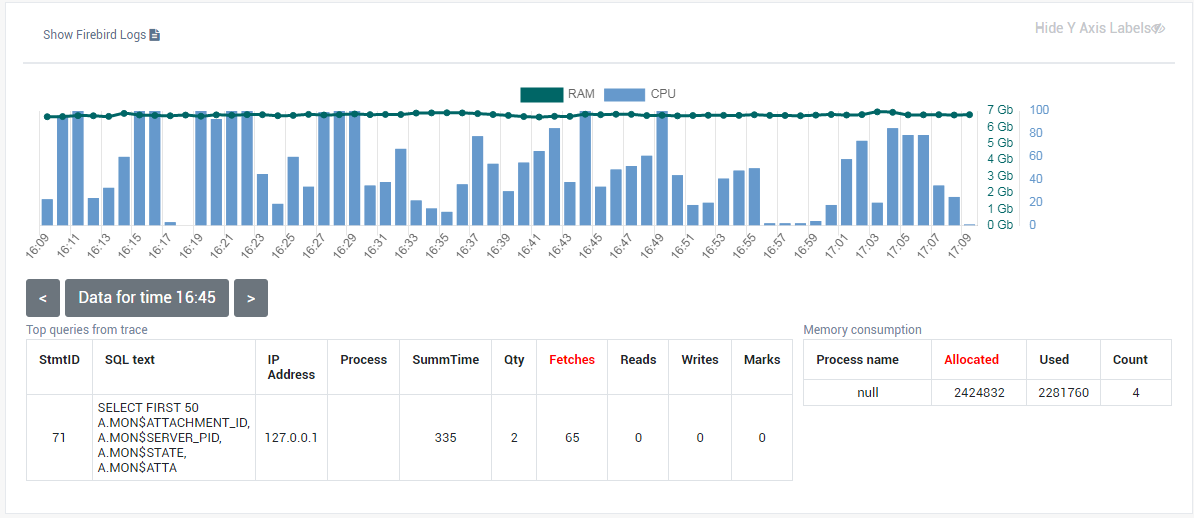
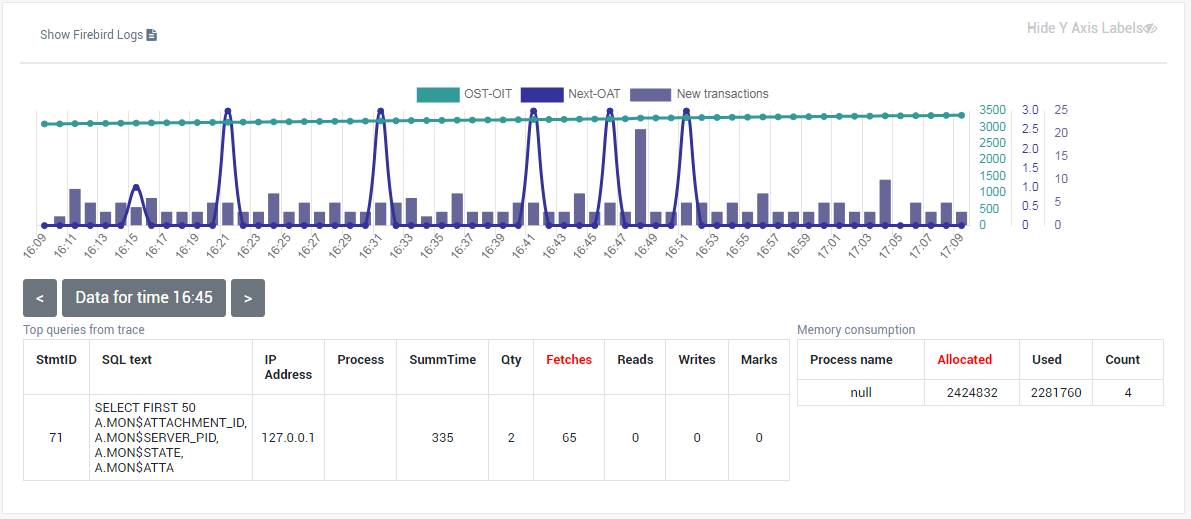
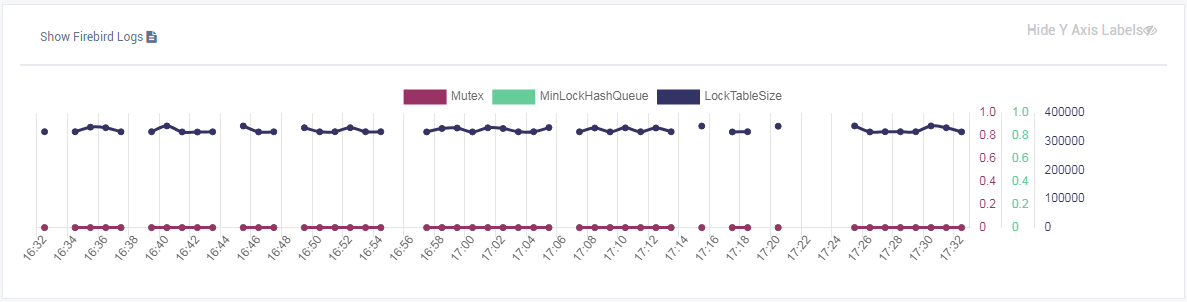
7. Database structure analysis
7.1. Overview of Firebird database structure
The first thing we have to say about the structure of Firebird database is that it represents a set of pages of strictly defined size: 4096, 8192, 16384 or 32768 (since Firebird 4.0).
Pages can be of different types, each of which serves its certain purpose.
Pages of the same type don’t go strictly one by one — they can be easily mixed, allocated in file in the order they were created by server when extending or creating databases.

| Page Type | ID | Description |
|---|---|---|
pag_undefined |
0 |
Undefined — If a page has this page type, it is most likely empty |
pag_header |
1 |
Database header page |
pag_pages |
2 |
Page inventory page (or Space inventory page — SIP) |
pag_transactions |
3 |
Transaction inventory page (TIP) |
pag_pointer |
4 |
Pointer page |
pag_data |
5 |
Data page |
pag_root |
6 |
Index root page |
pag_index |
7 |
Index (B-tree) page |
pag_blob |
8 |
Blob data page |
pag_ids |
9 |
Gen-ids |
pag_log |
10 |
Write ahead log information |
7.2. How to analyze database structure with HQbird Database Analyst (IBAnalyst)
IBAnalyst is a tool that assists a user to analyze in detail Firebird database statistics and identify possible problems with database performance, maintenance and how an application interacts with the database. IBAnalyst graphically displays Firebird database statistics in a user-friendly way and highlights the following problems:
-
tables and BLOBs fragmentation,
-
record versioning,
-
garbage collection,
-
indices effectiveness, etc
Moreover, IBAnalyst can automatically make intelligent suggestions about improving database performance and database maintenance.
IBAnalyst can get statistics from the live production databases through Services API (recommended), or analyze text output of gstat -a -r commands.
Statistics from the peak load periods can give a lot of information about actual performance problems in production databases.
Main features of IBAnalyst are listed below:
-
Retrieving database statistics via Service API and from
gstatoutput. -
Summary of all actual and possible problems in database
-
Colored grid representation of tables, indices and table→indices, which highlights fragmented tables, poor indices and so on.
-
Automatic expertise of database statistics provides recommendations and “how-to” for the following things:
-
Optimal database page size
-
Transactions state and gap between critical transactions
-
Different database flags
-
Index Depth
-
Index Key Duplicates
-
Fragmented Tables
-
Record Versions
-
Very Big Tables
-
-
and more…
7.2.1. How to get statistics from Firebird database in right way
Right time, right place
It sounds strange, but just taking statistics via gstat or Services API is not enough. Statistics must be taken at the right moment to show how applications affect data and transactions in database.
Worst time to take statistics is
-
Right after restore
-
After backup (
gbak -b db.gdb) without-gswitch is made -
After manual sweep (
gfix -sweep)
It is also correct that during work there can be moments where database is in correct state, for example, when applications make less database load than usual (users at launch, dinner or its by specific business process times).
How to catch when there is something wrong in database?
Yes, your applications can be designed so perfect that they will always work with transactions and data correctly, not making sweep gaps, lot of active transactions, long running snapshots and so on. Usually it does not happen. At least because some developers test their applications running 2-3 simultaneous users at the same time, not more. Thus, when they set up written applications for 15 and more simultaneous users, database can behave unpredictably. Of course, multi-user mode can work Ok, because most of multi-user conflicts can be tested with 2-3 concurrently running applications. But, next, when more concurrent applications will run, garbage collection problems can come (at least). And this can be caught if you take statistics at the correct moments.
If you does not experience periodical performance problems
This can happen when your applications are designed correctly, there is low database load, or your hardware is modern and very powerful (enough to handle well current user count and data).
The most valuable information is transactions load and version accumulation. This can be seen only if you setup regular statistics saving.
The best setup is to get hourly transaction statistics. This can be done by running
gstat -h db.gdb > db_stat_<time>.txtwhere
-
db.gdbis your database name, -
db_stat_<time>.txtis text file where statistics will be saved, -
<time>— current date and time when statistics was taken.
Also you can schedule to gather database statistics with HQbird FBDataGuard, job “Database: Statistics”.
If you experience periodical performance problems
These problems usually caused by automatic sweep run. First you need to determine time period between such a performance hits. Next, divide this interval minimally to 4 (8, 16 and so on). Now information systems have lot of concurrent users, and most of performance problems with not configured server and database happens 2 or 3 timers per day.
For example, if performance problem happens each 3 hours, you need to take
gstat -h db.gdbstatistics each 30-45 minutes, and
gstat -a -r db.gdb -user SYSDBA -pass masterkeyeach 1-1.5 hour.
The best is when you take gstat -a -r statistics right before forthcoming performance hit. It will show where real garbage is and how many obsolete record versions accumulated.
What to do with this statistics
If your application explicitly uses transactions and uses them well, i.e. you know what is read read_committed and when to use it, your snapshot transactions lasts no longer than needed, and transactions are being active minimal duration of time, you can tune sweep interval or set it off, and then only care about how many updates application(s) makes and what tables need to be less updated or cared about updates.
What does this mean, you can ask? We’ll give example of some system, where performance problems happened each morning for 20-30 minutes. That was very sufficient for morning applications, and could not last longer.
Database admin was asked correct questions, and here is the picture:
Daily work was divided by sections — analytic works in the morning, than data is inserted and edited by usual operators, and at the end of the day special procedures started gathering data, that would be used for analytic next day (at least).
The last work on database at the end of day was lot of updates, and updates of those tables which analytic used in the morning. So, there were a lot of garbage versions, which started to be collected by application, running in the morning.
And, the answer to that problem was found simple — to run gfix -sweep at the end of the day.
Sweep reads all tables in database and tries to collect all garbage versions for committed and rolled back transactions. After sweeping database became clear nearly it comes after restore.
And, “morning problem” has gone.
So, you need to understand statistics with lot of other factors:
-
how many concurrent users (average) work during the day
-
how long is the working day (8, 12, 16, 24 hours)
-
what kind of applications running at different day times, and how they affect data being used by other applications, running at the same time or next. I.e. you must understand business processes happening during the whole day and whole week.
When DBA can’t do nothing
Sadly to say, these situations happen. And again, example:
Some system installed for ~15 users. Periodically performance is so bad, that DBA needs to restart server. After server restart everything works fine for some time, then performance gets bad again. Statistics showed that average daily transactions is about 75,000, and there are active transactions running from the start of day to the moment when performance getting down.
Unfortunately, applications were written with BDE and with no transactions using at all; i.e. all transaction handling was automatic and used by BDE itself. This caused some transactions to stay active for a long time, and garbage (record versions) accumulated until DBA restarted server. After restart the automatic sweep will start, and the garbage will be collected (eliminated).
All these was caused by applications, because they were tested only with 2-3 concurrent users, and when they became ~15, applications started to make very high load.
Need to say that in that configuration 70% of users were only reading data, and other 30% were inserting and updating some (!) data.
In this situation the only thing that can make performance better is to redesign transaction management in this application.
How IBAnalyst can help find problems in your Firebird database
Let’s walk through the key features of IBAnalyst. When you look at your database statistics in IBAnalyst first time, things can be not clear, especially if IBAnalyst shows lot of warnings by colored red and yellow cells at Summary, Tables and Index views. Let’s consider several real statistics examples.
7.2.2. Summary View
Summary contains the most important information extracted from database statistics. Usually full statistics of database contains hundreds of Kbytes and it is not easy to recognize the important information.
Below is the description of database objects and parameters that you may see in Summary. For description of visible problems (marked red or yellow) see column hints or Recommendations output.
| Object or parameter | Description |
|---|---|
Database name |
Name of analyzed database. |
Creation date |
Database creation date. When it was created by |
Statistics date |
When statistics was taken — statistics file date or Services API call date (now). |
Page size |
Page size is a physical parameter of the database. In modern versions of Firebird, the page size can be 4096, 8192, or 16384 bytes (Firebird 4.0+ can use a 32 KB page size). To improve performance, restore the database from a backup using a page size of 8 or 16 KB. |
Forced Write |
It shows the mode of changed pages writing: synchronized or asynchronized — appropriate setting is ON or OFF. OFF is not recommended, because server crush, power failure or other problems can cause database corruption. |
Dialect |
Current database dialect. |
Sweep interval |
Current sweep interval value. Marked yellow if it is not 0, and marked red if Sweep Gap greater than Sweep interval. |
On Disk Structure |
ODS. It is a database physical format. See hint to know ODS number for particular IB/FB versions |
Transaction block |
|
Oldest transaction |
Oldest interesting transaction. The oldest transaction id that was rolled back, or in limbo. |
Oldest snapshot |
Oldest snapshot transaction Id of transaction that was oldest active when currently oldest snapshot started. |
Oldest active |
Oldest active transaction Id of oldest still active transaction. |
Next transaction |
Newest available transaction id |
Sweep gap (snapshot - oldest) |
For ODS 10.x databases. Difference between Oldest Snapshot and Oldest Interesting transaction. If it is greater than sweep interval, and sweep interval is > 0, Firebird tries to run sweep, and it can slowdown performance. |
Snapshot gap (active - oldest) |
Difference between Oldest Active and Oldest transaction. Same as previous sweep gap. |
TIP size |
Transaction Inventory Page size, in pages and kilobytes. TIP holds transaction state for every transaction was started from database creation (or restore). It is computed as Next transaction div 4 (bytes). |
Snapshot TIP Size |
Size of Transaction Inventory Pages that needed for snapshot transactions. Indicates how much memory will take each snapshot transaction to check concurrent transactions state. |
Active transactions |
Currently active (on the moment when statistics was taken from database) transaction count (Next - Oldest Active). Maybe incorrect, because it can be one active transaction and lot of ahead transactions committed. Anyway, active transactions prevent garbage collection. |
Transactions per day |
Simply divides Next transaction by days' count between database creation date and date statistics taken. Shows average transaction per day, and useless if it is not production database. Transaction warnings mostly based on average transactions per day count. |
Data versions percent |
Percent of record versions in database. Also total records size and versions size for all tables is shown, and total index size. Row is not shown when statistics does not contain record count information ( |
Table/Index lists (also reported in recommendations) |
|
Fragmented Tables |
Here you can view tables (with data > 200 kilobytes) that have average fill less than 60% (File/Options/Table average fill). |
Versioned Tables |
List of tables that have Versions greater than Records, set in Options/Tables. |
Tables fragmented with blobs |
List of tables that have blob fields with data size less than database page size. |
Massive deletes/updates |
List of tables that had lot of data deleted/updated by one delete/update statement. |
Very big tables |
Tables that are close to technical InterBase limit (36 gigabytes per table). You will see warning beforehand problem can occur. |
Deep Indices |
Indices with depth more than 3 (Options/Index) |
Bad Indices |
Indices with big MaxDup and TotalDup values |
Broken or incomplete indices |
Indices with key count less than record count. This can happen when index is broken or when statistics is taken during index creation or re-activation. |
Useless Indices |
Indices with Unique column = 1. May be deleted or deactivated, because they are useless for index search or sort operations. |
Tables with no records |
List of tables with Records = 0. This can be by design (temporary tables), or they can be just forgotten by database developer. |
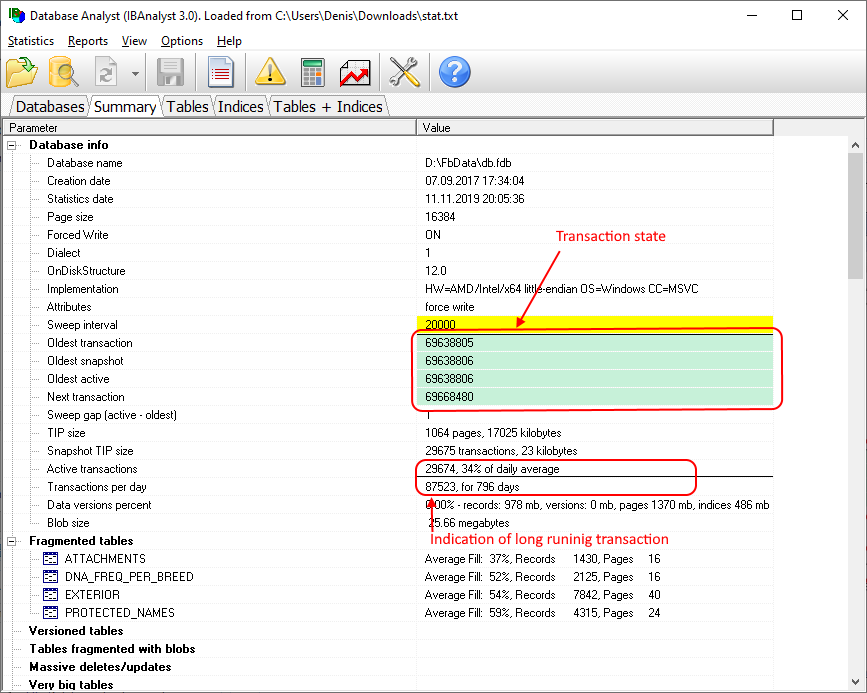
Summary page shows a lot of information, but the most valuable is transactions state (please read description of possible transactions states in IBAnalyst help, it is available by clicking F1 or in menu Help).
At this screenshot you can see that some transaction is active for a long time, “60% of daily average”. IBAnalyst marks such transaction’s state by red, because this transaction may prevent accumulated versions to be considered as garbage by server, and so, to be garbage collected. This is a possible reason of slowness: the more versions exist for some record, the more time it will takes to read it.
In order to find this long-running transaction you can use MON$Logger, or perform direct query of MON$ tables.
Then, to find out which tables were affected by long running transactions (tables with a lot of record versions) you need to go to “Tables” view of IBAnalyst.
7.2.3. Tables view
View Tables contains the information about all database tables. It represents important statistical information about each table. All table warnings are marked (see details below).
You can see the following columns (Columns Records, RecLength, VerLen, Versions, Max Vers are visible only if statistics was generated with gstat -r or with “Include record/rec versions” checkbox enabled):
| Column | Description |
|---|---|
Records |
Record count. Marked pink if table fragmented by blob fields which data is less than database page size. Hint shows real table fragmentation and average records if there were no blob fields. Such fragmentation can cause bad performance for big table joins or natural scans. |
RecLength |
Average record length. Depends on record data, especially on char/varchar columns data. Min physical record length is 17 bytes (record header + all fields are null), max — as declared in table. Statistics show this data without record header count, in this case RecLength can be 0 (if nearly all records are deleted) |
VerLen |
Average record version length. If it is close to RecLength, almost all record is being updated. If VerLen is 40-80% and not greater of RecLength, then Versions are mostly updates. If VerLen greater than 80-90% of RecLength, than maybe Versions are mostly deletes, or update is made by char/varchar columns with new, greater data. Marked yellow if it’s size is greater than specified % (Options/Record/Version size) of average record size. |
Versions |
Current record version count. More versions slowdown table reads. Also lot of versions means that there is no garbage collection performed or records are not read by anyone. Marked red if version count is greater than Records. (Options/Record Versions). |
Max Vers |
Max record versions for one particular record. Marked blue when it is equal to 1 and Versions is non-zero. It means that there were massive update/delete operation. See Options, Table, Massive deletes updates option. |
Data Pages |
Allocated data pages |
Size, Mb |
|
Idx Size, Mb |
Sum of all indices size for that table. Graph shows percentage of that value to total size of all indices. |
Slots |
Count of links to data pages. Empty links are Slots-Data Pages. Doesn’t affect disk space or performance. |
Average Fill |
Average data page fill %. Can be computed as |
Real Fill |
Because we found that Average Fill, calculated by |
20%, 40%, 60% and 100% fill |
Shows page count having corresponding fill rate. Can be turned on/off in Options dialog |
Total % |
How big is that table plus it’s indices in %, related to other tables. |
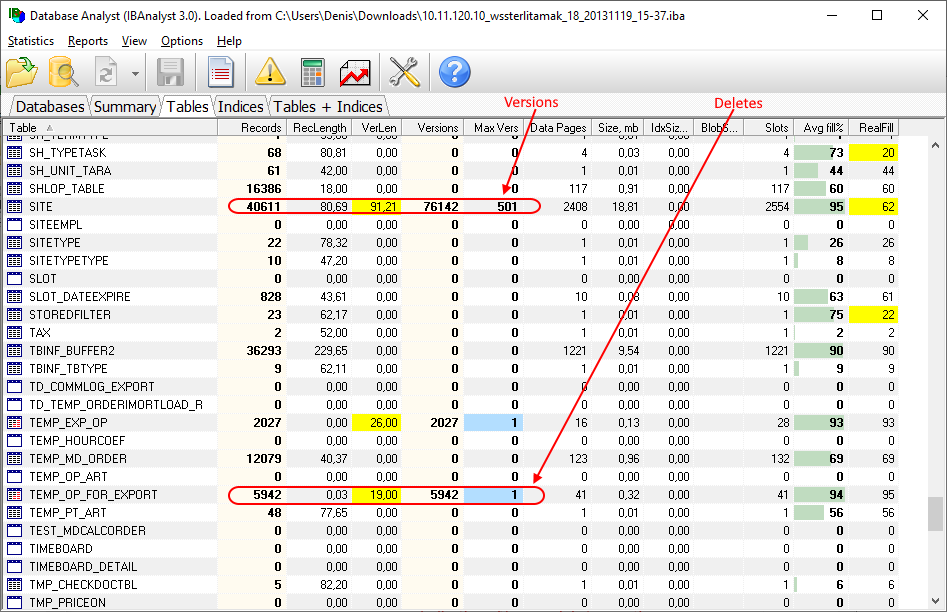
At “Tables” view you can see tables and their important parameters: number of records, number of record versions, record length, maximum number of versions, etc.
You can sort this view to find the largest tables. Especially we are interested tables with many record versions — many record versions will make garbage collection for affected tables longer. Usually it is necessary to change update and delete algorithms to get rid of many record versions.
Row Versions show total versions count for particular table, and row Max Vers shows maximum versions reached by some record. For example, if you look at table SITE, there are 40611 records, total versions are 76142, but one record has 501 versions. Reading and parsing such packet from disk takes more time, so, reading this record is slower than reading others.
This picture also shows a lot of tables where data was deleted. But, because of long running transaction, server can’t delete these versions, and they still on disk, still indexed, and still being read by server when reading data.
7.2.4. Index view
View Indices represents all indices in your database. You can estimate the effectiveness of indices with the following parameters (problem indices are marked red — see smart hints for details)
| Column | Description |
|---|---|
Depth |
Index depth is the page count that engine reads from disk to walk from index root to record pointer. Optimal index depth is 3 or less. When Depth is 4 and higher, it is recommended to increase database page size (backup, then restore with |
Keys |
Index key count. Usually equals to Records. If Keys is bigger than Records and Versions count is greater than 0 it means that concrete field value was changed in those record versions. If Table.RecVersions is bigger than Keys, than this index field(s) are not changed during updates. |
KeyLen |
Average index key length. The less KeyLen, the more equal or similar (postfix) values (keys) stored in index. |
Max Dup |
Maximum duplicates count for particular key value. Marked red if duplicates count is 30% of all keys. (Options/Index/Lot of key duplicates). |
Total Dup |
The overall count of keys with the same values. The closer this value to Keys count, the less effective will be searching using this index, especially when search is made using more than one index. Total Dup value can be counted as Keys minus unique keys count (index statistics is nonlinear). Marked yellow if |
Uniques |
Count of different key values. Primary and unique key indices will show same value as in Keys column. Useful to understand how many different values stored in index — is it useful or not. Index is useless if Unique column shows 1 (marked yellow). |
Selectivity |
Information from |
Size, Mb |
Index size in megabytes. Gap show percentage of that index size related to total size of all indices. |
Average Fill |
Average index pages fill rate, in %. Marked red if average fill rate is less than 50% (go to Options/Average Index Fill to adjust it). Fragmented index results more page reads as usual, and it’s Depth can be higher. Can be fixed by |
Leafs |
Leaf page count (pages with keys and record pointers). |
20%, 40%, 60% and 100% fill |
Shows page count having corresponding fill rate. Can be turned on/off in Options dialog |

Some production databases can have indices with the only key value indexed. This can happen because database was developed “to be extended in the future”, or, someone just experimented with the indices during development or tests. You can see these indices as “Useless” in IBAnalyst: I_NUMBER, etc, built on the column that has only one value for all rows. These indices are really useless, because
-
Optimizer may use this index if you specify “where field =…”. Since field contains only one value, using index will cause useless reading of index pages from disk to memory, and consume memory (and time) when server will prepare which rows to show for that query.
-
Creating indices is the part of restore process. Extra indices adds extra time.
Of course, that is not all that you can find about your database in IBAnalyst. You can also find
-
average number of transactions per day
-
was there rollbacks or lost connections, and when
-
how big (in megabytes) each table and index
-
tables that have records interchanged by blobs, and thus reading only records is slower
-
empty tables — just forgotten, or empty at the time when statistics was taken
-
indices with lot of duplicate keys (you can consider about column value distribution)
-
indices with depth 4 and greater — maybe you need to increase page size to speed up
8. Encryption support
HQbird includes the encryption plugin and provides support to work with encryption databases in web interface. This feature is supported only in HQBird with Firebird 3.0 and higher.
|
Please note!
The encryption plugin requires the separate license file, it is sent in the purchase email. The encryption plugin can be purchased separately and used with community version of Firebird: https://ib-aid.com/download-demo-firebird-encryption-plugin |
8.1. OpenSSL files
This product includes software developed by the OpenSSL Project for use in the OpenSSL Toolkit (http://www.openssl.org/).
HQbird for Windows already includes necessary binary files from OpenSSL 1.1, in order to use encryption features on Linux it is necessary to install OpenSSL 1.1.
8.2. How to encrypt and decrypt Firebird database
In this short guide below, we will demonstrate the key features of the encryption: how to encrypt your Firebird database on the server, how to implement an encrypted client connection, and perform backup/restore of the encrypted database. The demo of FEPF is fully functional, with the only exception — it is limited until December 30, 2019.
8.2.1. Demo package with client applications examples
Please download demo package with client applications examples from https://ib-aid.com/download/crypt/CryptTest.zip
8.2.2. Stage 1 — Initial encryption of the database
At the point, we suppose that you have some database to be encrypted.
Put unencrypted database to some path, for example, into c:\temp\employee30\employee.fdb
We suppose that all actions are made with 64-bit version of the Firebird 3.0.3+, in case of 32-bit version simply use the files from WinSrv32bit_ServerPart folder.
-
Create the following alias in
databases.confcrypt = C:\Temp\EMPLOYEE30\EMPLOYEE30.FDB { KeyHolderPlugin = KeyHolder }Also, you can declare
KeyHolderplugin for all databases at the server, for this add the following parameter tofirebird.conf:KeyHolderPlugin = KeyHolder
or, simply copy
firebird.confat step 2 (see below). -
Check that the following files to
server/pluginsfrom the folderWinSrv64Bit_ServerPart\plugins-
DbCrypt.dll -
DbCrypt.conf -
KeyHolder.dll -
KeyHolder.conf— this is the text file with keys, it is only for developer’s usage, it should not be sent to end users!
-
-
Put the following files into Firebird root from the folder
WinSrv64Bit_ServerPart-
fbcrypt.dll -
libcrypto-1_1-x64.dll -
libssl-1_1-x64.dll -
gbak.exe -
firebird.msg -
firebird.conf(optional, can be used as an example)
-
-
Connect to the unencrypted database with
isqland encrypt the database:isql localhost:C:\Temp\EMPLOYEE30\EMPLOYEE30.FDB -user SYSDBA -pass masterkey SQL>alter database encrypt with dbcrypt key red; SQL> show database; Database: localhost:C:\Temp\EMPLOYEE30\EMPLOYEE30.FDB Owner: ADMINISTRATOR PAGE_SIZE 8192 Number of DB pages allocated = 326 Number of DB pages used = 301 Number of DB pages free = 25 Sweep interval = 20000 Forced Writes are OFF Transaction - oldest = 2881 Transaction - oldest active = 2905 Transaction - oldest snapshot = 2905 Transaction - Next = 2909 ODS = 12.0 Database encrypted Default Character set: NONELet’s consider the encryption command:
alter database encrypt with dbcrypt key red;Here,
dbcryptis the name of the encryption plugin, andredis the name of the key to being used. Keys are defined inKeyHolder.conffile.Please note — on Linux it is necessary to use quotes and case-sensitive plugin name:
alter database encrypt with "DbCrypt" key Red;
After that, the database is encrypted with server-side authentication: the keys are located in the file KeyHolder.conf.
At the figure below you can see files we have on the server to enable the encryption, and what we need on the client side:
| On the server’s side: | On the client’s side (demo - CryptTest.exe) - 32bit |
|---|---|
Mandatory files: |
Mandatory files: |
|
|
|
|
|
|
|
Optional files: |
|
|
|
|
Files for gbak with encryption: |
|
|
|
|
|
Optional files: |
|
|
|
|
8.2.3. Stage 2 — Connect to the encrypted database with the client application
After the initial encryption, we suppose that the database will be copied to the customer environment, where access to it will be done only through the authorized application.
To imitate such environment, we need to remove (or simply rename) the file with keys (KeyHolder.conf) from the folder plugins.
Without KeyHolder.conf, the encryption plugin will require receiving the key from the connected application. The example of such application is included in the archive with demo plugin — there is a compiled version and full sources for it on Delphi XE8.
The code to initialize encrypted connection is very simple — before the usual connection, several calls should be done to send an appropriate key. After that, the client application works with Firebird as usual.
Run the demo application to test the work with the encrypted database, it is in the folder CryptTest\EnhancedCryptTestClient\Win32\Debug.
Do the following steps:
-
Specify database path or alias in “1. Setup Login”. This database will be used in the next steps.
-
Specify the key name and value to be used. If you have previously used key RED, set
Key Name = REDand copy the key value from theKeyHolder.conffile. -
You can encrypt and decrypt database with the specified key. Please note — encryption takes time, and it requires to have an active connection to the database
-
Click Execute query to test the connection to the encrypted database with the simple
|
Please note!
The test application can connect to the encrypted database only through TCP/IP, xnet is not supported. |
In the example of the client application, all database operations (connection, transaction start, transaction’s commit, query start, etc) are made in the very straightforward way to demonstrate all steps of the operation against the encrypted database. You can use this code as an example for the implementing encryption in your applications.
8.2.4. Stage 3 — backup and restore of the encrypted database
The full verified backup with gbak.exe is the primary backup method for Firebird databases. The standard Firebird distribution includes command line tool gbak.exe to perform it, however, it will not work with the encrypted database in the production mode (without keys on the server). After the encryption, only authorized applications can access an encrypted database, and standard gbak is not an authorized application.
We all know how important backup and restore for the database health and performance, so, in order to perform backup and restore for the encrypted databases, we have developed gbak.exe with the encryption support, and included it into the FEPF.
It is important to say, that this gbak.exe produces the encrypted backup file: it encrypts the backup with the same key as for the database encryption.
If you run gbak.exe from the plugin files with the switch -?, you will see the new parameters of gbak.exe, which are used to work with the encrypted databases:
    -KEYFILE              name of a file with DB and backup crypt key(s)
    -KEYNAME              name of a key to be used for encryption
    -KEY                  key value in "0x5A," notation
Let’s consider how to use gbak.exe with encrypted databases and backups.
Backup encrypted Firebird database
To backup an encrypted Firebird database, gbak.exe must provide the key for the server. This key will be used to connect and read the database and to encrypt the backup file.
There are 2 ways to supply the key for gbak.exe: store key in the key file or explicitly put it in the command line:
gbak.exe -b -KEYFILE h:\Firebird\Firebird-3.0.3.32900-0_Win32\examplekeyfile.txt
  -KEYNAME RED localhost:h:\employee_30.fdb h:\testenc4.fbk -user SYSDBA
  -pass masterkey
Here, in the parameter -KEYFILE we specify the location of the files with keys, and in -KEYNAME — the name of the key being used. Please note, that the file examplekeyfile.txt has the same structure as KeyHolder.conf.
If you apply backup with encryption (gbak -b -keyfile … -keyname …) on the unencrypted database, the backup will be encrypted.
gbak -b -KEY 0xec,0xa1,0x52,0xf6,0x4d,0x27,0xda,0x93,0x53,0xe5,0x48,0x86,0xb9,
  0x7d,0xe2,0x8f,0x3b,0xfa,0xb7,0x91,0x22,0x5b,0x59,0x15,0x82,0x35,0xf5,0x30,
  0x1f,0x04,0xdc,0x75, -keyname RED localhost:h:\employee30\employee30.fdb
  h:\testenc303.fbk -user SYSDBA -pass masterkey
Here, we specify the key value in the parameter -KEY, and the name of the key in the parameter -KEYNAME. It is necessary to specify key name even if we supply the explicit key value.
Restore the backup to the encrypted Firebird database
The gbak can also restore from the backup files to the encrypted databases. The approach is the same: we need to provide the key name and key value to restore the backup file.
See below examples of the restore commands:
gbak -c -v -keyfile h:\Firebird\Firebird-3.0.3.32900-0_Win32\examplekeyfile.txt
  -keyname white  h:\testenc4.fbk localhost:h:\employeeenc4.fdb  -user SYSDBA
  -pass masterkey
gbak -c -v -key 0xec,0xa1,0x52,0xf6,0x4d,0x27,0xda,0x93,0x53,0xe5,0x48,0x86,
  0xb9,0x7d,0xe2,0x8f,0x3b,0xfa,0xb7,0x91,0x22,0x5b,0x59,0x15,0x82,0x35,0xf5,
  0x30,0x1f,0x04,0xdc,0x75, -keyname RED  h:\testenc4.fbk
  localhost:h:\employeeenc4.fdb  -user SYSDBA -pass masterkey
If you restore from an unencrypted backup file with encryption keys (gbak -c -keyfile … -keyname …) , the restored database will be encrypted.
9. Authentication plugin for EXECUTE STATEMENT ON EXTERNAL
Firebird has a convenient mechanism of cross-database queries: EXECUTE STATEMENT ON EXTERNAL (ESOE). For example, the typical ESOE can look like this:
EXECUTE STATEMENT 'SELECT * FROM RDB$DATABASE'
ON EXTERNAL 'server:db1' AS USER 'MYUSER' PASSWORD 'mypassword'
As you can see, the statement contains username and password in the open form, which is not secure: for example, if ESOE is called from the stored procedure code, connected users can see the password.
The HQbird includes an authentication plugin for ESOE allows to establish trusted relationships between Firebird servers and perform the authentication of ESOE without a password:
EXECUTE STATEMENT 'SELECT * FROM RDB$DATABASE'
ON EXTERNAL 'server:db1' AS USER 'MYUSER';
Let’s consider how to install and configure HQbird Authentication plugin for ESOE.
9.1. Installation of authentication plugin for ESOE
9.1.1. Authentication plugin files
-
Windows
-
plugins\cluster.dll -
clusterkeygen.exe
-
-
Linux
-
plugins\libcluster.so -
bin\ClusterKeygen# executable
-
|
Please note!
The plugin files are already included into HQbird, so you don’t need to copy them. |
9.1.2. Configuration
In firebird.conf
First of all, it is necessary to add plugin name (Cluster) to the AuthServer and AuthClient parameters in firebird.conf on all servers which will trust each other:
AuthServer = Srp, Legacy_Auth, Cluster
AuthClient = Srp, Srp256, Legacy_Auth, Cluster
Keyfile
Then, it is necessary to generate keyfile for the plugin. This key should be placed to the all Firebird servers which should trust to each other.
In order to generate keyfile cluster.conf run the following command:
C:\HQbird\Firebird30>clusterkeygen.exe > cluster.conf
As a result, the key file cluster.conf will be generated.
It contains 2048 digits key, something like this:
Then, we need to copy the key file to the all Firebird servers with trusted relationships to the plugins folder.
Key, created on Windows, can be used on Linux, and vice versa.
|
Please note!
The keyfile name should be exactly |
Mapping
In order to use authentication plugin inside the particular database, it is necessary to create mapping between users of cluster plugin and regular Firebird users.
For example, if we run the following ESOE
EXECUTE STATEMENT 'SELECT * FROM RDB$DATABASE'
ON EXTERNAL 'server:db1' AS USER 'MYUSER';
we need to map user MYUSER to the actual user in the destination database db1.
Let’s assume we have a user MYUSER2 in the destination database, in this case we need to create the following command in the destination database db1:
CREATE MAPPING usr_mapping_cluster1 USING PLUGIN CLUSTER
FROM USER MYUSER TO user MYUSER2;
As a result, the mapping usr_mapping_cluster1 will be created in db1, to map user MYUSER to MYUSER2.
|
Please note!
The both users should exist, even if they have the same name. Otherwise there will be the following error: Execute statement error at attach: 335544472: Your user name and password are not defined. Ask your database administrator to set up a Firebird login. |
You can create as many mapping as you need.
Existing mapping can be found in the table RDB$AUTH_MAPPING with the following query:
 SQL> select rdb$map_name, rdb$map_from, rdb$map_to from RDB$AUTH_MAPPING
 CON> where RDB$MAP_PLUGIN ='CLUSTER';

 RDB$MAP_NAME               RDB$MAP_FROM             RDB$MAP_TO
 ============================================================================
 USR_MAPPING_CLUSTER1            MYUSER		MYUSER2
Global mappings
It is possible to create mapping between users for all databases on the server — in this case the following command should be used:
CREATE GLOBAL MAPPING global_usr_mapping_cluster1 USING PLUGIN CLUSTER
FROM USER MYUSER TO user MYUSER2;
In this case, mappings will be stored in security database, to see them use the following query:
 SQL> select SEC$MAP_NAME, SEC$MAP_USING, SEC$MAP_FROM, SEC$MAP_TO
 CON> from SEC$GLOBAL_AUTH_MAPPING  where SEC$MAP_PLUGIN ='CLUSTER';

 SEC$MAP_NAME    	         SEC$MAP_USING    SEC$MAP_FROM   SEC$MAP_TO
 =========================================================================
 GLOBAL_USR_MAPPING_CLUSTER1  P                MYUSER         MYUSER2
9.1.3. How to test
The following query can be used to test the work of the authentication plugin for ESOE:
execute block
returns (
    CUSER varchar(255),
    CCONNECT bigint,
    CROLE varchar(31))
as
begin
  execute statement
    'select CURRENT_USER, CURRENT_CONNECTION, CURRENT_ROLE FROM RDB$DATABASE'
  on external 'server:db1'
  into :CUSER, :CCONNECT, :CROLE;
  suspend;
end
As a result, this query will return username, connection id and user role from the destination database db1.
10. Working with external data sources (other DBMS)
In HQBird for Firebird 4.0 or higher, it became possible to work with external data sources, that is, not only with other Firebird DBMS databases, but also with other DBMS. The following plugins are used for this:
-
MySQLEngineto work with MySQL and MariaDB; -
ODBCEngineto work with any data source through the appropriate ODBC driver.
This feature is currently only available for Windows.
10.1. MySQLEngine
The MySQLEngine plugin is designed to access MySQL and MariaDB databases.
In order for the plugin to be known to Firebird, you need to edit the firebird.conf configuration file by adding the MySQLEngine plugin to the list of providers (the Providers parameter):
Providers = Remote,Engine13,MySQLEngine,LoopbackNow you can try to execute the simplest query on the MySQL database
execute block
returns (i integer)
as
  declare dsn_mysql varchar(128);
begin
  dsn_mysql = ':mysql:host=localhost;port=3306;database=employees;user=root';

  for
    execute statement 'select 1'
    on external dsn_mysql
    as user null password 'sa'
    into i
  do
    suspend;
end
10.1.1. Connection string format
The connection string for the MySQLEngine plugin must begin with the prefix :mysql: followed by the connection parameters as <param>=<value> separated by semicolons.
Possible options:
-
host — host or IP address where the MySQL server is located;
-
port is the port number that the MySQL server is listening on. Can be omitted if the default port (3306) is used;
-
database — the name of the database in which queries will be executed;
-
user — username;
-
password — password.
|
Notes
|
10.1.2. Supported statement types
The MySQLEngine plugin supports the following types of queries:
-
SELECT -
INSERT,UPDATE,DELETE -
CALL procedure(<params>)
10.1.3. Output parameters of SQL queries
Data types returned from a SQL queries
| MySQL data type | Firebird data type |
|---|---|
|
|
|
|
|
|
|
|
|
|
|
|
|
|
|
|
|
|
|
|
|
|
|
|
|
|
|
|
|
|
|
|
|
|
|
|
|
|
Sample query with multiple fields:
execute block
returns (
  emp_no bigint,
  birth_date date,
  first_name varchar(14),
  last_name varchar(16),
  gender char(1),
  hire_date date
)
as
  declare dsn_mysql varchar(128);
begin
  dsn_mysql = ':mysql:host=localhost;port=3306;database=employees;user=root';

  for
    execute statement q'{
      select
        emp_no,
        birth_date,
        first_name,
        last_name,
        gender,
        hire_date
      from employees
      order by birth_date desc
      limit 5
    }'
    on external dsn_mysql
    as user null password 'sa'
    into
      emp_no, birth_date, first_name, last_name, gender, hire_date
  do
    suspend;
end
A SELECT statement always returns a cursor.
In MySQL, CALL statements can return values through parameters of type OUT and INOUT. The Firebird parser knows nothing about the CALL operator, so returning parameters of OUT and INOUT types is not supported.
|
This may change in the future. Firebird 6.0 added the ability to call stored procedures using the |
However, you can return OUT and INOUT parameters using local variables and executing multiple queries in sequence.
Suppose you have the following stored procedure:
CREATE PROCEDURE `sp_test_add`(
  IN `A` INT,
  IN `B` INT,
  OUT `C` INT
)
LANGUAGE SQL
NOT DETERMINISTIC
NO SQL
SQL SECURITY DEFINER
BEGIN
  SET C = A + B;
END
Then the result of such a procedure can be returned as follows:
execute block
returns (
  c int
)
as
  declare dsn_mysql varchar(128);
  declare psw_mysql varchar(25);
begin
  dsn_mysql = ':mysql:host=localhost;port=3306;database=employees;user=root';
  psw_mysql = 'sa';

  execute statement 'SET @C=NULL'
  on external dsn_mysql
  as user null password psw_mysql;

  execute statement
  ('CALL sp_test_add(?, ?, @C)')
  (1, 2)
  on external dsn_mysql
  as user null password psw_mysql;

  execute statement
  'SELECT @C'
  on external dsn_mysql
  as user null password psw_mysql
  into c;

  suspend;
end
CALL statements can also return a cursor or multiple cursors. Cursor return from CALL statements is not supported in the current version. Working with multiple datasets using the EXECUTE STATEMENT … ON EXTERNAL statement is not supported.
10.1.4. Input parameters of SQL queries
The MySQLEngine plugin supports the use of parameters in SQL queries. Parameters can be unnamed (positional) or named.
An example of using unnamed parameters:
execute block
returns (
  emp_no bigint,
  birth_date date,
  first_name varchar(14),
  last_name varchar(16),
  gender char(1),
  hire_date date
)
as
  declare dsn_mysql varchar(128);
begin
  dsn_mysql = ':mysql:host=localhost;port=3306;database=employees;user=root';

  for
    execute statement (q'{
      select
        emp_no,
        birth_date,
        first_name,
        last_name,
        gender,
        hire_date
        from employees
      where emp_no = ?
    }')
    (10020)
    on external dsn_mysql
    as user null password 'sa'
    into
      emp_no, birth_date, first_name, last_name, gender, hire_date
  do
    suspend;
end
An example of using named parameters:
execute block
returns (
  emp_no bigint,
  birth_date date,
  first_name varchar(14),
  last_name varchar(16),
  gender char(1),
  hire_date date
)
as
  declare dsn_mysql varchar(128);
begin
  dsn_mysql = ':mysql:host=localhost;port=3306;database=employees;user=root';

  for
    execute statement (q'{
      select
        emp_no,
        birth_date,
        first_name,
        last_name,
        gender,
        hire_date
      from employees
      where emp_no = :emp_no
    }')
    (emp_no := 10020)
    on external dsn_mysql
    as user null password 'sa'
    into
      emp_no, birth_date, first_name, last_name, gender, hire_date
  do
    suspend;
end
10.1.5. Restricting the use of input parameters
For named parameters to work, the EDS (EXTERNAL DATA SOURCE) subsystem uses an internal preparser of queries, which replaces all parameters of the form :<name> with ? and retains the binding of the parameter name and its number. Therefore, this only works for queries whose syntax is similar to Firebird’s. For example, for CALL statements, named parameters will not work. In this case, you must use unnamed parameters.
set term ;#

execute block
as
  declare dsn_mysql varchar(128);
begin
  dsn_mysql = ':mysql:host=localhost;port=3306;database=employees;user=root';

  execute statement
  ('CALL sp_conn_audit(:A_CONN_ID, :A_USER, :A_DT)')
  (
    A_CONN_ID := current_connection,
    A_USER := current_user,
    A_DT := localtimestamp
  )
  on external dsn_mysql
  as user null password 'sa';
end#
Statement failed, SQLSTATE = 42000 Execute statement error at isc_dsql_prepare : 335544382 : You have an error in your SQL syntax; check the manual that corresponds to your MariaDB server version for the right syntax to use near ':A_CONN_ID, :A_USER, :A_DT)' at line 1 Statement : CALL sp_conn_audit(:A_CONN_ID, :A_USER, :A_DT) Data source : Firebird:::mysql:host=localhost;port=3306;database=employees;user=root -At block line: 7, col: 3
If you replace the named parameters with unnamed ones, then the query will successfully complete
execute block
as
  declare dsn_mysql varchar(128);
begin
  dsn_mysql = ':mysql:host=localhost;port=3306;database=employees;user=root';

  execute statement
    ('CALL sp_conn_audit(?, ?, ?)')
    (current_connection, current_user, localtimestamp)
  on external dsn_mysql
  as user null password 'sa';
end#|
This may change in the future. Firebird 6.0 added the ability to call stored procedures using the |
When executing prepare, Firebird obtains the types, sizes, and other properties of input and output query parameters. Further, based on these data, input and output messages are built, buffers for data exchange are allocated. MySQL is able to return the types, sizes, and properties of output parameters (columns), but for input parameters, only their total number is returned. The MySQL C-API is designed so that the types, sizes, and other attributes for input parameters are set by the client application. However, in the Firebird API it is not possible to fully define the input message on its own, it is only possible to convert the input message returned after prepare to another message (type compatible).
Since it is impossible to know the types of input parameters, all parameters are assumed to be of type VARCHAR(8191) CHARACTER SET UTF8. Most Firebird types can be converted to and from a string. However, you cannot pass binary data (types BINARY(N), VARBINARY(N), and BLOB SUB_TYPE BINARY) to such parameters, as they will be malformed. Also, you cannot pass BLOB SUB_TYPE TEXT as parameters if the text is longer than 8191 characters.
10.2. ODBCEngine
The ODBCEngine plugin is designed to access various databases through the ODBC interface.
In order for the plugin to be known to Firebird, you need to edit the firebird.conf configuration file by adding the ODBCEngine plugin to the list of providers (the Providers parameter):
Providers = Remote,Engine13,ODBCEngine,Loopback10.2.1. Connection string format
The connection string for an ODBCEngine plugin must begin with the prefix :odbc: followed by the connection parameters. There are two options for connecting to the database: using DNS or using the full connection string for the specified driver.
Possible connection string options:
-
DSN — DSN of the data source (required if there is no DRIVER);
-
DRIVER — ODBC driver name (required if there is no DSN);
-
UID or USER — username;
-
PWD or PASSWORD — password;
-
other parameters specific to the selected driver.
On Windows, if Firebird is running as a service, only system DSNs are visible.
Here are examples of connecting to a MySQL database. Let’s say you configured a system DSN named test_dsn, then the connection string would look like this:
execute block
returns (
  i integer
)
as
begin
  for
    execute statement q'{
       select 1
    }'
    on external ':odbc:dsn=test_dsn;user=root'
    as user null password '12345'
    into
      i
  do
    suspend;
end
Another option is to connect to the same database using the full connection string. The set of valid parameters in the connection string depends on the selected driver.
For example, for the MariaDB driver, the connection would look like this:
execute block returns (
  i integer
)
as
begin
  for
    execute statement 'select 1'
    on external ':odbc:DRIVER={MariaDB ODBC 3.1 Driver};SERVER=127.0.0.1;PORT=3306;DATABASE=test;TCPIP=1;CHARSET=utf8mb4;UID=root'
    as user null password '12345'
    into i
  do
    suspend;
end|
Notes
|
10.2.2. Correspondence table of data types between ODBC and Firebird
| ODBC data type | Firebird data type |
|---|---|
|
|
|
|
|
|
|
|
|
|
|
|
|
|
|
|
|
|
|
|
|
|
|
|
|
|
|
|
|
|
|
|
|
|
|
|
|
|
10.2.3. SQL query types
A SELECT query always returns a cursor.
CALL statements can return values through parameters of type OUT and INOUT. The Firebird parser knows nothing about the CALL operator, so returning parameters of OUT and INOUT types is not supported.
|
This may change in the future. Firebird 6.0 added the ability to call stored procedures using the |
CALL statements can also return a cursor or multiple cursors. Cursor return from CALL statements is not supported in the current version. Working with multiple datasets using the EXECUTE STATEMENT … ON EXTERNAL statement is not supported.
Queries like INSERT, UPDATE, DELETE usually return no data unless a RETURNING clause is specified, otherwise a cursor is returned.
An example of executing a SELECT query.
execute block
returns (
  id     integer,
  title  varchar(255),
  body blob sub_type text,
  bydate varchar(50)
)
as
declare sql varchar(8191);
begin
  sql = Q'{
    SELECT
      id,
      title,
      body,
      bydate
    FROM article
  }';
  for
    execute statement (:sql)
    on external ':odbc:DRIVER={MariaDB ODBC 3.1 Driver};SERVER=127.0.0.1;PORT=3306;DATABASE=test;TCPIP=1;CHARSET=utf8mb4;UID=root'
    as user null password 'root'
    into
      id,
      title,
      body,
      bydate
  do
    suspend;
end
10.2.4. Input parameters of SQL queries
The ODBCEngine plugin supports the use of parameters in queries. Parameters can be unnamed (positional) or named.
An example of using anonymous parameters:
execute block
returns(
   CODE_SEX INTEGER,
   NAME VARCHAR(70),
   NAME_EN VARCHAR(70)
)
as
declare xSQL varchar(8191);
declare xCODE_SEX INT = 1;
begin
  xSQL = '
SELECT
  CODE_SEX,
  NAME,
  NAME_EN
FROM sex
WHERE CODE_SEX = ?
';
  for
    execute statement (:xSQL)
    (xCODE_SEX)
    on external ':odbc:DRIVER={MariaDB ODBC 3.1 Driver};SERVER=127.0.0.1;PORT=3306;DATABASE=test;TCPIP=1;CHARSET=utf8mb4;UID=test'
    as user null password '12345'
    into CODE_SEX, NAME, NAME_EN
  do
    suspend;
end
An example of using named parameters:
execute block
returns(
   CODE_SEX INTEGER,
   NAME VARCHAR(70),
   NAME_EN VARCHAR(70)
)
as
declare xSQL varchar(8191);
declare xCODE_SEX INT = 1;
begin
  xSQL = '
SELECT
  CODE_SEX,
  NAME,
  NAME_EN
FROM sex
WHERE CODE_SEX = :A_CODE_SEX
';
  for
    execute statement (:xSQL)
    (A_CODE_SEX := xCODE_SEX)
    on external ':odbc:DRIVER={MariaDB ODBC 3.1 Driver};SERVER=127.0.0.1;PORT=3306;DATABASE=test;TCPIP=1;CHARSET=utf8mb4;UID=test'
    as user null password '12345'
    into CODE_SEX, NAME, NAME_EN
  do
    suspend;
end
10.2.5. Restricting the use of input parameters
For named parameters to work, the EDS (EXTERNAL DATA SOURCE) subsystem uses an internal preparser of queries, which replaces all parameters of the form :<name> with ? and retains the binding of the parameter name and its number. Therefore, this only works for queries whose syntax is similar to Firebird’s. For example, for CALL statements, named parameters will not work. In this case, you must use unnamed parameters.
When executing prepare, Firebird obtains the types, sizes, and other properties of input and output query parameters. Further, based on these data, input and output messages are built, buffers for data exchange are allocated.
Not all ODBC drivers support describing input parameters with the SQLDescribeParam function. Some ODBC drivers formally support this function, but in fact the description does not correspond to reality. For example ODBC driver for MySQL for all parameters returns type SQL_VARCHAR with a length of 255 characters.
11. RSA-UDR — security functions to sign documents and verify signatures
HQbird includes RSA-UDR which contains the set of useful security functions. These functions can be useful to protect documents (stored as VARCHARs, BLOBs and even external files) with digital signature.
|
Important
This RSA-UDR is not required if using Firebird 4.0 and higher, as these functions are built-in. |
|
Please note!
To use RSA-UDR functions, you need to register them in your database with an appropriate SQL script.
The script is available in |
Let’s consider functions from this library and examples their usage.
| Function Name | Description |
|---|---|
BIN2HEX |
Convert binary representation to HEX |
BIN2HEXB |
Convert BLOB binary representation to HEX |
CRC32 |
Calculate checksum |
CRC32B |
Calculate BLOB checksum |
DECODE_BASE64 |
Decode from Base64 |
DECODE_BASE64B |
Decode BLOB from Base64 |
ENCODE_BASE64 |
Encode to Base64 |
ENCODE_BASE64B |
Encode BLOB to Base64 |
HEX2BIN |
Convert HEX to binary |
HEX2BINB |
Convert NEX BLOB to binary |
MD5 |
Calculate MD5 hash sum |
MD5B |
Calculate BLOB MD5 hash sum |
RSA_PUBLIC_KEY |
Generate public key |
RSA_PRIVATE_KEY |
Generate private key |
RSA_SIGN |
Sign object |
RSA_VERIFY |
Verify the signature |
SHA1 |
Calculate SHA |
SHA1B |
Calculate SHA for BLOB |
SHA256 |
Calculate SHA256 |
SHA256B |
Calculate SHA256 for BLOB |
Let’s consider the simplified example how to use these functions to sign some document and verify the signature.
For simplicity, we will put the document, private key, public key, digest (hash sum of the document) and signature will be in the same table, in the single column:
 SQL> show table TBL;

 DOC BLOB segment 80, subtype BINARY Nullable
 DIGEST VARCHAR(32) CHARACTER SET OCTETS Nullable
 SALTLEN INTEGER Nullable
 PRIVATE_KEY VARCHAR(2048) CHARACTER SET OCTETS Nullable
 SIGN VARCHAR(1024) CHARACTER SET OCTETS Nullable
 PUBLIC_KEY VARCHAR(512) CHARACTER SET OCTETS Nullable
 BAD_SIGN VARCHAR(1024) CHARACTER SET OCTETS Nullable
Then, let’s go through the example:
 -- First, we will connect to the database:

 C:\HQbird\Firebird30>isql localhost:c:\temp\rsatest.fdb -user SYSDBA -pass masterkey
 Database: localhost:c:\temp\rsatest.fdb, User: SYSDBA

 -- and then we will check that functions are registered
 SQL> show functions;
 Global functions

 Function Name Invalid Dependency, Type
 ================================= ======= =====================================
 RSA_PRIVATE_KEY
 RSA_PUBLIC_KEY
 RSA_SIGN
 RSA_VERIFY
 SHA256


 -- clean the test table
 SQL>delete from tbl
 SQL>commit;

 -- generate private key and write
 -- it into table TBL (normally, the private will be kept in the - secret place)

 SQL>insert into tbl(PRIVATE_KEY) values(rsa_private_key(1024));

 -- generate public key
 SQL>update tbl set PUBLIC_KEY = rsa_public_key(PRIVATE_KEY);

 -- create BLOB document
 SQL>update TBL set DOC='testtesttest';

 -- and calculate its digest
 SQL>update tbl set digest = sha256(doc);

 –- sign document and remember its signature
 SQL>update tbl set sign = rsa_sign(digest, PRIVATE_KEY, 8);

 -- check the signature
 SQL> select RSA_VERIFY(SIGN, DIGEST, PUBLIC_KEY, SALTLEN) from tbl;

 RSA_VERIFY
 ==========
 <true>
 -- as you can see, signature is valid

 –- change the document (BLOB)
 SQL> update TBL set DOC='testtesttest222';

 -- recalculate its digest
 SQL> update tbl set digest = sha256(doc);

 -- check signature
 SQL> select rsa_verify(sign, digest, PUBLIC_KEY, 8) from tbl;

 RSA_VERIFY
 ==========
 <false>
 -- we can see that protected document was changed
Examples of BIN2HEX and HEX2BIN functions
 SQL> set list;
 SQL> select bin2hex('Test string') from rdb$database;

 BIN2HEX 5465737420737472696E67

 SQL> select cast (hex2bin('5465737420737472696E67') as varchar(32))
 CON> from rdb$database;

 CAST     Test string
11.1. How to use RSA-UDR security and conversion functions
In general, RSA-UDR functions allow to seal electronic documents of all types (DOC, PDF, XML, JPG, PNG, etc), and then detect unauthorized changes.
Conversion functions make easy BIN→HEX and HEX→BIN conversions, as well as Base64 encoding and decoding.
12. SPLIT-UDR — procedures to splitting strings by separator
HQbird includes SPLIT-UDR which contains the set of useful stored procedures. These procedures can be useful to splitting string (stored as VARCHAR or BLOB) by separator.
|
Please note!
To use SPLIT-UDR functions, you need to register them in your database with an appropriate SQL script.
The script is available in |
For convenience, procedures for splitting text by separator are packed in the SPLIT_UTILS package.
Let’s consider procedures from this library and examples their usage.
| Procedure Name | Description |
|---|---|
|
Splits the string at the delimiter and returns a set of |
|
Splits the string at the delimiter and returns a set of |
|
Splits the string at the delimiter and returns a set of |
|
Splits the string at the delimiter and returns a set of |
|
Splits the string at the delimiter and returns a set of |
|
Splits the string at the delimiter and returns a set of |
|
Splits the string at the delimiter and returns a set of |
|
Splits the string at the delimiter and returns a set of |
|
Splits the string at the delimiter and returns a set of |
The first argument of these procedures is a BLOB with subtype TEXT, the second is a string of type VARCHAR(10).
The output type depends on the name of the procedure.
Let’s look at simple examples of how to use these procedures.
SQL> select cast(out_str as varchar(10)) from SPLIT_UTILS.split_str('abc##defg##aa', '##');

CAST
==========
abc
defg
aa

SQL> select out_int from SPLIT_UTILS.split_int('1,2,3,4,5', ',');

     OUT_INT
============
           1
           2
           3
           4
           5
In addition, SPLIT-UDR also contains procedures for splitting text into tokens (the text is split into several separators). These procedures are declared as follows:
CREATE OR ALTER PROCEDURE SPLIT_WORDS (
    IN_TXT        BLOB SUB_TYPE TEXT CHARACTER SET UTF8,
    IN_SEPARATORS VARCHAR(50) CHARACTER SET UTF8 DEFAULT NULL)
RETURNS (
    WORD VARCHAR(8191) CHARACTER SET UTF8)
EXTERNAL NAME 'splitudr!strtok' ENGINE UDR;

CREATE OR ALTER PROCEDURE SPLIT_WORDS_S (
    IN_TXT        VARCHAR(8191) CHARACTER SET UTF8,
    IN_SEPARATORS VARCHAR(50) CHARACTER SET UTF8 DEFAULT NULL)
RETURNS (
    WORD VARCHAR(8191) CHARACTER SET UTF8)
EXTERNAL NAME 'splitudr!strtok_s' ENGINE UDR;
Input parameters:
-
IN_TXT- input text of typeBLOB SUB_TYPE TEXTorVARCHAR (8191) -
IN_SEPARATORS- a list of separators (a string with separator symbols), if not specified, then separators are used " \n\r\t,.?!:;/\|<>[]{}()@#$%^&*-+='"~`"
Example:
  SELECT
    w.WORD
  FROM DOCS
  LEFT JOIN SPLIT_WORDS(DOCS.CONTENT) w ON TRUE
  WHERE DOCS.DOC_ID = 4
13. OCR-UDR — function to recognizing text from images
HQbird includes OCR-UDR which contains function to recognizing text from images.
UDR OCR is based on the free text recognition library Tesseract OCR 4.1, released under the Apache License, Version 2.0.
To register OCR-UDR, you need to execute the following script:
CREATE OR ALTER FUNCTION GET_OCR_TEXT (
    PIX_DATA BLOB SUB_TYPE BINARY,
    PPI      SMALLINT = NULL)
RETURNS BLOB SUB_TYPE TEXT
EXTERNAL NAME 'ocrudr!getOcrText!eng' ENGINE UDR;

COMMENT ON FUNCTION GET_OCR_TEXT IS
'Recognizing text from images';

COMMENT ON PARAMETER GET_OCR_TEXT.PIX_DATA IS
'Image';

COMMENT ON PARAMETER GET_OCR_TEXT.PPI IS
'Pix Per Inch. Some image formats do not store this information. For scanned
pages are usually 200-300 ppi. The minimum value is 70.';|
Pay attention to the Where is The set contains a limited number of dictionaries. A complete list of dictionaries is available at: https://github.com/tesseract-ocr/tessdata_best (high recognition quality) or https://github.com/tesseract-ocr/tessdata_fast (high recognition speed). |
The library supports text recognition from images in PNG, JPEG, GIF formats.
13.1. Example of using OCR-UDR
Suppose you have a DOCS table that stores scans of documents, defined as follows:
CREATE TABLE DOCS (
    ID         BIGINT GENERATED BY DEFAULT AS IDENTITY,
    NAME       VARCHAR(127) NOT NULL,
    PIC        BLOB SUB_TYPE 0,
    TXT        BLOB SUB_TYPE TEXT,
    PROCESSED  BOOLEAN DEFAULT FALSE NOT NULL,
    CONSTRAINT PK_DOCS PRIMARY KEY (ID)
);
Images for recognition are saved in the PIC field, the recognized text in the TXT field.
To recognize text from a single image, you can use the query:
SELECT GET_OCR_TEXT(pic, 200) as txt
FROM docs
WHERE docs.id = 2;
The next query recognizes text from images and saves it to the TXT field.
UPDATE DOCS
SET TXT = GET_OCR_TEXT(PIC, 200),
    PROCESSED = TRUE
WHERE PROCESSED IS FALSE;
14. LK-JSON-UDR — building and parsing JSON
HQbird includes UDR library udr-lkJSON for building and parsing JSON on the server side. The library is distributed open source under the MIT license and is free to use. It is written in Free Pascal. Source code is available at https://github.com/mnf71/udr-lkJSON
14.1. Install UDR lkJSON
To use the UDR lkJSON library, you need to register it in your database.
To do this, run one of the scripts plugin/UDR/udrJSON.sql or plugin/UDR/udrJSON-utf8.sql, depending on the encoding of your database
(the first will work for any single-byte encoding).
After installing the UDR, it can be verified using the https://github.com/mnf71/udr-lkJSON/blob/main/verify.sql script.
The script calls a function to parse the JSON and build it back into a string. If the original JSON is the same as the newly assembled JSON, then everything is in order. In reality, the strings will not completely match, since the JSON is assembled without taking into account the beautiful formatting. But the content must be identical.
Verification occurs for two sets (procedure + function):
-
js$func.ParseText— parsing JSON given as BLOB.js$func.GenerateText— JSON assembly with BLOB return. -
js$func.ParseString— parsing JSON given asVARCHAR(N).js$func.GenerateString— JSON assembly returningVARCHAR(N).
14.2. How it works?
The udr-lkJSON library is based on the free lkJSON library for generating and parsing JSON. Therefore, in order to have a good idea of how to work with UDR-lkJSON, it is advisable to familiarize yourself with the lkjson library (see https://sourceforge.net/projects/lkjson/).
When parsing JSON, some elements can be simple types that exist in Firebird (INTEGER, DOUBLE PRECISION,
VARCHAR (N), BOOLEAN), and some complex ones are objects and arrays. Complex objects are returned as a pointer to
an internal object from the lkJSON library. The pointer maps to the TY$POINTER domain. This domain is defined as follows:
CREATE DOMAIN TY$POINTER AS
CHAR(8) CHARACTER SET OCTETS;
In addition, if NULL is encountered in JSON, then it will not be returned to simple types! You will have to recognize this value separately. This is because the UDR-lkJSON library simply copies the methods of the lkJSON library classes into PSQL packages. And as you know, simple types in Pascal do not have a separate state for NULL.
14.3. Description of PSQL packages from UDR-lkJSON
14.3.1. JS$BASE package
The header of this package looks like this:
CREATE OR ALTER PACKAGE JS$BASE
AS
BEGIN
  /* TlkJSONbase = class
     TlkJSONtypes =
       (jsBase, jsNumber, jsString, jsBoolean, jsNull, jsList, jsObject);
        0       1         2         3          4       5       6
  */
  FUNCTION Dispose(Self TY$POINTER) RETURNS SMALLINT; /* 0 - succes */

  FUNCTION Field(Self TY$POINTER, Name VARCHAR(128) CHARACTER SET NONE /* = Idx */) RETURNS TY$POINTER;

  FUNCTION Count_(Self TY$POINTER) RETURNS INTEGER;
  FUNCTION Child(Self TY$POINTER, Idx INTEGER, Obj TY$POINTER = NULL /* Get */) RETURNS TY$POINTER;

  FUNCTION Value_(Self TY$POINTER, Val VARCHAR(32765) CHARACTER SET NONE = NULL /* Get */) RETURNS VARCHAR(32765) CHARACTER SET NONE;
  FUNCTION WideValue_(Self TY$POINTER, WVal BLOB SUB_TYPE TEXT = NULL /* Get */) RETURNS BLOB SUB_TYPE TEXT;

  FUNCTION SelfType(Self TY$POINTER = NULL /* NULL - class function */) RETURNS SMALLINT;
  FUNCTION SelfTypeName(Self TY$POINTER = NULL /* NULL - class function */) RETURNS VARCHAR(32) CHARACTER SET NONE;
END
As you can see from the comment, this package is a blueprint for the TlkJSONbase class. It contains basic functionality for working with JSON.
The Dispose function is designed to release a pointer to a JSON object. Pointers to be forcibly freed are the
result of parsing or JSON generation. You should not call it on intermediate objects when parsing or assembling JSON.
It is only required for the top-level object.
The Field function returns a pointer to an object field. The first parameter is a pointer to the object,
the second is the field name. If the field does not exist, then the function will return a null pointer
(This is not NULL, but x'0000000000000000').
The Count_ function returns the number of items in a list or fields in an object. A pointer to an object or a list
is specified as a parameter.
The Child function returns or sets the value for the element at index Idx in the Self object or list.
If the Obj parameter is not specified, then it returns a pointer to the element from the Idx indices.
If Obj is specified, then sets its value to the element with indices Idx. Note Obj is a pointer to one of the TlkJSONbase descendants.
The Value_ function returns or sets in the form of a JSON string (VARCHAR) the value for the object specified
in the Self parameter. If the Val parameter is not specified, then the value is returned; otherwise, it is set.
The WideValue_ function returns or sets as a JSON string (BLOB SUB_TYPE TEXT) the value for the object specified
in the Self parameter. If the Val parameter is not specified, then the value is returned; otherwise, it is set.
The SelfType function returns the type of the object for the pointer specified in the Self parameter.
The object type is returned as a number, where
-
0 — jsBase
-
1 — jsNumber
-
2 — jsString
-
3 — jsBoolean
-
4 — jsNull
-
5 — jsList
-
6 — jsObject
If the Self parameter is not specified, it will return 0.
The SelfTypeName function returns the object type for the pointer specified in the Self parameter.
The object type is returned as a string. If the Self parameter is not specified, it will return 'jsBase'.
14.3.2. JS$BOOL package
The header of this package looks like this:
CREATE OR ALTER PACKAGE JS$BOOL
AS
BEGIN
  /* TlkJSONbase = class
     TlkJSONboolean = class(TlkJSONbase)
  */
  FUNCTION Value_(Self TY$POINTER, Bool BOOLEAN = NULL /* Get */) RETURNS BOOLEAN;

  FUNCTION Generate(Self TY$POINTER = NULL /* NULL - class function */, Bool BOOLEAN = TRUE) RETURNS TY$POINTER;

  FUNCTION SelfType(Self TY$POINTER = NULL /* NULL - class function */) RETURNS SMALLINT;
  FUNCTION SelfTypeName(Self TY$POINTER = NULL /* NULL - class function */) RETURNS VARCHAR(32) CHARACTER SET NONE;
END
As you can see from the comment, this package is a blueprint for the TlkJSONboolean class.
It is designed to work with the BOOLEAN datatype.
The Value_ function returns or sets to a boolean value for the object specified in the Self parameter.
If the Bool parameter is not specified, then the value will be returned, if specified — set.
Note that NULL is not returned and cannot be set by this method, there is a separate JS$NULL package for this.
The Generate function returns a pointer to a new TlkJSONboolean object, which is a Boolean value in JSON.
The Self parameter is a pointer to the JSON object on the basis of which the TlkJSONboolean object is created.
The boolean value is specified in the Bool parameter.
The SelfType function returns the type of the object for the pointer specified in the Self parameter.
The object type is returned as a number. If the Self parameter is not specified, it will return 3.
The SelfTypeName function returns the object type for the pointer specified in the Self parameter.
The object type is returned as a string. If the Self parameter is not specified, it will return 'jsBoolean'.
14.3.3. JS$CUSTLIST package
The header of this package looks like this:
CREATE OR ALTER PACKAGE JS$CUSTLIST
AS
BEGIN
  /* TlkJSONbase = class
     TlkJSONcustomlist = class(TlkJSONbase)
  */
  PROCEDURE ForEach
    (Self TY$POINTER) RETURNS (Idx Integer, Name VARCHAR(128) CHARACTER SET NONE, Obj TY$POINTER /* js$Base */);

  FUNCTION Field(Self TY$POINTER, Name VARCHAR(128) CHARACTER SET NONE /* = Idx */) RETURNS TY$POINTER;
  FUNCTION Count_(Self TY$POINTER) RETURNS INTEGER;
  FUNCTION Child(Self TY$POINTER, Idx INTEGER, Obj TY$POINTER = NULL /* Get */) RETURNS TY$POINTER;

  FUNCTION GetBoolean(Self TY$POINTER, Idx INTEGER) RETURNS BOOLEAN;
  FUNCTION GetDouble(Self TY$POINTER, Idx INTEGER) RETURNS DOUBLE PRECISION;
  FUNCTION GetInteger(Self TY$POINTER, Idx INTEGER) RETURNS INTEGER;
  FUNCTION GetString(Self TY$POINTER, Idx INTEGER) RETURNS VARCHAR(32765) CHARACTER SET NONE;
  FUNCTION GetWideString(Self TY$POINTER, Idx INTEGER) RETURNS BLOB SUB_TYPE TEXT;
END
As you can see from the comment, this package is a blueprint for the TlkJSONcustomlist class.
This type is basic when working with objects and lists. All procedures and functions of this package can be used
as JSON of the object type, and JSON of the list type.
The ForEach procedure retrieves each list item or each object field from the JSON pointer specified in Self.
The following values are returned:
-
Idx— the index of the list item or the number of the field in the object. Starts at 0. -
Name— the name of the next field, ifSelfis an object. Or the index of the list item, starting at 0, ifSelfis a list. -
Objis a pointer to the next element of the list or object field.
The Field function returns a pointer to a field by its name from the object specified in Self.
Instead of a field name, you can specify the item number in the list or the field number. Numbering starts from 0.
The Count_ function returns the number of items in a list or fields in an object specified in the Self parameter.
The Child function returns or sets the value for the element at index Idx in the Self object or list.
Indexing starts from 0. If the Obj parameter is not specified, then it returns a pointer to the element from the Idx indices.
If Obj is specified, then sets its value to the element with indices Idx. Note Obj is a pointer to one of the TlkJSONbase descendants.
The GetBoolean function returns the boolean value of an object field or array element with index Idx. Indexing starts at 0.
The GetDouble function returns the floating point value of an object field or array element with index Idx. Indexing starts at 0.
The GetInteger function returns the integer value of an object field or array element with index Idx. Indexing starts at 0.
The GetString function returns the character value (VARCHAR) of an object field or array element with index Idx. Indexing starts at 0.
The GetWideString function returns the BLOB SUB_TYPE TEXT of an object field or array element with index Idx. Indexing starts at 0.
|
The functions |
14.3.4. JS$FUNC package
The header of this package looks like this:
CREATE OR ALTER PACKAGE JS$FUNC
AS
BEGIN
  FUNCTION ParseText(Text BLOB SUB_TYPE TEXT, Conv BOOLEAN = FALSE) RETURNS TY$POINTER;
  FUNCTION ParseString(String VARCHAR(32765) CHARACTER SET NONE, Conv BOOLEAN = FALSE) RETURNS TY$POINTER;

  FUNCTION GenerateText(Obj TY$POINTER, Conv BOOLEAN = FALSE) RETURNS BLOB SUB_TYPE TEXT;
  FUNCTION GenerateString(Obj TY$POINTER, Conv BOOLEAN = FALSE) RETURNS VARCHAR(32765) CHARACTER SET NONE;

  FUNCTION ReadableText(Obj TY$POINTER, Level INTEGER = 0, Conv BOOLEAN = FALSE)
    RETURNS BLOB SUB_TYPE TEXT;
END
This package contains a set of functions for parsing JSON or converting JSON to string.
The ParseText function parses JSON specified as a string of BLOB SUB_TYPE TEXT type in the Text parameter.
If you pass TRUE in the Conv parameter, then the JSON text of the string will be converted from UTF8 encoding to general.
The ParseString function parses the JSON specified as a VARCHAR (N) string in the String parameter.
If you pass TRUE in the Conv parameter, then the JSON text of the string will be converted from UTF8 encoding to general.
The GenerateText function returns JSON as a BLOB SUB_TYPE TEXT string. If TRUE is passed in the Conv parameter,
then the text returned by this function will be converted to UTF8.
The GenerateString function returns JSON as a VARCHAR (N) string.
If TRUE is passed in the Conv parameter, then the text returned by this function will be converted to UTF8.
The ReadableText function returns JSON as a human-readable string of type BLOB SUB_TYPE TEXT.
The Level parameter sets the number of indents for the first level.
This is required if the generated string is part of another JSON. If TRUE is passed in the Conv parameter,
then the text returned by this function will be converted to UTF8.
|
Use of the |
14.3.5. JS$LIST package
The header of this package looks like this:
CREATE OR ALTER PACKAGE JS$LIST
AS
BEGIN
  /* TlkJSONbase = class
     TlkJSONcustomlist = class(TlkJSONbase)
     TlkJSONlist = class(TlkJSONcustomlist)
  */
  PROCEDURE ForEach
    (Self TY$POINTER) RETURNS (Idx Integer, Name VARCHAR(128) CHARACTER SET NONE, Obj TY$POINTER /* js$Base */);

  FUNCTION Add_(Self TY$POINTER, Obj TY$POINTER) RETURNS INTEGER;
  FUNCTION AddBoolean(Self TY$POINTER, Bool BOOLEAN) RETURNS INTEGER;
  FUNCTION AddDouble(Self TY$POINTER, Dbl DOUBLE PRECISION) RETURNS INTEGER;
  FUNCTION AddInteger(Self TY$POINTER, Int_ INTEGER) RETURNS INTEGER;
  FUNCTION AddString(Self TY$POINTER, Str VARCHAR(32765) CHARACTER SET NONE) RETURNS INTEGER;
  FUNCTION AddWideString(Self TY$POINTER, WStr BLOB SUB_TYPE TEXT) RETURNS INTEGER;

  FUNCTION Delete_(Self TY$POINTER, Idx Integer) RETURNS SMALLINT;
  FUNCTION IndexOfObject(Self TY$POINTER, Obj TY$POINTER) RETURNS INTEGER;
  FUNCTION Field(Self TY$POINTER, Name VARCHAR(128) CHARACTER SET NONE /* = Idx */) RETURNS TY$POINTER;

  FUNCTION Count_(Self TY$POINTER) RETURNS INTEGER;
  FUNCTION Child(Self TY$POINTER, Idx INTEGER, Obj TY$POINTER = NULL /* Get */) RETURNS TY$POINTER;

  FUNCTION Generate(Self TY$POINTER = NULL /* NULL - class function */) RETURNS TY$POINTER;

  FUNCTION SelfType(Self TY$POINTER = NULL /* NULL - class function */) RETURNS SMALLINT;
  FUNCTION SelfTypeName(Self TY$POINTER = NULL /* NULL - class function */) RETURNS VARCHAR(32) CHARACTER SET NONE;
END
As you can see from the comment, this package is a blueprint for the TlkJSONlist class. It is designed to work with a list.
The ForEach procedure retrieves each list item or each object field from the JSON pointer specified in Self.
The following values are returned:
-
Idx— the index of the list item or the number of the field in the object. Starts at 0. -
Name— the name of the next field, ifSelfis an object. Or the index of the list item, starting at 0, ifSelfis a list. -
Objis a pointer to the next element of the list or object field.
The Add_ function adds a new item to the end of the list, the pointer to which is specified in the Self parameter.
The element to add is specified in the Obj parameter, which must be a pointer to one of the TlkJSONbase descendants.
The function returns the index of the newly added element.
The AddBoolean function adds a new boolean element to the end of the list pointed to by the Self parameter.
The function returns the index of the newly added element.
The AddDouble function adds a new element of real type to the end of the list, the pointer to which is specified
in the Self parameter. The function returns the index of the newly added element.
The AddInteger function adds a new integer element to the end of the list pointed to by the Self parameter.
The function returns the index of the newly added element.
The AddString function adds a new element of string type (VARCHAR (N)) to the end of the list pointed to
by the Self parameter. The function returns the index of the newly added element.
The AddWideString function adds a new BLOB SUB_TYPE TEXT to the end of the list pointed to by the Self parameter.
The function returns the index of the newly added element.
The Delete_ function removes an element from the list with index Idx. The function returns 0.
The IndexOfObject function returns the index of an item in a list. The pointer to the list is specified in the Self parameter.
The Obj parameter specifies a pointer to the element whose index is being defined.
The Field function returns a pointer to a field by its name from the object specified in Self.
Instead of a field name, you can specify the item number in the list or the field number. Numbering starts from 0.
The Count_ function returns the number of items in a list or fields in an object specified in the Self parameter.
The Child function returns or sets the value for the element at index Idx in the Self object or list.
Indexing starts from 0. If the Obj parameter is not specified, then it returns a pointer to the element from the Idx indices.
If Obj is specified, then sets its value to the element with indices Idx. Note Obj is a pointer to one of the TlkJSONbase descendants.
The Generate function returns a pointer to a new TlkJSONlist object, which is an empty list.
The Self parameter is a pointer to the JSON object on the basis of which the TlkJSONlist is created.
The SelfType function returns the type of the object for the pointer specified in the Self parameter.
The object type is returned as a number. If the Self parameter is not specified, it will return 5.
14.3.6. JS$METH package
The header of this package looks like this:
CREATE OR ALTER PACKAGE JS$METH
AS
BEGIN
  /* TlkJSONbase = class
     TlkJSONobjectmethod = class(TlkJSONbase)
  */
  FUNCTION MethodObjValue(Self TY$POINTER) RETURNS TY$POINTER;
  FUNCTION MethodName(Self TY$POINTER, Name VARCHAR(128) CHARACTER SET NONE = NULL /* Get */) RETURNS VARCHAR(128) CHARACTER SET NONE;
  FUNCTION MethodGenerate(Self TY$POINTER, Name VARCHAR(128) CHARACTER SET NONE, Obj TY$POINTER /* js$Base */)
    RETURNS TY$POINTER /* js$Meth */;
END
As you can see from the comment, this package is a blueprint for the TlkJSONobjectmethod class. It is a key-value pair.
The MethodObjValue function returns a pointer to the value from the key-value pair specified in the Self parameter.
The MethodName function returns or sets the key name for the key-value pair specified in the Self parameter.
If the Name parameter is not specified, then returns the name of the key, if specified, then sets the new name of the key.
The MethodGenerate function creates a new key-value pair and returns a pointer to it. The Name parameter specifies
the name of the key, and the Obj parameter specifies a pointer to the key value.
14.3.7. JS$NULL package
The header of this package looks like this:
CREATE OR ALTER PACKAGE JS$NULL
AS
BEGIN
  /* TlkJSONbase = class
     TlkJSONnull = class(TlkJSONbase)
  */
  FUNCTION Value_(Self TY$POINTER) RETURNS SMALLINT;

  FUNCTION Generate(Self TY$POINTER = NULL /* NULL - class function */) RETURNS TY$POINTER;

  FUNCTION SelfType(Self TY$POINTER = NULL /* NULL - class function */) RETURNS SMALLINT;
  FUNCTION SelfTypeName(Self TY$POINTER = NULL /* NULL - class function */) RETURNS VARCHAR(32) CHARACTER SET NONE;
END
As you can see from the comment, this package is a blueprint for the TlkJSONnull class. It is designed to handle NULL values.
Value_ returns 0 if the value of the object in Self is null (jsNull), and 1 otherwise.
The Generate function returns a pointer to a new TlkJSONnull object, which is null.
The Self parameter is a pointer to the JSON object on the basis of which TlkJSONnull is created.
The SelfType function returns the type of the object for the pointer specified in the Self parameter.
The object type is returned as a number. If the Self parameter is not specified, it will return 4.
The SelfTypeName function returns the object type for the pointer specified in the Self parameter.
The object type is returned as a string. If the Self parameter is not specified, it will return 'jsNull'.
14.3.8. JS$NUM package
The header of this package looks like this:
CREATE OR ALTER PACKAGE JS$NUM
AS
BEGIN
  /* TlkJSONbase = class
     TlkJSONnumber = class(TlkJSONbase)
  */
  FUNCTION Value_(Self TY$POINTER, Num DOUBLE PRECISION = NULL /* Get */) RETURNS DOUBLE PRECISION;

  FUNCTION Generate(Self TY$POINTER = NULL /* NULL - class function */, Num DOUBLE PRECISION = 0) RETURNS TY$POINTER;

  FUNCTION SelfType(Self TY$POINTER = NULL /* NULL - class function */) RETURNS SMALLINT;
  FUNCTION SelfTypeName(Self TY$POINTER = NULL /* NULL - class function */) RETURNS VARCHAR(32) CHARACTER SET NONE;
END
As you can see from the comment, this package is a blueprint for the TlkJSONnumber class. It is designed to handle numeric values.
The Value_ function returns or sets to a value of a numeric type for the object specified in the Self parameter.
If the Num parameter is not specified, then the value will be returned, if specified — set.
Note that NULL is not returned and cannot be set by this method, there is a separate JS$NULL package for this.
The Generate function returns a pointer to a TlkJSONnumber object, which is a JSON numeric value.
The Self parameter is a pointer to the JSON object on the basis of which the TlkJSONnumber object is created.
The Num parameter is a numeric value.
The SelfType function returns the type of the object for the pointer specified in the Self parameter.
The object type is returned as a number. If the Self parameter is not specified, it will return 1.
The SelfTypeName function returns the object type for the pointer specified in the Self parameter.
The object type is returned as a string. If the Self parameter is not specified, it will return 'jsNumber'.
14.3.9. JS$OBJ package
The header of this package looks like this:
CREATE OR ALTER PACKAGE JS$OBJ
AS
BEGIN
  /* TlkJSONbase = class
     TlkJSONcustomlist = class(TlkJSONbase)
     TlkJSONobject = class(TlkJSONcustomlist)
  */
  FUNCTION New_(UseHash BOOLEAN = TRUE) RETURNS TY$POINTER;
  FUNCTION Dispose(Self TY$POINTER) RETURNS SMALLINT; /* 0 - succes */

  PROCEDURE ForEach(Self TY$POINTER) RETURNS (Idx INTEGER,  Name VARCHAR(128) CHARACTER SET NONE, Obj TY$POINTER /* js$Meth */);

  FUNCTION Add_(Self TY$POINTER, Name VARCHAR(128) CHARACTER SET NONE, Obj TY$POINTER) RETURNS INTEGER;
  FUNCTION AddBoolean(Self TY$POINTER, Name VARCHAR(128) CHARACTER SET NONE, Bool BOOLEAN) RETURNS INTEGER;
  FUNCTION AddDouble(Self TY$POINTER, Name VARCHAR(128) CHARACTER SET NONE, Dbl DOUBLE PRECISION) RETURNS INTEGER;
  FUNCTION AddInteger(Self TY$POINTER, Name VARCHAR(128) CHARACTER SET NONE, Int_ INTEGER) RETURNS INTEGER;
  FUNCTION AddString(Self TY$POINTER, Name VARCHAR(128) CHARACTER SET NONE, Str VARCHAR(32765) CHARACTER SET NONE) RETURNS INTEGER;
  FUNCTION AddWideString(Self TY$POINTER, Name VARCHAR(128) CHARACTER SET NONE, WStr BLOB SUB_TYPE TEXT) RETURNS INTEGER;

  FUNCTION Delete_(Self TY$POINTER, Idx Integer) RETURNS SMALLINT;
  FUNCTION IndexOfName(Self TY$POINTER, Name VARCHAR(128) CHARACTER SET NONE) RETURNS INTEGER;
  FUNCTION IndexOfObject(Self TY$POINTER, Obj TY$POINTER) RETURNS INTEGER;
  FUNCTION Field(Self TY$POINTER, Name VARCHAR(128) CHARACTER SET NONE /* = Idx */, Obj TY$POINTER = NULL /* Get */) RETURNS TY$POINTER;

  FUNCTION Count_(Self TY$POINTER) RETURNS INTEGER;
  FUNCTION Child(Self TY$POINTER, Idx INTEGER, Obj TY$POINTER = NULL /* Get */) RETURNS TY$POINTER;

  FUNCTION Generate(Self TY$POINTER = NULL /* NULL - class function */, UseHash BOOLEAN = TRUE) RETURNS TY$POINTER;

  FUNCTION SelfType(Self TY$POINTER = NULL /* NULL - class function */) RETURNS SMALLINT;
  FUNCTION SelfTypeName(Self TY$POINTER = NULL  /* NULL - class function */) RETURNS VARCHAR(32) CHARACTER SET NONE;

  FUNCTION FieldByIndex(Self TY$POINTER, Idx INTEGER, Obj TY$POINTER = NULL /* Get */) RETURNS TY$POINTER;
  FUNCTION NameOf(Self TY$POINTER, Idx INTEGER) RETURNS VARCHAR(128) CHARACTER SET NONE;

  FUNCTION GetBoolean(Self TY$POINTER, Idx INTEGER) RETURNS BOOLEAN;
  FUNCTION GetDouble(Self TY$POINTER, Idx INTEGER) RETURNS DOUBLE PRECISION;
  FUNCTION GetInteger(Self TY$POINTER, Idx INTEGER) RETURNS INTEGER;
  FUNCTION GetString(Self TY$POINTER, Idx INTEGER) RETURNS VARCHAR(32765) CHARACTER SET NONE;
  FUNCTION GetWideString(Self TY$POINTER, Idx INTEGER) RETURNS BLOB SUB_TYPE TEXT;

  FUNCTION GetBooleanByName(Self TY$POINTER, Name VARCHAR(128) CHARACTER SET NONE) RETURNS BOOLEAN;
  FUNCTION GetDoubleByName(Self TY$POINTER, Name VARCHAR(128) CHARACTER SET NONE) RETURNS DOUBLE PRECISION;
  FUNCTION GetIntegerByName(Self TY$POINTER, Name VARCHAR(128) CHARACTER SET NONE) RETURNS INTEGER;
  FUNCTION GetStringByName(Self TY$POINTER, Name VARCHAR(128) CHARACTER SET NONE) RETURNS VARCHAR(32765) CHARACTER SET NONE;
  FUNCTION GetWideStringByName(Self TY$POINTER, Name VARCHAR(128) CHARACTER SET NONE) RETURNS BLOB SUB_TYPE TEXT;
END
As you can see from the comment, this package is a blueprint for the TlkJSONobject class. It is designed to handle object values.
The New_ function creates and returns a pointer to a new empty object.
If UseHash is set to TRUE (the default value), then the HASH table will be used to search for fields within the object,
otherwise the search will be performed by simple iteration.
The Dispose function is designed to release a pointer to a JSON object.
Pointers to be forcibly freed are the result of parsing or JSON generation.
You should not call it on intermediate objects when parsing or assembling JSON. It is only required for the top-level object.
The ForEach procedure retrieves each object field from the JSON pointer specified in Self. The following values are returned:
-
Idx— the index of the list item or the number of the field in the object. Starts at 0. -
Name— the name of the next field, ifSelfis an object. Or the index of the list item, starting at 0, ifSelfis a list. -
Objis a pointer to a key-value pair (to handle such a pair, you must use theJS$METHpackage).
The Add_ function adds a new field to the object, the pointer to which is specified in the Self parameter.
The element to add is specified in the Obj parameter, which must be a pointer to one of the TlkJSONbase descendants.
The field name is specified in the Name parameter. The function returns the index of the newly added field.
The AddBoolean function adds a new boolean field to the object pointed to by the Self parameter.
The field name is specified in the Name parameter. The field value is specified in the Bool parameter.
The function returns the index of the newly added field.
The AddDouble function adds a new field of real type to the object, the pointer to which is specified in the Self parameter.
The field name is specified in the Name parameter. The field value is specified in the Dbl parameter.
The function returns the index of the newly added field.
The AddInteger function adds a new integer field to the object pointed to by the Self parameter.
The field name is specified in the Name parameter.
The field value is specified in the Int_ parameter. The function returns the index of the newly added field.
The AddString function adds a new field of string type (VARCHAR (N)) to the object pointed to by the Self parameter.
The field name is specified in the Name parameter. The field value is specified in the Int_ parameter.
The function returns the index of the newly added field.
The AddWideString function adds a new BLOB SUB_TYPE TEXT field to the object pointed to by the Self parameter.
The field name is specified in the Name parameter. The field value is specified in the Int_ parameter.
The function returns the index of the newly added field.
The Delete_ function removes a field from the object with the Idx index. The function returns 0.
The IndexOfName function returns the index of a field by its name.
A pointer to an object is specified in the Self parameter. The Obj parameter specifies a pointer to the element whose index is being defined.
The IndexOfObject function returns the index of a field value in an object.
A pointer to an object is specified in the Self parameter.
The Obj parameter specifies a pointer to the values of the field whose index is being determined.
The Field function returns or sets the value of a field by its name. A pointer to an object is specified in the Self parameter.
The field name is specified in the Name parameter. Instead of a field name, you can specify the item number in the list or the field number.
Numbering starts from 0. If a value other than NULL is specified in the Obj parameter, then the new value
will be written in the field, otherwise the function will return a pointer to the field value.
The Count_ function returns the number of fields in the object specified in the Self parameter.
The Child function returns or sets the value for the element at index Idx in the Self object.
Indexing starts from 0. If the Obj parameter is not specified, then it returns a pointer to the element from the Idx indices.
If Obj is specified, then sets its value to the element with indices Idx. Note Obj is a pointer to one of the TlkJSONbase descendants.
The Generate function returns a pointer to a TlkJSONobject, which is a JSON object. If UseHash is set to TRUE (the default value),
then the HASH table will be used to search for fields within the object, otherwise the search will be performed
by simple iteration. In the Self parameter, a pointer to the object is passed on the basis of which a new object
of the TlkJSONobject type is created.
The SelfType function returns the object type for the pointer specified in the Self parameter.
The object type is returned as a number. If the Self parameter is not specified, it will return 6.
The SelfTypeName function returns the object type for the pointer specified in the Self parameter.
The object type is returned as a string. If the Self parameter is not specified, it will return 'jsObject'.
The FieldByIndex function returns or sets the property as a key-value pair at the specified Idx index.
A pointer to an object is specified in the Self parameter. You must use the JS$METH package to handle the key-value pair.
If a value other than NULL is specified in the Obj parameter, then the new value will be written to the field at the
specified index, otherwise the function will return a pointer to the field.
The NameOf function returns the name of the field at its index specified in the Idx parameter.
A pointer to an object is specified in the Self parameter.
The GetBoolean function returns the boolean value of the object field with the Idx index. Indexing starts at 0.
The GetDouble function returns the floating point value of the field of the object with the Idx index. Indexing starts at 0.
The GetInteger function returns the integer value of the object field with the Idx index. Indexing starts at 0.
The GetString function returns the character value (VARCHAR) of the object field with index Idx. Indexing starts at 0.
The GetWideString function returns the BLOB SUB_TYPE TEXT of the object field with the Idx index. Indexing starts at 0.
The GetBooleanByName function returns the boolean value of an object field by its name Name.
The GetDoubleByName function returns the floating point value of an object field by its name Name.
The GetIntegerByName function returns the integer value of the object field by its name Name.
The GetStringByName function returns the character value (VARCHAR) of an object field by its name Name.
The GetWideStringByName function returns the BLOB SUB_TYPE TEXT of an object field by its Name.
14.3.10. JS$PTR package
The header of this package looks like this:
CREATE OR ALTER PACKAGE JS$PTR
AS
BEGIN
  FUNCTION New_
    (UsePtr CHAR(3) CHARACTER SET NONE /* Tra - Transaction, Att - Attachment */, UseHash BOOLEAN = TRUE)
    RETURNS TY$POINTER;
  FUNCTION Dispose(UsePtr CHAR(3) CHARACTER SET NONE) RETURNS SMALLINT;

  FUNCTION Tra RETURNS TY$POINTER;
  FUNCTION Att RETURNS TY$POINTER;

  FUNCTION isNull(jsPtr TY$POINTER) RETURNS BOOLEAN;
END
This package helps keep track of pointers that occur when creating JSON objects.
The New_ function creates and returns a pointer to a new empty object.
If the value 'Tra' is passed to the UsePtr parameter, then the pointer will be attached to the transaction,
and upon its completion it will be automatically deleted. If the 'Att' value is passed to the UsePtr parameter,
then the pointer will be attached to the connection, and when it is closed, it will be automatically deleted.
If UseHash is set to TRUE (the default value), then the HASH table will be used to search for fields within the object,
otherwise the search will be performed by simple iteration.
The Dispose function removes a pointer to a JSON object bound to a transaction or connection.
If the 'Tra' value is passed to the UsePtr parameter, the pointer associated with the transaction will be deleted.
If the 'Att' value is passed to the UsePtr parameter, then the pointer bound to the connection will be deleted.
The Tra function returns the pointer associated with the transaction.
The Att function returns the pointer attached to the connection.
The isNull function checks if the pointer is not null (with a null address).
A null pointer returns the functions js$func.ParseText and js$func.ParseString in case of incorrect JSON input,
access to a nonexistent field through the Field method, and more. This function can be used to detect such errors.
14.3.11. JS$STR package
The header of this package looks like this:
CREATE OR ALTER PACKAGE JS$STR
AS
BEGIN
  /* TlkJSONbase = class
     TlkJSONstring = class(TlkJSONbase)
  */
  FUNCTION Value_(Self TY$POINTER, Str VARCHAR(32765) CHARACTER SET NONE = NULL /* Get */) RETURNS VARCHAR(32765) CHARACTER SET NONE;
  FUNCTION WideValue_(Self TY$POINTER, WStr BLOB SUB_TYPE TEXT = NULL /* Get */) RETURNS BLOB SUB_TYPE TEXT;

  FUNCTION Generate(Self TY$POINTER = NULL /* NULL - class function */, Str VARCHAR(32765) CHARACTER SET NONE = '') RETURNS TY$POINTER;
  FUNCTION WideGenerate(Self TY$POINTER = NULL /* NULL - class function */, WStr BLOB SUB_TYPE TEXT = '') RETURNS TY$POINTER;

  FUNCTION SelfType(Self TY$POINTER = NULL /* NULL - class function */) RETURNS SMALLINT;
  FUNCTION SelfTypeName(Self TY$POINTER = NULL /* NULL - class function */) RETURNS VARCHAR(32) CHARACTER SET NONE;
END
As you can see from the comment, this package is a blueprint for the TlkJSONstring class. It is designed to handle string values.
The Value_ function returns or sets to a value of a string type (VARCHAR (N)) for the object specified in the Self parameter.
If the Str parameter is not specified, then the value will be returned, if specified — set.
Note that NULL is not returned and cannot be set by this method, there is a separate JS$NULL package for this.
The WideValue_ function returns or sets to a value of the BLOB SUB_TYPE TEXT type for the object specified in the Self parameter.
If the Str parameter is not specified, then the value will be returned, if specified — set.
Note that NULL is not returned and cannot be set by this method, there is a separate JS$NULL package for this.
The Generate function returns a pointer to a` TlkJSONstring` object, which is a JSON string value.
The Self parameter is a pointer to a JSON object on the basis of which a new TlkJSONstring object is created.
The string value is specified in the Str parameter.
The WideGenerate function returns a pointer to the TlkJSONstring object, which is a JSON string value.
The Self parameter is a pointer to a JSON object for which a long string value (BLOB SUB_TYPE TEXT) is set
in the Str parameter. The value of the Self parameter will be returned by the function if it is non-NULL,
otherwise it will return a pointer to a new TlkJSONstring object.
The SelfType function returns the object type for the pointer specified in the Self parameter.
The object type is returned as a number. If the Self parameter is not specified, it will return 2.
The SelfTypeName function returns the object type for the pointer specified in the Self parameter.
The object type is returned as a string. If the Self parameter is not specified, it will return 'jsString'.
14.4. Examples
14.4.1. Building JSON
Let’s take the employee database as an example.
|
The examples use a modified employee database converted to UTF8 encoding. |
The MAKE_JSON_DEPARTMENT_TREE function displays a list of departments in JSON format in a hierarchical format.
CREATE OR ALTER FUNCTION MAKE_JSON_DEPARTMENT_TREE
RETURNS BLOB SUB_TYPE TEXT
AS
  DECLARE VARIABLE JSON_TEXT BLOB SUB_TYPE TEXT;
  DECLARE VARIABLE JSON          TY$POINTER;
  DECLARE VARIABLE JSON_SUB_DEPS TY$POINTER;
BEGIN
  JSON = JS$OBJ.NEW_();
  FOR
      WITH RECURSIVE R
      AS (SELECT
              :JSON AS JSON,
              CAST(NULL AS TY$POINTER) AS PARENT_JSON,
              D.DEPT_NO,
              D.DEPARTMENT,
              D.HEAD_DEPT,
              D.MNGR_NO,
              D.BUDGET,
              D.LOCATION,
              D.PHONE_NO
          FROM DEPARTMENT D
          WHERE D.HEAD_DEPT IS NULL
          UNION ALL
          SELECT
              JS$OBJ.NEW_() AS JSON,
              R.JSON,
              D.DEPT_NO,
              D.DEPARTMENT,
              D.HEAD_DEPT,
              D.MNGR_NO,
              D.BUDGET,
              D.LOCATION,
              D.PHONE_NO
          FROM DEPARTMENT D
            JOIN R
                   ON D.HEAD_DEPT = R.DEPT_NO)
      SELECT
          JSON,
          PARENT_JSON,
          DEPT_NO,
          DEPARTMENT,
          HEAD_DEPT,
          MNGR_NO,
          BUDGET,
          LOCATION,
          PHONE_NO
      FROM R AS CURSOR C_DEP
  DO
  BEGIN
    -- for each departure, fill in the value of the JSON object fields
    JS$OBJ.ADDSTRING(C_DEP.JSON, 'dept_no', C_DEP.DEPT_NO);
    JS$OBJ.ADDSTRING(C_DEP.JSON, 'department', C_DEP.DEPARTMENT);
    IF (C_DEP.HEAD_DEPT IS NOT NULL) THEN
      JS$OBJ.ADDSTRING(C_DEP.JSON, 'head_dept', C_DEP.HEAD_DEPT);
    ELSE
      JS$OBJ.ADD_(C_DEP.JSON, 'head_dept', JS$NULL.GENERATE());
    IF (C_DEP.MNGR_NO IS NOT NULL) THEN
      JS$OBJ.ADDINTEGER(C_DEP.JSON, 'mngr_no', C_DEP.MNGR_NO);
    ELSE
      JS$OBJ.ADD_(C_DEP.JSON, 'mngr_no', JS$NULL.GENERATE());
    -- here ADDSTRING is probably better, since it is guaranteed to preserve the precision of the number
    JS$OBJ.ADDDOUBLE(C_DEP.JSON, 'budget', C_DEP.BUDGET);
    JS$OBJ.ADDSTRING(C_DEP.JSON, 'location', C_DEP.LOCATION);
    JS$OBJ.ADDSTRING(C_DEP.JSON, 'phone_no', C_DEP.PHONE_NO);
    -- add a list to each departure in which the subordinate departures will be entered.
    JS$OBJ.ADD_(C_DEP.JSON, 'departments', JS$LIST.GENERATE());
    IF (C_DEP.PARENT_JSON IS NOT NULL) THEN
    BEGIN
      -- where there are departments, there is also an object of the parent JSON object,
      -- we get a field with a list from it
      JSON_SUB_DEPS = JS$OBJ.FIELD(C_DEP.PARENT_JSON, 'departments');
      -- and add the current departure to it
      JS$LIST.ADD_(JSON_SUB_DEPS, C_DEP.JSON);
    END
  END
  -- generate JSON as text
  JSON_TEXT = JS$FUNC.READABLETEXT(JSON);
  -- don't forget to release the pointer
  JS$OBJ.DISPOSE(JSON);
  RETURN JSON_TEXT;
  WHEN ANY DO
  BEGIN
    -- if there was an error, release the pointer anyway
    JS$OBJ.DISPOSE(JSON);
    EXCEPTION;
  END
END
Here’s a trick: at the very top level of the recursive statement, a pointer to a previously created JSON root object is used. In the recursive part of the query, we output a JSON object for the parent departure PARENT_JSON and a JSON object for the current departure PARENT_JSON. Thus, we always know in which JSON object to add the departure.
Then we loop through the cursor and add field values for the current departure at each iteration.
Note that in order to add a NULL value, you have to use the JS$NULL.GENERATE() call.
If you don’t, then when you call JS$OBJ.ADDSTRING (C_DEP.JSON, 'head_dept', C_DEP.HEAD_DEPT) when C_DEP.HEAD_DEPT is NULL,
the head_dept field will simply not be added.
Also, for each department, you need to add a JSON list to which subordinate departments will be added.
If the JSON object of the parent unit is not NULL, then we get the list added for it differently using the
JS$OBJ.FIELD function and add the current JSON object to it.
Further, the JSON of the object of the highest level, you can generate the text, after which we no longer need the object
itself and we need to clear the pointer allocated for it using the JS$OBJ.DISPOSE function.
Pay attention to the WHEN ANY DO exception handling block. It is required, because even when it happens, we need to free the pointer to avoid a memory leak.
14.4.2. Parse JSON
Parsing JSON is somewhat more difficult than collecting it. The fact is that you need to take into account that incorrect JSON may be received at the input, not only by itself, but also with a structure that does not correspond to your logic.
Suppose you have a JSON that contains a list of people with their characteristics.
This JSON looks like this:
[
  {"id": 1, "name": "John"},
  {"id": 2, "name": null}
]
The following procedure returns a list of people from this JSON:
create exception e_custom_error 'custom error';

set term ^;

CREATE OR ALTER PROCEDURE PARSE_PEOPLES_JSON (
    JSON_STR BLOB SUB_TYPE TEXT)
RETURNS (
    ID   INTEGER,
    NAME VARCHAR(120))
AS
declare variable json TY$POINTER;
declare variable jsonId TY$POINTER;
declare variable jsonName TY$POINTER;
begin
  json = js$func.parsetext(json_str);
  -- If JSON incorrect js$func.parsetext will not throw an exception,
  -- but return a null pointer, so you need to handle this case yourself
  if (js$ptr.isNull(json)) then
    exception e_custom_error 'invalid json';
  -- Again, functions from this library do not check the correctness of element types
  -- and do not return an understandable error. We need to check if the type we are processing.
  -- Otherwise, when calling js$list.foreach, an "Access violation" will occur
  if (js$base.SelfTypeName(json) != 'jsList') then
    exception e_custom_error 'Invalid JSON format. The top level of the JSON item must be a list. ';
  for
    select Obj
    from js$list.foreach(:json)
    as cursor c
  do
  begin
    -- Checking that the array element is an object,
    -- Otherwise, when calling js$obj.GetIntegerByName, an "Access violation" will occur
    if (js$base.SelfTypeName(c.Obj) != 'jsObject') then
      exception e_custom_error 'Element of list is not object';
    -- js$obj.GetIntegerByName does not check for the existence of an element with the given name
    -- it will simply return 0 if it is missing. Therefore, such a check must be done independently.
    -- And js$obj.Field will return a null pointer.
    if (js$obj.indexofname(c.Obj, 'id') < 0) then
      exception e_custom_error 'Field "id" not found in object';
    jsonId = js$obj.Field(c.Obj, 'id');
    if (js$base.selftypename(jsonId) = 'jsNull') then
      id = null;
    else if (js$base.selftypename(jsonId) = 'jsNumber') then
      id = js$obj.GetIntegerByName(c.Obj, 'id');
    else
      exception e_custom_error 'Field "id" is not number';

    if (js$obj.indexofname(c.Obj, 'name') < 0) then
      exception e_custom_error 'Field "name" not found in object';
    jsonName = js$obj.Field(c.Obj, 'name');
    if (js$str.selftypename(jsonName) = 'jsNull') then
      name = null;
    else
      name = js$str.value_(jsonName);
    suspend;
  end
  js$base.dispose(json);
  when any do
  begin
    js$base.dispose(json);
    exception;
  end
end^

set term ;^
Run the following query to check if it is correct
select id, name
from parse_peoples_json( '[{"id": 1, "name": "John"}, {"id": 2, "name": null}]' )
Let’s take a closer look at the JSON parsing script. The first feature is that the js$func.parsetext function
will not throw an exception if any other string is input instead of JSON. It will just return a null pointer.
But, this is not NULL as you thought, but a pointer with the content x'0000000000000000'.
Therefore, after executing this function, you need to check what was returned to you,
otherwise the calls of the subsequent functions will return an "Access violation" error.
Next, it is important to check what type of JSON object was returned.
If an object or any other type appears in the input instead of a list, then the js$list.foreach call will cause an "Access violation".
The same will happen if you call any other function that expects a pointer to a different type that is not intended for it.
The next feature is that you should always check for the presence of fields (object properties).
If there is no field with the specified name, then in some cases an incorrect value may be returned
(as in the case of js$obj.GetIntegerByName), in others it will lead to a type conversion error.
Note that functions like js$obj.GetIntegerByName or js$obj.GetSrtingByName cannot return NULL.
To recognize a null value, you need to check the field type with the js$base.selftypename function.
As with the JSON assembly, remember to free the top-level JSON pointer and also do this in the WHEN ANY DO exception handling block.
Below is an example of parsing JSON that was collected by the MAKE_JSON_DEPARTMENT_TREE function in the example above.
The text of the example contains comments explaining the principle of parsing.
SET TERM ^ ;

CREATE OR ALTER PACKAGE JSON_PARSE_DEPS
AS
BEGIN
  PROCEDURE PARSE_DEPARTMENT_TREE (
      JSON_TEXT BLOB SUB_TYPE TEXT)
  RETURNS (
      DEPT_NO    CHAR(3),
      DEPARTMENT VARCHAR(25),
      HEAD_DEPT  CHAR(3),
      MNGR_NO    SMALLINT,
      BUDGET     DECIMAL(18,2),
      LOCATION   VARCHAR(15),
      PHONE_NO   VARCHAR(20));
END^

RECREATE PACKAGE BODY JSON_PARSE_DEPS
AS
BEGIN
  PROCEDURE GET_DEPARTMENT_INFO (
      JSON TY$POINTER)
  RETURNS (
      DEPT_NO    CHAR(3),
      DEPARTMENT VARCHAR(25),
      HEAD_DEPT  CHAR(3),
      MNGR_NO    SMALLINT,
      BUDGET     DECIMAL(18,2),
      LOCATION   VARCHAR(15),
      PHONE_NO   VARCHAR(20),
      JSON_LIST  TY$POINTER);

  PROCEDURE PARSE_DEPARTMENT_TREE (
      JSON_TEXT BLOB SUB_TYPE TEXT)
  RETURNS (
      DEPT_NO    CHAR(3),
      DEPARTMENT VARCHAR(25),
      HEAD_DEPT  CHAR(3),
      MNGR_NO    SMALLINT,
      BUDGET     DECIMAL(18,2),
      LOCATION   VARCHAR(15),
      PHONE_NO   VARCHAR(20))
  AS
    DECLARE VARIABLE JSON    TY$POINTER;
  BEGIN
    JSON = JS$FUNC.PARSETEXT(JSON_TEXT);
    -- If JSON is incorrect js$func.parsetext will not throw an exception,
    -- but simply return a null pointer, so you need to handle this case
    -- yourself.
    IF (JS$PTR.ISNULL(JSON)) THEN
      EXCEPTION E_CUSTOM_ERROR 'invalid json';
    FOR
      SELECT
          INFO.DEPT_NO,
          INFO.DEPARTMENT,
          INFO.HEAD_DEPT,
          INFO.MNGR_NO,
          INFO.BUDGET,
          INFO.LOCATION,
          INFO.PHONE_NO
      FROM JSON_PARSE_DEPS.GET_DEPARTMENT_INFO(:JSON) INFO
      INTO
          :DEPT_NO,
          :DEPARTMENT,
          :HEAD_DEPT,
          :MNGR_NO,
          :BUDGET,
          :LOCATION,
          :PHONE_NO
    DO
      SUSPEND;
    JS$OBJ.DISPOSE(JSON);
    WHEN ANY DO
    BEGIN
      JS$OBJ.DISPOSE(JSON);
      EXCEPTION;
    END
  END

  PROCEDURE GET_DEPARTMENT_INFO (
      JSON TY$POINTER)
  RETURNS (
      DEPT_NO    CHAR(3),
      DEPARTMENT VARCHAR(25),
      HEAD_DEPT  CHAR(3),
      MNGR_NO    SMALLINT,
      BUDGET     DECIMAL(18,2),
      LOCATION   VARCHAR(15),
      PHONE_NO   VARCHAR(20),
      JSON_LIST  TY$POINTER)
  AS
  BEGIN
    IF (JS$OBJ.INDEXOFNAME(JSON, 'dept_no') < 0) THEN
      EXCEPTION E_CUSTOM_ERROR 'field "dept_no" not found';
    DEPT_NO = JS$OBJ.GETSTRINGBYNAME(JSON, 'dept_no');
    IF (JS$OBJ.INDEXOFNAME(JSON, 'department') < 0) THEN
      EXCEPTION E_CUSTOM_ERROR 'field "department" not found';
    DEPARTMENT = JS$OBJ.GETSTRINGBYNAME(JSON, 'department');
    IF (JS$OBJ.INDEXOFNAME(JSON, 'head_dept') < 0) THEN
      EXCEPTION E_CUSTOM_ERROR 'field "head_dept" not found';
    IF (JS$BASE.SELFTYPENAME(JS$OBJ.FIELD(JSON, 'head_dept')) = 'jsNull') THEN
      HEAD_DEPT = NULL;
    ELSE
      HEAD_DEPT = JS$OBJ.GETSTRINGBYNAME(JSON, 'head_dept');
    IF (JS$OBJ.INDEXOFNAME(JSON, 'mngr_no') < 0) THEN
      EXCEPTION E_CUSTOM_ERROR 'field "mngr_no" not found';
    IF (JS$BASE.SELFTYPENAME(JS$OBJ.FIELD(JSON, 'mngr_no')) = 'jsNull') THEN
      MNGR_NO = NULL;
    ELSE
      MNGR_NO = JS$OBJ.GETINTEGERBYNAME(JSON, 'mngr_no');
    IF (JS$OBJ.INDEXOFNAME(JSON, 'budget') < 0) THEN
      EXCEPTION E_CUSTOM_ERROR 'field "budget" not found';
    BUDGET = JS$OBJ.GETDOUBLEBYNAME(JSON, 'budget');
    IF (JS$OBJ.INDEXOFNAME(JSON, 'location') < 0) THEN
      EXCEPTION E_CUSTOM_ERROR 'field "location" not found';
    LOCATION = JS$OBJ.GETSTRINGBYNAME(JSON, 'location');
    IF (JS$OBJ.INDEXOFNAME(JSON, 'phone_no') < 0) THEN
      EXCEPTION E_CUSTOM_ERROR 'field "phone_no" not found';
    PHONE_NO = JS$OBJ.GETSTRINGBYNAME(JSON, 'phone_no');
    IF (JS$OBJ.INDEXOFNAME(JSON, 'departments') >= 0) THEN
    BEGIN
      -- get a list of child departures
      JSON_LIST = JS$OBJ.FIELD(JSON, 'departments');
      IF (JS$BASE.SELFTYPENAME(JSON_LIST) != 'jsList') THEN
        EXCEPTION E_CUSTOM_ERROR 'Invalid JSON format. Field "departments" must be list';
      SUSPEND;
      -- This list is traversed and the procedure for retrieving information about each
      -- departure is recursively called for it.
      FOR
        SELECT
            INFO.DEPT_NO,
            INFO.DEPARTMENT,
            INFO.HEAD_DEPT,
            INFO.MNGR_NO,
            INFO.BUDGET,
            INFO.LOCATION,
            INFO.PHONE_NO,
            INFO.JSON_LIST
        FROM JS$LIST.FOREACH(:JSON_LIST) L
          LEFT JOIN JSON_PARSE_DEPS.GET_DEPARTMENT_INFO(L.OBJ) INFO
                 ON TRUE
        INTO
            :DEPT_NO,
            :DEPARTMENT,
            :HEAD_DEPT,
            :MNGR_NO,
            :BUDGET,
            :LOCATION,
            :PHONE_NO,
            :JSON_LIST
      DO
        SUSPEND;
    END
    ELSE
      EXCEPTION E_CUSTOM_ERROR 'Invalid JSON format. Field "departments" not found' || DEPT_NO;
  END
END
^

SET TERM ; ^
15. NANODBC-UDR — working with ODBC Data Sources
Starting from version 2.5, Firebird DBMS has the ability to work with external data through the EXECUTE STATEMENT .. ON EXTERNAL DATA SOURCE statement. Unfortunately, working with external data sources is limited only to Firebird databases.
To be able to work with other DBMS, UDR nanodbc was developed. Fully open source library licensed under the MIT license and free to use. It is written in C++. Source code is available at https://github.com/mnf71/udr-nanodbc
The library is based on a thin C++ wrapper around the native C ODBC API https://github.com/nanodbc/nanodbc
|
UDR nanodbc provides a low-level interface for interaction with ODBC drivers, which is difficult to use. Instead of UDR nanodbc, you can use the higher-level and more familiar |
15.1. Install UDR nanodbc
To be able to use UDR nanodbc, it must be registered in your database. To do this, you need to execute the plugin/UDR/nanodbc_install.sql script.
15.2. How it works?
UDR nanodbc is based on the free library nanodbc, therefore, for a complete understanding, we recommend that you study the API of this library in its source codes and documentation (see https://github.com/mnf71/udr-nanodbc).
When working with library objects, so-called descriptors (pointers to nanodbc objects) are used. Pointers are described by a domain defined as:
CREATE DOMAIN TY$POINTER AS
CHAR(8) CHARACTER SET OCTETS;
in Firebird 4.0 it can be described in the following way
CREATE DOMAIN TY$POINTER AS BINARY(8);After finishing work with the object, the pointer to it must be released using the release_() functions, which are located in the corresponding PSQL packages. Which package to use depends on the type of object you want to free the pointer to.
In Firebird, it is impossible to create a function that does not return a result, therefore, for C++ functions with a void return type, UDR functions return the type described by the TY$NANO_BLANK domain. It makes no sense to analyze the result of such functions. Domain TY$NANO_BLANK is described as:
CREATE DOMAIN TY$NANO_BLANK AS SMALLINT;Before you start working with the UDR, you need to initialize the nanodbc library. This is done by calling the nano$udr.initialize() function. And upon completion of the work, call finalization function nano$udr.finalize(). It is recommended to call nano$udr.initialize() function in the ON CONNECT trigger, and nano$udr.finalize() function in the ON DISCONNECT trigger.
15.3. Description of PSQL packages from UDR-nanodbc
15.3.1. NANO$UDR package
The header of this package looks like this:
CREATE OR ALTER PACKAGE NANO$UDR
AS
BEGIN

  FUNCTION initialize RETURNS TY$NANO_BLANK;
  FUNCTION finalize RETURNS TY$NANO_BLANK;
  FUNCTION expunge RETURNS TY$NANO_BLANK;

  FUNCTION locale(
      set_locale VARCHAR(20) CHARACTER SET NONE DEFAULT NULL /* NULL - Get */
    ) RETURNS CHARACTER SET NONE VARCHAR(20);

  FUNCTION error_message RETURNS VARCHAR(512) CHARACTER SET UTF8;

END
The NANO$UDR package contains functions for initializing and finalizing UDRs.
The initialize() function initializes the nanodbc UDR. It is recommended to call this function in the ON CONNECT trigger. It must be called before the first call to any other function from the nanodbc UDR.
The finalize() function terminates the nanodbc UDR. After calling it, it is impossible to work with UDR nanodbc. When called, the function automatically releases all previously allocated resources. It is recommended to call this function in the ON DISCONNECT trigger.
The expunge() function automatically releases all previously allocated resources (connections, transactions, prepared statements, cursors).
The locale() function returns or sets the default encoding for connections. If the set_locale parameter is specified, then a new encoding will be set, otherwise the function will return the value of the current encoding. This is necessary to transform transmitted and received strings, before and after exchanging with an ODBC source. The default encoding is cp1251.
If initially the connection to the database is established with UTF8 encoding, then you can set utf8, according to the names of iconv. If the encoding is NONE, then it is better to convert to your language encoding using the convert_[var]char() functions.
The error_message() function returns the text of the last error.
15.3.2. NANO$CONN package
The header of this package looks like this:
CREATE OR ALTER PACKAGE NANO$CONN
AS
BEGIN

  /*  Note:
        CHARACTER SET UTF8
        attr VARCHAR(512) CHARACTER SET UTF8 DEFAULT NULL
        ...
        CHARACTER SET WIN1251
        attr VARCHAR(2048) CHARACTER SET WIN1251 DEFAULT NULL
   */

  FUNCTION connection(
      attr VARCHAR(512) CHARACTER SET UTF8 DEFAULT NULL,
      user_ VARCHAR(63) CHARACTER SET UTF8 DEFAULT NULL,
      pass VARCHAR(63) CHARACTER SET UTF8 DEFAULT NULL,
      timeout INTEGER NOT NULL DEFAULT 0
    ) RETURNS TY$POINTER;

  FUNCTION valid(conn TY$POINTER NOT NULL) RETURNS BOOLEAN;

  FUNCTION release_(conn TY$POINTER NOT NULL) RETURNS TY$POINTER;
  FUNCTION expunge(conn ty$pointer NOT NULL) RETURNS TY$NANO_BLANK;

  FUNCTION allocate(conn ty$pointer NOT NULL) RETURNS TY$NANO_BLANK;
  FUNCTION deallocate(conn ty$pointer NOT NULL) RETURNS TY$NANO_BLANK;

  FUNCTION txn_read_uncommitted RETURNS SMALLINT;
  FUNCTION txn_read_committed RETURNS SMALLINT;
  FUNCTION txn_repeatable_read RETURNS SMALLINT;
  FUNCTION txn_serializable RETURNS SMALLINT;

  FUNCTION isolation_level(
      conn TY$POINTER NOT NULL,
      level_ SMALLINT DEFAULT NULL /* NULL - get usage */
    ) RETURNS SMALLINT;

  FUNCTION connect_(
      conn TY$POINTER NOT NULL,
      attr VARCHAR(512) CHARACTER SET UTF8 NOT NULL,
      user_ VARCHAR(63) CHARACTER SET UTF8 DEFAULT NULL,
      pass VARCHAR(63) CHARACTER SET UTF8 DEFAULT NULL,
      timeout INTEGER NOT NULL DEFAULT 0
    ) RETURNS TY$NANO_BLANK;

  FUNCTION connected(conn TY$POINTER NOT NULL) RETURNS BOOLEAN;

  FUNCTION disconnect_(conn ty$pointer NOT NULL) RETURNS TY$NANO_BLANK;

  FUNCTION transactions(conn TY$POINTER NOT NULL) RETURNS INTEGER;

  FUNCTION get_info(conn TY$POINTER NOT NULL, info_type SMALLINT NOT NULL)
    RETURNS VARCHAR(256) CHARACTER SET UTF8;

  FUNCTION dbms_name(conn ty$pointer NOT NULL) RETURNS VARCHAR(128) CHARACTER SET UTF8;
  FUNCTION dbms_version(conn ty$pointer NOT NULL) RETURNS VARCHAR(128) CHARACTER SET UTF8;
  FUNCTION driver_name(conn TY$POINTER NOT NULL) RETURNS VARCHAR(128) CHARACTER SET UTF8;
  FUNCTION database_name(conn TY$POINTER NOT NULL) RETURNS VARCHAR(128) CHARACTER SET UTF8;
  FUNCTION catalog_name(conn TY$POINTER NOT NULL) RETURNS VARCHAR(128) CHARACTER SET UTF8;

END
The NANO$CONN package contains functions for setting up an ODBC data source and getting some connection information.
The connection() function establishes a connection to an ODBC data source. If more than one parameter is not specified, the function will return a pointer to the "connection" object. The actual connection to the ODBC data source can be made later using the connect_() function.
Function parameters:
- attr specifies the connection string or the so-called DSN;
- user_ specifies the username;
- pass sets the password;
- timeout specifies the idle timeout.
The valid() function returns whether the connection object pointer is valid.
The release_() function releases the connection pointer and all associated resources (transactions, prepared statements, cursors).
The expunge() function releases all resources associated with the connection (transactions, prepared statements, cursors).
The allocate() function allows you to allocate descriptors on demand for setting the environment and ODBC attributes prior to establishing a connection to the database. Typically, the user does not need to make this call explicitly.
The deallocate() function frees the connection handles.
The txn_read_uncommitted() function returns the numeric constant required to set the transaction isolation level to READ UNCOMMITTED.
The txn_read_committed() function returns the numeric constant required to set the transaction isolation level to READ COMMITTED.
The txn_repeatable_read() function returns a numeric constant required to set the isolation level of the REPEATABLE READ transaction.
The txn_serializable() function returns the numeric constant required to set the transaction isolation level to SERIALIZABLE.
The isolation_level() function sets the isolation level for new transactions.
Function parameters:
-
conn— pointer to a connection object; -
level_— transaction isolation level, must be one of the numbers returned by thetnx_*functions.
The connected() function returns whether a database connection has been established for the given pointer to the connection object.
Function parameters:
-
conn— pointer to the connection object; -
attrspecifies the connection string or the so-called DSN; -
user_specifies the username; -
passsets the password; -
timeoutspecifies the idle timeout.
The connected() function returns whether a connection to the database is established for the given pointer to a connection object.
The disconnect_() function disconnects from the database. A pointer to the connection object is passed as a parameter.
The transactions() function returns the number of active transactions for a given connection.
The get_info() function returns various information about the driver or data source. This low-level function is the ODBC analogue of the SQLGetInfo function. It is not recommended use it directly. Function parameters:
-
conn— pointer to the connection object; -
info_type— the type of information returned. Numeric constants with return types can be found at https://github.com/microsoft/ODBC-Specification/blob/master/Windows/inc/sql.h
The dbms_name() function returns the name of the DBMS to which the connection was made.
The dbms_version() function returns the version of the DBMS to which the connection was made.
The driver_name() function returns the name of the driver.
The database_name() function returns the name of the database to which the connection was made.
The catalog_name() function returns the name of the database catalog to which the connection was made.
15.3.3. NANO$TNX package
The header of this package looks like this:
CREATE OR ALTER PACKAGE NANO$TNX
AS
BEGIN

  FUNCTION transaction_(conn TY$POINTER NOT NULL) RETURNS TY$POINTER;

  FUNCTION valid(tnx TY$POINTER NOT NULL) RETURNS BOOLEAN;

  FUNCTION release_(tnx ty$pointer NOT NULL) RETURNS TY$POINTER;

  FUNCTION connection(tnx TY$POINTER NOT NULL) RETURNS TY$POINTER;

  FUNCTION commit_(tnx TY$POINTER NOT NULL) RETURNS TY$NANO_BLANK;

  FUNCTION rollback_(tnx TY$POINTER NOT NULL) RETURNS TY$NANO_BLANK;

END
The NANO$TNX package contains functions for explicitly managing transactions.
The transaction _() function disables the automatic confirmation of the transaction and starts a new transaction with the isolation level specified in the
NANO$CONN.isolation_level() function. The function returns a pointer to a new transaction.
The valid() function returns whether the pointer to the transaction object is valid.
The release_() function releases the pointer to the transaction object. When the pointer is freed, the uncommitted transaction is rolled back and the driver returns
to the automatic transaction confirmation mode.
The connection() function returns a pointer to the connection for which the transaction was started.
The commit_() function confirms the transaction.
The rollback_() function rolls back the transaction.
15.3.4. NANO$STMT package
The header of this package looks like this:
CREATE OR ALTER PACKAGE NANO$STMT
AS
BEGIN

  FUNCTION statement_(
      conn TY$POINTER DEFAULT NULL,
      query VARCHAR(8191) CHARACTER SET UTF8 DEFAULT NULL,
      scrollable BOOLEAN DEFAULT NULL /* NULL - default ODBC driver */,
      timeout INTEGER NOT NULL DEFAULT 0
    ) RETURNS TY$POINTER;

  FUNCTION valid(stmt TY$POINTER NOT NULL) RETURNS BOOLEAN;

  FUNCTION release_(stmt TY$POINTER NOT NULL) RETURNS TY$POINTER;

  FUNCTION connected(stmt TY$POINTER NOT NULL) RETURNS BOOLEAN;
  FUNCTION connection(stmt TY$POINTER NOT NULL) RETURNS TY$POINTER;

  FUNCTION open_(
      stmt TY$POINTER NOT NULL,
      conn TY$POINTER NOT NULL
    ) RETURNS TY$NANO_BLANK;

  FUNCTION close_(stmt TY$POINTER NOT NULL) RETURNS TY$NANO_BLANK;

  FUNCTION cancel(stmt TY$POINTER NOT NULL) RETURNS TY$NANO_BLANK;

  FUNCTION closed(stmt TY$POINTER NOT NULL) RETURNS BOOLEAN;

  FUNCTION prepare_direct(
      stmt TY$POINTER NOT NULL,
      conn TY$POINTER NOT NULL,
      query VARCHAR(8191) CHARACTER SET UTF8 NOT NULL,
      scrollable BOOLEAN DEFAULT NULL /* NULL - default ODBC driver */,
      timeout INTEGER NOT NULL DEFAULT 0
    ) RETURNS TY$NANO_BLANK;

  FUNCTION prepare_(
      stmt TY$POINTER NOT NULL,
      query VARCHAR(8191) CHARACTER SET UTF8 NOT NULL,
      scrollable BOOLEAN DEFAULT NULL /* NULL - default ODBC driver */,
      timeout INTEGER NOT NULL DEFAULT 0
    ) RETURNS TY$NANO_BLANK;

  FUNCTION scrollable(
      stmt TY$POINTER NOT NULL,
      usage_ BOOLEAN DEFAULT NULL /* NULL - get usage */
    ) RETURNS BOOLEAN;

  FUNCTION timeout(
      stmt TY$POINTER NOT NULL,
      timeout INTEGER NOT NULL DEFAULT 0
    ) RETURNS TY$NANO_BLANK;

  FUNCTION execute_direct(
      stmt TY$POINTER NOT NULL,
      conn TY$POINTER NOT NULL,
      query VARCHAR(8191) CHARACTER SET UTF8 NOT NULL,
      scrollable BOOLEAN DEFAULT NULL /* NULL - default ODBC driver */,
      batch_operations INTEGER NOT NULL DEFAULT 1,
      timeout INTEGER NOT NULL DEFAULT 0
    ) RETURNS TY$POINTER;

  FUNCTION just_execute_direct(
      stmt TY$POINTER NOT NULL,
      conn TY$POINTER NOT NULL,
      query VARCHAR(8191) CHARACTER SET UTF8 NOT NULL,
      batch_operations INTEGER NOT NULL DEFAULT 1,
      timeout INTEGER NOT NULL DEFAULT 0
    ) RETURNS TY$NANO_BLANK;

  FUNCTION execute_(
      stmt TY$POINTER NOT NULL,
      batch_operations INTEGER NOT NULL DEFAULT 1,
      timeout INTEGER NOT NULL DEFAULT 0
    ) RETURNS TY$POINTER;

  FUNCTION just_execute(
      stmt TY$POINTER NOT NULL,
      batch_operations INTEGER NOT NULL DEFAULT 1,
      timeout INTEGER NOT NULL DEFAULT 0
    ) RETURNS TY$NANO_BLANK;

  FUNCTION procedure_columns(
      stmt TY$POINTER NOT NULL,
      catalog_ VARCHAR(128) CHARACTER SET UTF8 NOT NULL,
      schema_ VARCHAR(128) CHARACTER SET UTF8 NOT NULL,
      procedure_ VARCHAR(63) CHARACTER SET UTF8 NOT NULL,
      column_ VARCHAR(63) CHARACTER SET UTF8 NOT NULL
    ) RETURNS TY$POINTER;

  FUNCTION affected_rows(stmt TY$POINTER NOT NULL) RETURNS INTEGER;
  FUNCTION columns(stmt TY$POINTER NOT NULL) RETURNS SMALLINT;
  FUNCTION parameters(stmt TY$POINTER NOT NULL) RETURNS SMALLINT;
  FUNCTION parameter_size(stmt TY$POINTER NOT NULL, parameter_index SMALLINT NOT NULL)
    RETURNS INTEGER;

  ------------------------------------------------------------------------------

  FUNCTION bind_smallint(
      stmt TY$POINTER NOT NULL,
      parameter_index SMALLINT NOT NULL,
      value_ SMALLINT
    ) RETURNS TY$NANO_BLANK;

  FUNCTION bind_integer(
      stmt TY$POINTER NOT NULL,
      parameter_index SMALLINT NOT NULL,
      value_ INTEGER
    ) RETURNS TY$NANO_BLANK;

/*
  FUNCTION bind_bigint(
      stmt TY$POINTER NOT NULL,
      parameter_index SMALLINT NOT NULL,
      value_ BIGINT
    ) RETURNS TY$NANO_BLANK;
*/

  FUNCTION bind_float(
      stmt TY$POINTER NOT NULL,
      parameter_index SMALLINT NOT NULL,
      value_ FLOAT
    ) RETURNS TY$NANO_BLANK;

  FUNCTION bind_double(
      stmt TY$POINTER NOT NULL,
      parameter_index SMALLINT NOT NULL,
      value_ DOUBLE PRECISION
    ) RETURNS TY$NANO_BLANK;

  FUNCTION bind_varchar(
      stmt TY$POINTER NOT NULL,
      parameter_index SMALLINT NOT NULL,
      value_ VARCHAR(32765) CHARACTER SET NONE,
      param_size SMALLINT NOT NULL DEFAULT 0
    ) RETURNS TY$NANO_BLANK;

  FUNCTION bind_char(
      stmt TY$POINTER NOT NULL,
      parameter_index SMALLINT NOT NULL,
      value_ CHAR(32767) CHARACTER SET NONE,
      param_size SMALLINT NOT NULL DEFAULT 0
    ) RETURNS TY$NANO_BLANK;

  FUNCTION bind_u8_varchar(
      stmt TY$POINTER NOT NULL,
      parameter_index SMALLINT NOT NULL,
      value_ VARCHAR(8191) CHARACTER SET UTF8,
      param_size SMALLINT NOT NULL DEFAULT 0
    ) RETURNS TY$NANO_BLANK;

  FUNCTION bind_u8_char(
      stmt TY$POINTER NOT NULL,
      parameter_index SMALLINT NOT NULL,
      value_ CHAR(8191) CHARACTER SET UTF8,
      param_size SMALLINT NOT NULL DEFAULT 0
    ) RETURNS TY$NANO_BLANK;

  FUNCTION bind_blob(
      stmt TY$POINTER NOT NULL,
      parameter_index SMALLINT NOT NULL,
      value_ BLOB
    ) RETURNS TY$NANO_BLANK;

  FUNCTION bind_boolean(
      stmt TY$POINTER NOT NULL,
      parameter_index SMALLINT NOT NULL,
      value_ BOOLEAN
    ) RETURNS TY$NANO_BLANK;

  FUNCTION bind_date(
      stmt TY$POINTER NOT NULL,
      parameter_index SMALLINT NOT NULL,
      value_ DATE
    ) RETURNS TY$NANO_BLANK;

/*
  FUNCTION bind_time(
      stmt TY$POINTER NOT NULL,
      parameter_index SMALLINT NOT NULL,
      value_ TIME
    ) RETURNS TY$NANO_BLANK
    EXTERNAL NAME 'nano!stmt_bind'
    ENGINE UDR;
*/

  FUNCTION bind_timestamp(
      stmt TY$POINTER NOT NULL,
      parameter_index SMALLINT NOT NULL,
      value_ TIMESTAMP
    ) RETURNS TY$NANO_BLANK;

  FUNCTION bind_null(
      stmt TY$POINTER NOT NULL,
      parameter_index SMALLINT NOT NULL,
      batch_size INTEGER NOT NULL DEFAULT 1 -- <> 1 call nulls all batch
    ) RETURNS TY$NANO_BLANK;

  FUNCTION convert_varchar(
      value_ VARCHAR(32765) CHARACTER SET NONE,
      from_ VARCHAR(20) CHARACTER SET NONE NOT NULL,
      to_ VARCHAR(20) CHARACTER SET NONE NOT NULL,
      convert_size SMALLINT NOT NULL DEFAULT 0
    ) RETURNS VARCHAR(32765) CHARACTER SET NONE;

  FUNCTION convert_char(
      value_ CHAR(32767) CHARACTER SET NONE,
      from_ VARCHAR(20) CHARACTER SET NONE NOT NULL,
      to_ VARCHAR(20) CHARACTER SET NONE NOT NULL,
      convert_size SMALLINT NOT NULL DEFAULT 0
    ) RETURNS CHAR(32767) CHARACTER SET NONE;

  FUNCTION clear_bindings(stmt TY$POINTER NOT NULL) RETURNS TY$NANO_BLANK;

  ------------------------------------------------------------------------------

  FUNCTION describe_parameter(
      stmt TY$POINTER NOT NULL,
      idx SMALLINT NOT NULL,
      type_ SMALLINT NOT NULL,
      size_ INTEGER NOT NULL,
      scale_ SMALLINT NOT NULL DEFAULT 0
    ) RETURNS TY$NANO_BLANK;

  FUNCTION describe_parameters(stmt TY$POINTER NOT NULL) RETURNS TY$NANO_BLANK;

  FUNCTION reset_parameters(stmt TY$POINTER NOT NULL, timeout INTEGER NOT NULL DEFAULT 0)
    RETURNS TY$NANO_BLANK;

END
The NANO$STMT package contains functions for working with SQL queries.
The statement_() function creates and returns a pointer to an SQL query object.
Parameters:
-
conn— pointer to the connection object; -
query— the text of the SQL query; -
scrollable— whether the cursor is scrollable (if, of course, the operator returns a cursor), if not set (NULLvalue), then the default behavior of the ODBC driver is used; -
timeout— SQL statement timeout.
If no parameter is specified, then it returns a pointer to the newly created SQL query object, without binding to the connection. You can later associate this pointer with a connection and set other query properties.
The valid() function returns whether the pointer to the SQL query object is valid.
The release_() function releases the pointer to the SQL query object.
The connected() function returns whether the request is attached to a connection.
The connection() function is a pointer to the bound connection.
The open_() function opens a connection and binds it to the request.
Parameters:
-
stmt— pointer to SQL query; -
conn— connection pointer.
The close_() function closes a previously opened request and clears all resources allocated by the request.
The cancel() function cancels the execution of the request.
The closed() function returns whether the request is closed.
The prepare_direct() function prepares an SQL statement and binds it to the specified connection.
Parameters:
-
stmt— a pointer to the statement; -
conn— connection pointer; -
query— the text of the SQL query; -
scrollable— whether the cursor is scrollable (if, of course, the operator returns a cursor), if not set (NULLvalue), then the default behavior of the ODBC driver is used; -
timeout— SQL statement timeout.
The prepare_() function prepares the SQL query.
Parameters:
-
stmt— a pointer to the statement; -
query— the text of the SQL query; -
scrollable— whether the cursor is scrollable (if, of course, the operator returns a cursor), if not set (NULL value), then the default behavior of the ODBC driver is used; -
timeout— SQL statement timeout.
The scrollable_() function returns or sets whether the cursor is scrollable.
Parameters:
-
stmt— a pointer to the statement; -
usage_— whether the cursor is scrollable (if, of course, the operator returns a cursor), if not set (NULL value), then it returns the current value of this flag.
The timeout() function sets the timeout for the SQL query.
The execute_direct() function prepares and executes an SQL statement. The function returns a pointer to a data set (cursor), which can be processed using
the functions of the NANO$RSLT package.
Parameters:
-
stmt— a pointer to the statement; -
conn— connection pointer; -
query— the text of the SQL query; -
scrollable— whether the cursor is scrollable (if, of course, the operator returns a cursor), if not set (NULLvalue), then the default behavior of the ODBC driver is used; -
batch_operations— the number of batch operations. The default is 1; -
timeout— SQL statement timeout.
The just_execute_direct() function prepares and executes an SQL statement. The function is designed to execute SQL statements that do not return data (do not open a cursor).
Parameters:
-
stmt— a pointer to the statement; -
conn— connection pointer; -
query— the text of the SQL query; -
batch_operations— the number of batch operations. The default is 1; -
timeout— SQL statement timeout.
The execute_() function executes the prepared SQL statement. The function returns a pointer to a data set (cursor), which can be processed using the functions of the NANO$RSLT package.
Parameters:
-
stmt— a pointer to a prepared statement; -
batch_operations— the number of batch operations. By default,NANO$STMTis 1; -
timeout— SQL statement timeout.
The just_execute() function executes the prepared SQL statement. The function is designed to execute SQL statements that do not return data (do not open a cursor).
Parameters:
-
stmt— a pointer to a prepared statement; -
batch_operations— the number of batch operations. The default is 1; -
timeout— SQL statement timeout.
The procedure_columns() function — returns the description of the output field of the stored procedure as a nano$rslt dataset. Function parameters:
-
stmt— a pointer to the statement; -
catalog_— the name of the catalog to which the SP belongs; -
schema_— the name of the schema in which the SP is located; -
procedure_— the name of the stored procedure; -
column_— the name of the output column of the SP.
The affected_rows() function returns the number of rows affected by the SQL statement. This function can be called after the statement is executed.
The columns() function returns the number of columns returned by the SQL query.
The parameters() function returns the number of SQL query parameters. This function can be called only after preparing the SQL query.
The parameter_size() function returns the size of the parameter in bytes.
-
stmt— a pointer to a prepared statement; -
parameter_index— parameter index.
Functions of the bind_<type> … family bind a value to a parameter if the DBMS supports batch operations see. execute() parameter batch_operations, then the number of transmitted values is not limited, within reasonable limits. Otherwise, only the first set of values entered is transmitted. The binding itself occurs already when you call execute().
The bind_smallint() function binds a SMALLINT value to an SQL parameter.
-
stmt— a pointer to a prepared statement; -
parameter_index— parameter index; -
value_— parameter value.
The bind_integer() function binds an INTEGER value to a SQL parameter.
-
stmt— a pointer to a prepared statement; -
parameter_index— parameter index; -
value_— parameter value.
The bind_bigint() function binds a BIGINT value to a SQL parameter.
-
stmt— a pointer to a prepared statement; -
parameter_index— parameter index; -
value_— parameter value.
The bind_float() function binds a FLOAT value to an SQL parameter.
-
stmt— a pointer to a prepared statement; -
parameter_index— parameter index; -
value_— parameter value.
The bind_double() function binds a DOUBLE PRECISION value to an SQL parameter.
-
stmt— a pointer to a prepared statement; -
parameter_index— parameter index; -
value_— parameter value.
The bind_varchar() function binds a VARCHAR value to a SQL parameter. Used for single-byte encodings.
-
stmt— a pointer to a prepared statement; -
parameter_index— parameter index; -
value_— parameter value; -
param_size— the size of the parameter (string).
The bind_char() function binds a CHAR value to a SQL parameter. Used for single-byte encodings.
-
stmt— a pointer to a prepared statement; -
parameter_index— parameter index; -
value_— parameter value; -
param_size— the size of the parameter (string).
The bind_u8_varchar() function binds a VARCHAR value to a SQL parameter. Used for UTF8 encoded strings.
-
stmt— a pointer to a prepared statement; -
parameter_index— parameter index; -
value_— parameter value; -
param_size— the size of the parameter (string).
The bind_u8_char() function binds a CHAR value to a SQL parameter. Used for UTF8 encoded strings.
-
stmt— a pointer to a prepared statement; -
parameter_index— parameter index; -
value_— parameter value; -
param_size— the size of the parameter (string).
The bind_blob() function binds a BLOB value to an SQL parameter.
-
stmt— a pointer to a prepared statement; -
parameter_index— parameter index; -
value_— parameter value.
The bind_boolean() function binds a BOOLEAN value to an SQL parameter.
-
stmt— a pointer to a prepared statement; -
parameter_index— parameter index; -
value_— parameter value.
The bind_date() function binds a DATE value to a SQL parameter.
-
stmt— a pointer to a prepared statement; -
parameter_index— parameter index; -
value_— parameter value.
The bind_time() function binds a TIME value to an SQL parameter.
-
stmt— a pointer to a prepared statement; -
parameter_index— parameter index; -
value_— parameter value.
|
Using |
The bind_timestamp() function binds a TIMESTAMP value to a SQL parameter.
-
stmt— a pointer to a prepared statement; -
parameter_index— parameter index; -
value_— parameter value.
The bind_null() function binds a NULL value to an SQL parameter. It is not fundamentally necessary to assign a NULL value directly to a single value,
unless it follows from the processing logic. You can also bind NULL by calling the corresponding function bind _… if NULL is passed to it.
-
stmt— a pointer to a prepared statement; -
parameter_index— parameter index; -
batch_size— batch size (default 1). Allows you to set theNULLvalue for the parameter with the specified index, in several elements of the package at once.
The convert_varchar() function converts a VARCHAR value to a different encoding.
Parameters:
-
value_— string value; -
from_— encoding from which to recode the string; -
to_— encoding into which you want to recode the string; -
convert_size— sets the size of the input buffer for conversion (for speed), for UTF8, for example, the number of characters should be * 4. The size of the output buffer is always equal to the size of the returns declaration (you can create your own functions), the size change depends on where and from where it is converted string value: single-byte encoding to multibyte — possibly increasing relative to convert_size and vice versa — decreasing if multibyte encoding is converted to single-byte. The result is always truncated according to the size of the received parameter.
This is a helper function for converting strings to the desired encoding, since the other ODBC side may not always respond in the correct encoding.
The convert_char() function converts a CHAR value to a different encoding.
Parameters:
-
value_— string value; -
from_— encoding from which to recode the string; -
to_— encoding into which you want to recode the string; -
convert_size— sets the size of the input buffer for conversion (for speed), for UTF8, for example, the number of characters should be * 4. The size of the output buffer is always equal to the size of the returns declaration (you can create your own functions), the size change depends on where and from where it is converted string value: single-byte encoding to multibyte — possibly increasing relative to convert_size and vice versa — decreasing if multibyte encoding is converted to single-byte. The result is always truncated according to the size of the received parameter.
This is a helper function for converting strings to the desired encoding, since the other ODBC side may not always respond in the correct encoding.
The clear_bindings () function clears the current bindings for parameters. This function call is required when reusing a prepared statement with new values.
The describe_parameter() function fills a buffer for describing the parameter, that is, it allows you to specify the type, size and scale of the parameter.
-
stmt— a pointer to a prepared request; -
idx— parameter index; -
type_— parameter type; -
size_— size (for strings); -
scale_— scale.
The describe_parameters() function sends this parameter description buffer to ODBC, actually describes the parameters.
The reset_parameters() function resets the parameter information of a prepared query.
15.3.5. NANO$RSLT package
The header of this package looks like this:
CREATE OR ALTER PACKAGE NANO$RSLT
AS
BEGIN

  FUNCTION valid(rslt TY$POINTER NOT NULL) RETURNS BOOLEAN;

  FUNCTION release_(rslt TY$POINTER NOT NULL) RETURNS TY$POINTER;

  FUNCTION connection(rslt TY$POINTER NOT NULL) RETURNS TY$POINTER;

  FUNCTION rowset_size(rslt TY$POINTER NOT NULL) RETURNS INTEGER;
  FUNCTION affected_rows(rslt TY$POINTER NOT NULL) RETURNS INTEGER;
  FUNCTION has_affected_rows(rslt TY$POINTER NOT NULL) RETURNS BOOLEAN;
  FUNCTION rows_(rslt TY$POINTER NOT NULL) RETURNS INTEGER;
  FUNCTION columns(rslt TY$POINTER NOT NULL) RETURNS SMALLINT;

  ------------------------------------------------------------------------------

  FUNCTION first_(rslt TY$POINTER NOT NULL) RETURNS BOOLEAN;
  FUNCTION last_(rslt TY$POINTER NOT NULL) RETURNS BOOLEAN;
  FUNCTION next_(rslt TY$POINTER NOT NULL) RETURNS BOOLEAN;
  FUNCTION prior_(rslt TY$POINTER NOT NULL) RETURNS BOOLEAN;
  FUNCTION move(rslt TY$POINTER NOT NULL, row_ INTEGER NOT NULL) RETURNS BOOLEAN;
  FUNCTION skip_(rslt TY$POINTER NOT NULL, row_ INTEGER NOT NULL) RETURNS BOOLEAN;
  FUNCTION position_(rslt TY$POINTER NOT NULL) RETURNS INTEGER;
  FUNCTION at_end(rslt TY$POINTER NOT NULL) RETURNS BOOLEAN;

  ------------------------------------------------------------------------------

  FUNCTION get_smallint(
      rslt TY$POINTER NOT NULL, column_ VARCHAR(63) CHARACTER SET UTF8 NOT NULL
    ) RETURNS SMALLINT;

  FUNCTION get_integer(
      rslt TY$POINTER NOT NULL, column_ VARCHAR(63) CHARACTER SET UTF8 NOT NULL
    ) RETURNS INTEGER;

/*
  FUNCTION get_bigint(
      rslt TY$POINTER NOT NULL, column_ VARCHAR(63) CHARACTER SET UTF8 NOT NULL
    ) RETURNS BIGINT;
*/

  FUNCTION get_float(
      rslt TY$POINTER NOT NULL, column_ VARCHAR(63) CHARACTER SET UTF8 NOT NULL
    ) RETURNS FLOAT;

  FUNCTION get_double(
      rslt TY$POINTER NOT NULL, column_ VARCHAR(63) CHARACTER SET UTF8 NOT NULL
    ) RETURNS DOUBLE PRECISION;

  FUNCTION get_varchar_s(
      rslt TY$POINTER NOT NULL, column_ VARCHAR(63) CHARACTER SET UTF8 NOT NULL
    ) RETURNS VARCHAR(64) CHARACTER SET NONE;

  FUNCTION get_varchar(
      rslt TY$POINTER NOT NULL, column_ VARCHAR(63) CHARACTER SET UTF8 NOT NULL
    ) RETURNS VARCHAR(256) CHARACTER SET NONE;

  FUNCTION get_varchar_l(
      rslt TY$POINTER NOT NULL, column_ VARCHAR(63) CHARACTER SET UTF8 NOT NULL
    ) RETURNS VARCHAR(1024) CHARACTER SET NONE;

  FUNCTION get_varchar_xl (
      rslt TY$POINTER NOT NULL, column_ VARCHAR(63) CHARACTER SET UTF8 NOT NULL
    ) RETURNS VARCHAR(8192) CHARACTER SET NONE;

  FUNCTION get_varchar_xxl (
      rslt TY$POINTER NOT NULL, column_ VARCHAR(63) CHARACTER SET UTF8 NOT NULL
    ) RETURNS VARCHAR(32765) CHARACTER SET NONE;

  FUNCTION get_char_s (
      rslt TY$POINTER NOT NULL, column_ VARCHAR(63) CHARACTER SET UTF8 NOT NULL
    ) RETURNS CHAR(64) CHARACTER SET NONE;

  FUNCTION get_char (
      rslt TY$POINTER NOT NULL, column_ VARCHAR(63) CHARACTER SET UTF8 NOT NULL
    ) RETURNS CHAR(256) CHARACTER SET NONE;

  FUNCTION get_char_l (
      rslt TY$POINTER NOT NULL, column_ VARCHAR(63) CHARACTER SET UTF8 NOT NULL
    ) RETURNS CHAR(1024) CHARACTER SET NONE;

  FUNCTION get_char_xl(
      rslt TY$POINTER NOT NULL, column_ VARCHAR(63) CHARACTER SET UTF8 NOT NULL
    ) RETURNS CHAR(8192) CHARACTER SET NONE;

  FUNCTION get_char_xxl(
      rslt TY$POINTER NOT NULL, column_ VARCHAR(63) CHARACTER SET UTF8 NOT NULL
    ) RETURNS CHAR(32767) CHARACTER SET NONE;

  FUNCTION get_u8_varchar(
      rslt TY$POINTER NOT NULL, column_ VARCHAR(63) CHARACTER SET UTF8 NOT NULL
    ) RETURNS VARCHAR(64) CHARACTER SET UTF8;

  FUNCTION get_u8_varchar_l(
      rslt TY$POINTER NOT NULL, column_ VARCHAR(63) CHARACTER SET UTF8 NOT NULL
    ) RETURNS VARCHAR(256) CHARACTER SET UTF8;

  FUNCTION get_u8_varchar_xl(
      rslt TY$POINTER NOT NULL, column_ VARCHAR(63) CHARACTER SET UTF8 NOT NULL
    ) RETURNS VARCHAR(2048) CHARACTER SET UTF8;

  FUNCTION get_u8_varchar_xxl(
      rslt TY$POINTER NOT NULL, column_ VARCHAR(63) CHARACTER SET UTF8 NOT NULL
    ) RETURNS VARCHAR(8191) CHARACTER SET UTF8;

  FUNCTION get_u8_char(
      rslt TY$POINTER NOT NULL, column_ VARCHAR(63) CHARACTER SET UTF8 NOT NULL
    ) RETURNS CHAR(64) CHARACTER SET UTF8;

  FUNCTION get_u8_char_l(
      rslt TY$POINTER NOT NULL, column_ VARCHAR(63) CHARACTER SET UTF8 NOT NULL
    ) RETURNS CHAR(256) CHARACTER SET UTF8;

  FUNCTION get_u8_char_xl(
      rslt TY$POINTER NOT NULL, column_ VARCHAR(63) CHARACTER SET UTF8 NOT NULL
    ) RETURNS CHAR(2048) CHARACTER SET UTF8;

  FUNCTION get_u8_char_xxl(
      rslt TY$POINTER NOT NULL, column_ VARCHAR(63) CHARACTER SET UTF8 NOT NULL
    ) RETURNS CHAR(8191) CHARACTER SET UTF8;

  FUNCTION get_blob(
      rslt TY$POINTER NOT NULL, column_ VARCHAR(63) CHARACTER SET UTF8 NOT NULL
    ) RETURNS BLOB;

  FUNCTION get_boolean(
      rslt TY$POINTER NOT NULL, column_ VARCHAR(63) CHARACTER SET UTF8 NOT NULL
    ) RETURNS BOOLEAN;

  FUNCTION get_date(
      rslt TY$POINTER NOT NULL, column_ VARCHAR(63) CHARACTER SET UTF8 NOT NULL
    ) RETURNS DATE;

/*
  FUNCTION get_time(
      rslt TY$POINTER NOT NULL, column_ VARCHAR(63) CHARACTER SET UTF8 NOT NULL
    ) RETURNS TIME;
*/

  FUNCTION get_timestamp(
      rslt TY$POINTER NOT NULL, column_ VARCHAR(63) CHARACTER SET UTF8 NOT NULL
    ) RETURNS TIMESTAMP;

  FUNCTION convert_varchar_s(
      value_ VARCHAR(64) CHARACTER SET NONE,
      from_ VARCHAR(20) CHARACTER SET NONE NOT NULL,
      to_ VARCHAR(20) CHARACTER SET NONE NOT NULL,
      convert_size SMALLINT NOT NULL DEFAULT 0
    ) RETURNS VARCHAR(64) CHARACTER SET NONE;

  FUNCTION convert_varchar(
      value_ VARCHAR(256) CHARACTER SET NONE,
      from_ VARCHAR(20) CHARACTER SET NONE NOT NULL,
      to_ VARCHAR(20) CHARACTER SET NONE NOT NULL,
      convert_size SMALLINT NOT NULL DEFAULT 0
    ) RETURNS VARCHAR(256) CHARACTER SET NONE;

  FUNCTION convert_varchar_l(
      value_ VARCHAR(1024) CHARACTER SET NONE,
      from_ VARCHAR(20) CHARACTER SET NONE NOT NULL,
      to_ VARCHAR(20) CHARACTER SET NONE NOT NULL,
      convert_size SMALLINT NOT NULL DEFAULT 0
    ) RETURNS VARCHAR(1024) CHARACTER SET NONE;

  FUNCTION convert_varchar_xl(
      value_ VARCHAR(8192) CHARACTER SET NONE,
      from_ VARCHAR(20) CHARACTER SET NONE NOT NULL,
      to_ VARCHAR(20) CHARACTER SET NONE NOT NULL,
      convert_size SMALLINT NOT NULL DEFAULT 0
    ) RETURNS VARCHAR(8192) CHARACTER SET NONE;

  FUNCTION convert_varchar_xxl(
      value_ VARCHAR(32765) CHARACTER SET NONE,
      from_ VARCHAR(20) CHARACTER SET NONE NOT NULL,
      to_ VARCHAR(20) CHARACTER SET NONE NOT NULL,
      convert_size SMALLINT NOT NULL DEFAULT 0
    ) RETURNS VARCHAR(32765) CHARACTER SET NONE;

  FUNCTION convert_char_s(
      value_ CHAR(64) CHARACTER SET NONE,
      from_ VARCHAR(20) CHARACTER SET NONE NOT NULL,
      to_ VARCHAR(20) CHARACTER SET NONE NOT NULL,
      convert_size SMALLINT NOT NULL DEFAULT 0
    ) RETURNS CHAR(64) CHARACTER SET NONE;

  FUNCTION convert_char(
      value_ CHAR(256) CHARACTER SET NONE,
      from_ VARCHAR(20) CHARACTER SET NONE NOT NULL,
      to_ VARCHAR(20) CHARACTER SET NONE NOT NULL,
      convert_size SMALLINT NOT NULL DEFAULT 0
    ) RETURNS CHAR(256) CHARACTER SET NONE;

  FUNCTION convert_char_l(
      value_ CHAR(1024) CHARACTER SET NONE,
      from_ VARCHAR(20) CHARACTER SET NONE NOT NULL,
      to_ VARCHAR(20) CHARACTER SET NONE NOT NULL,
      convert_size SMALLINT NOT NULL DEFAULT 0
    ) RETURNS CHAR(1024) CHARACTER SET NONE;

  FUNCTION convert_char_xl(
      value_ CHAR(8192) CHARACTER SET NONE,
      from_ VARCHAR(20) CHARACTER SET NONE NOT NULL,
      to_ VARCHAR(20) CHARACTER SET NONE NOT NULL,
      convert_size SMALLINT NOT NULL DEFAULT 0
    ) RETURNS CHAR(8192) CHARACTER SET NONE;

  FUNCTION convert_char_xxl(
      value_ CHAR(32767) CHARACTER SET NONE,
      from_ VARCHAR(20) CHARACTER SET NONE NOT NULL,
      to_ VARCHAR(20) CHARACTER SET NONE NOT NULL,
      convert_size SMALLINT NOT NULL DEFAULT 0
    ) RETURNS CHAR(32767) CHARACTER SET NONE;

  ------------------------------------------------------------------------------

  FUNCTION unbind(rslt TY$POINTER NOT NULL, column_ VARCHAR(63) CHARACTER SET UTF8 NOT NULL)
    RETURNS TY$NANO_BLANK;

  FUNCTION is_null(rslt TY$POINTER NOT NULL, column_ VARCHAR(63) CHARACTER SET UTF8 NOT NULL)
    RETURNS BOOLEAN;

  FUNCTION is_bound( -- now hiding exception out of range
      rslt TY$POINTER NOT NULL, column_ VARCHAR(63) CHARACTER SET UTF8 NOT NULL)
    RETURNS BOOLEAN;

  FUNCTION column_(rslt TY$POINTER NOT NULL, column_ VARCHAR(63) CHARACTER SET UTF8 NOT NULL)
    RETURNS SMALLINT;

  FUNCTION column_name(rslt TY$POINTER NOT NULL, index_ SMALLINT NOT NULL)
    RETURNS VARCHAR(63) CHARACTER SET UTF8;

  FUNCTION column_size(rslt TY$POINTER NOT NULL, column_ VARCHAR(63) CHARACTER SET UTF8 NOT NULL)
    RETURNS INTEGER;

  FUNCTION column_decimal_digits(rslt TY$POINTER NOT NULL, column_ VARCHAR(63) CHARACTER SET UTF8 NOT NULL)
    RETURNS INTEGER;

  FUNCTION column_datatype(rslt TY$POINTER NOT NULL, column_ VARCHAR(63) CHARACTER SET UTF8 NOT NULL)
    RETURNS INTEGER;

  FUNCTION column_datatype_name(rslt TY$POINTER NOT NULL, column_ VARCHAR(63) CHARACTER SET UTF8 NOT NULL)
    RETURNS VARCHAR(63) CHARACTER SET UTF8;

  FUNCTION column_c_datatype(rslt TY$POINTER NOT NULL, column_ VARCHAR(63) CHARACTER SET UTF8 NOT NULL)
    RETURNS INTEGER;

  FUNCTION next_result(rslt TY$POINTER NOT NULL) RETURNS BOOLEAN;

  ------------------------------------------------------------------------------

  FUNCTION has_data(rslt TY$POINTER NOT NULL) RETURNS BOOLEAN;

END
The NANO$RSLT package contains functions for working with a dataset returned by an SQL query.
The valid() function returns whether the pointer to the dataset is valid.
The release_() function releases the pointer to the dataset.
The connection() function returns a pointer to a database connection.
The rowset_size() function returns the size of the dataset (how many active cursors are in the dataset).
The affected_rows() function returns the number of rows affected by the statement (fetched in the cursor).
The has_affected_rows() function returns whether at least one row is affected by the statement.
The rows_() function returns the number of records in the open cursor.
The columns() function returns the number of columns in the current cursor.
The first_() function moves the current cursor to the first record. Works only for bidirectional (scrollable cursors). Returns true if the operation is successful.
The last_() function moves the current cursor to the last record. Works only for bidirectional (scrollable cursors). Returns true if the operation is successful.
The next_() function moves the current cursor to the next record. Returns true if the operation is successful.
The prior_() function moves the current cursor to the previous record. Works only for bidirectional (scrollable cursors). Returns true if the operation is successful.
The move() function moves the current cursor to the specified record. Works only for bidirectional (scrollable cursors). Returns true if the operation is successful.
-
rslt- a pointer to a prepared dataset; -
row_- record number.
The skip_() function moves the current cursor by the specified number of records. Works only for bidirectional (scrollable cursors). Returns true if the operation is successful.
-
rslt- a pointer to a prepared dataset; -
row_- how many records to skip.
The position_() function returns the current position of the cursor.
The at_end() function returns whether the cursor has reached the last record.
The get_smallint() function returns the value of the SMALLINT column.
-
rslt- a pointer to a prepared dataset; -
column_- the name of the column or its number0..n-1.
The get_integer() function returns the value of an INTEGER column.
-
rslt- a pointer to a prepared dataset; -
column_- the name of the column or its number0..n-1.
The get_bigint() function returns the value of a BIGINT column.
-
rslt- a pointer to a prepared dataset; -
column_- the name of the column or its number0..n-1.
The get_float() function returns the value of a FLOAT column.
-
rslt- a pointer to a prepared dataset; -
column_- the name of the column or its number0..n-1.
The get_double() function returns the value of a DOUBLE PRECISION column.
-
rslt- a pointer to a prepared dataset; -
column_- the name of the column or its number0..n-1.
The get_varchar() function returns the value of column VARCHAR (256) CHARACTER SET NONE. The function is intended for single-byte encodings.
-
rslt- a pointer to a prepared dataset; -
column_- the name of the column or its number0..n-1.
There is a whole family of these suffixed functions. The maximum size of the returned string changes depending on the suffix:
-
_s-VARCHAR (64) CHARACTER SET NONE; -
_l-VARCHAR (1024) CHARACTER SET NONE; -
_xl-VARCHAR (8192) CHARACTER SET NONE; -
_xxl-VARCHAR (32765) CHARACTER SET NONE.
The data retrieval speed depends on the maximum row size. So filling the buffer for a VARCHAR (32765) string is several times slower than for a VARCHAR (256) string, so you need to choose the size of a smaller value if you don’t need a larger one.
The get_char() function returns the value of column CHAR (256) CHARACTER SET NONE. The function is intended for single-byte encodings.
-
rslt- a pointer to a prepared dataset; -
column_- the name of the column or its number0..n-1.
There is a whole family of these suffixed functions. The maximum size of the returned string changes depending on the suffix:
-
_s-CHAR (64) CHARACTER SET NONE; -
_l-CHAR (1024) CHARACTER SET NONE; -
_xl-CHAR (8192) CHARACTER SET NONE; -
_xxl-CHAR (32767) CHARACTER SET NONE.
The data retrieval speed depends on the maximum row size. So filling the buffer for the CHAR (32767) string is several times slower than for the CHAR (256) string, so you need to choose the size of a smaller value if you don’t need a larger one.
The get_u8_varchar() function returns the value of column VARCHAR (64) CHARACTER SET UTF8.
-
rslt- a pointer to a prepared dataset; -
column_- the name of the column or its number0..n-1.
There is a whole family of these suffixed functions. The maximum size of the returned string changes depending on the suffix:
-
_l- VARCHAR (256) CHARACTER SET UTF8; -
_xl- VARCHAR (2048) CHARACTER SET UTF8; -
_xxl- VARCHAR (8191) CHARACTER SET UTF8.
The get_u8_char() function returns the value of column CHAR (64) CHARACTER SET UTF8.
-
rslt- a pointer to a prepared dataset; -
column_- the name of the column or its number0..n-1.
There is a whole family of these suffixed functions. The maximum size of the returned string changes depending on the suffix:
-
_l- CHAR (256) CHARACTER SET UTF8; -
_xl- CHAR (2048) CHARACTER SET UTF8; -
_xxl- CHAR (8191) CHARACTER SET UTF8.
The get_blob() function returns the value of a BLOB column.
-
rslt- a pointer to a prepared dataset; -
column_- the name of the column or its number0..n-1.
The get_boolean() function returns the value of a BOOLEAN column.
-
rslt- a pointer to a prepared dataset; -
column_- the name of the column or its number0..n-1.
The get_date() function returns the value of a DATE column.
-
rslt- a pointer to a prepared dataset; -
column_- the name of the column or its number0..n-1.
The get_time() function returns the value of a TIME column.
-
rslt- a pointer to a prepared dataset; -
column_- the name of the column or its number0..n-1.
The get_timestamp() function returns the value of a TIMESTAMP column.
-
rslt- a pointer to a prepared dataset; -
column_- the name of the column or its number0..n-1.
The convert_varchar() function converts a VARCHAR value to a different encoding.
Parameters:
-
value_- string value; -
from_- encoding from which to recode the string; -
to_- encoding into which you want to recode the string; -
convert_size- sets the size of the input buffer for conversion. Seenano$stmt.convert_[var]char.
There is a whole family of these suffixed functions. The maximum size of the returned string changes depending on the suffix:
-
_s-VARCHAR (64) CHARACTER SET NONE; -
_l-VARCHAR (1024) CHARACTER SET NONE; -
_xl-VARCHAR (8192) CHARACTER SET NONE; -
_xxl-VARCHAR (32765) CHARACTER SET NONE.
The convert_char() function converts a CHAR value to a different encoding.
Parameters:
-
value_- string value; -
from_- encoding from which to recode the string; -
to_- encoding into which you want to recode the string; -
convert_size- set the size of the input buffer for conversion. Seenano$stmt.convert_[var]char.
There is a whole family of these suffixed functions. The maximum size of the returned string changes depending on the suffix:
-
_s-CHAR (64) CHARACTER SET NONE; -
_l-CHAR (1024) CHARACTER SET NONE; -
_xl-CHAR (8192) CHARACTER SET NONE; -
_xxl-CHAR (32765) CHARACTER SET NONE.
The unbind() function unbinds a buffer from a given column. The peculiarity of transferring large data types in some ODBC implementations.
-
rslt- a pointer to a prepared dataset; -
column_- the name of the column or its number0..n-1.
The is_null() function returns whether the value of a column is null.
-
rslt- a pointer to a prepared dataset; -
column_- the name of the column or its number0..n-1.
The is_bound() function checks if a buffer of values for a given column is bound.
-
rslt- a pointer to a prepared dataset; -
column_- the name of the column or its number0..n-1.
The column_() function returns the number of a column by its name.
-
rslt- a pointer to a prepared dataset; -
column_is the name of the column.
The column_name() function returns the name of a column by its index.
-
rslt- a pointer to a prepared dataset; -
index_- column number0..n-1.
The column_size() function returns the size of a column. For string fields, the number of characters.
The column_decimal_digits() function returns the precision for numeric types.
-
rslt- a pointer to a prepared dataset; -
column_- the name of the column or its number0..n-1.
The column_datatype() function returns the type of the column.
-
rslt- a pointer to a prepared dataset; -
column_- the name of the column or its number0..n-1.
The column_datatype_name() function returns the name of the column type.
-
rslt- a pointer to a prepared dataset; -
column_- the name of the column or its number0..n-1.
The column_c_datatype() function returns the type of the column as encoded in ODBC constants.
-
rslt- a pointer to a prepared dataset; -
column_- the name of the column or its number0..n-1.
The next_result() function switches to the next data set.
-
rslt- a pointer to a prepared dataset.
The has_data() function returns whether there is data in a dataset.
-
rslt- a pointer to a prepared dataset.
15.3.6. NANO$FUNC package
The header of this package looks like this:
CREATE OR ALTER PACKAGE NANO$FUNC
AS
BEGIN

  /*  Note:
        Result cursor by default ODBC driver (NANODBC implementation),
        scrollable into NANO$STMT
   */

  FUNCTION execute_conn(
      conn TY$POINTER NOT NULL,
      query VARCHAR(8191) CHARACTER SET UTF8 NOT NULL,
      batch_operations INTEGER NOT NULL DEFAULT 1,
      timeout INTEGER NOT NULL DEFAULT 0
    ) RETURNS TY$POINTER;

  FUNCTION just_execute_conn(
      conn TY$POINTER NOT NULL,
      query VARCHAR(8191) CHARACTER SET UTF8 NOT NULL,
      batch_operations INTEGER NOT NULL DEFAULT 1,
      timeout INTEGER NOT NULL DEFAULT 0
    ) RETURNS TY$NANO_BLANK;

  FUNCTION execute_stmt(
      stmt TY$POINTER NOT NULL, batch_operations INTEGER NOT NULL DEFAULT 1
    ) RETURNS TY$POINTER;

  FUNCTION just_execute_stmt(
      stmt TY$POINTER NOT NULL, batch_operations INTEGER NOT NULL DEFAULT 1
    ) RETURNS TY$NANO_BLANK;

  FUNCTION transact_stmt(
      stmt TY$POINTER NOT NULL, batch_operations INTEGER NOT NULL DEFAULT 1
    ) RETURNS TY$POINTER;

  FUNCTION just_transact_stmt(
      stmt TY$POINTER NOT NULL, batch_operations INTEGER NOT NULL DEFAULT 1
    ) RETURNS TY$NANO_BLANK;

  FUNCTION prepare_stmt(
      stmt TY$POINTER NOT NULL,
      query VARCHAR(8191) CHARACTER SET UTF8 NOT NULL,
      timeout INTEGER NOT NULL DEFAULT 0
    ) RETURNS TY$NANO_BLANK;

END
The NANO$FUNC package contains functions for working with SQL queries. This package is a lightweight version of the NANO$STMT package. The peculiarity is that the
functions performed have inherited the behavior of NANODBC without changes and their own modifications of the UDR in terms of the exchange of parameters and values.
Possible direction of use: performing ODBC connection settings through executing SQL commands (just_execute …), if supported, event logging, etc. simple operations.
The execute_conn() function prepares and executes an SQL statement. The function returns a pointer to a data set (cursor), which can be processed using the functions of the NANO$RSLT package.
Parameters:
-
conn- connection pointer; -
query- the text of the SQL query; -
batch_operations- the number of batch operations. The default is 1; -
timeout- SQL statement timeout.
The just_execute_conn() function prepares and executes the SQL statement. The function is designed to execute SQL statements that do not return data (do not open
a cursor). A pointer to the SQL query object is not created.
Parameters:
-
conn- connection pointer; -
query- the text of the SQL query; -
batch_operations- the number of batch operations. The default is 1; -
timeout- SQL statement timeout.
The execute_stmt() function executes the prepared SQL statement. The function returns a pointer to a data set (cursor), which can be processed using the functions of the NANO$RSLT package.
Parameters:
-
stmt- a pointer to a prepared statement; -
batch_operations- the number of batch operations. The default is 1.
The transact_stmt() function - executes a previously prepared SQL statement, starting and ending its own (autonomous) transaction. The function returns a pointer to a data set (cursor), which can be processed using the functions of the NANO$RSLT package.
Parameters:
-
stmt- a pointer to a prepared statement; -
batch_operations- the number of batch operations. The default is 1.
Function just_transact_stmt() - executes a previously prepared SQL statement, starting and ending its own (autonomous) transaction. The function is designed to execute SQL statements that do not return data (do not open a cursor).
Parameters:
-
stmt- a pointer to a prepared statement; -
batch_operations- the number of batch operations. The default is 1.
The prepare_stmt() function prepares the SQL query. Parameters:
-
stmt- a pointer to the statement; -
query- the text of the SQL query; -
timeout- SQL statement timeout.
15.4. Examples
15.4.1. Fetching data from a Postgresql table
This example fetches from a Postgresql database. The block text is provided with comments to understand what is happening.
EXECUTE BLOCK
RETURNS (
  id bigint,
  name VARCHAR(1024) CHARACTER SET UTF8
)
AS
  DECLARE conn_str varchar(512) CHARACTER SET UTF8;
  declare variable sql_txt VARCHAR(8191) CHARACTER SET UTF8;
  DECLARE conn ty$pointer;
  DECLARE stmt ty$pointer;
  DECLARE rs ty$pointer;
  DECLARE tnx ty$pointer;
BEGIN
  conn_str = 'DRIVER={PostgreSQL ODBC Driver(UNICODE)};SERVER=localhost;DATABASE=test;UID=postgres;PASSWORD=mypassword';
  sql_txt = 'select * from t1';

  -- initialize nanodbc
  -- this function can be called in the ON CONNECT trigger
  nano$udr.initialize();

  BEGIN
    -- connect to ODBC data source
    conn = nano$conn.connection(conn_str);
    WHEN EXCEPTION nano$nanodbc_error DO
    BEGIN
      -- if the connection was unsuccessful
      -- call the function to terminate nanodbc
      -- instead of an explicit call in the script, this function can be called
      -- in the ON DISCONNECT trigger
      nano$udr.finalize();
      -- rethrow exception
      EXCEPTION;
    END
  END

  BEGIN
    -- allocate a pointer to an SQL statement
    stmt = nano$stmt.statement_(conn);
    -- prepare query
    nano$stmt.prepare_(stmt, sql_txt);
    -- execute query
    -- function returns a pointer to a dataset
    rs = nano$stmt.execute_(stmt);
    -- while there are records in the cursor, move forward along it
    while (nano$rslt.next_(rs)) do
    begin
      -- for each column, depending on its type, it is necessary to call
      -- the corresponding function or function with the type to which
      -- the initial column can be converted
      id = nano$rslt.get_integer(rs, 'id');
      -- note, since we are working with UTF8, the function is called with u8
      name = nano$rslt.get_u8_char_l(rs, 'name');
      suspend;
    end

    -- release the previously allocated resource
    /*
    rs = nano$rslt.release_(rs);
    stmt = nano$stmt.release_(stmt);
    */
    -- the above functions can be omitted, since calling
    -- nano$conn.release_ will automatically release all resources
    -- bound to the connection
    conn = nano$conn.release_(conn);
    -- call the function to terminate nanodbc
    -- instead of an explicit call in the script, this function can be called
    -- in the ON DISCONNECT trigger
    nano$udr.finalize();

    WHEN EXCEPTION nano$invalid_resource,
         EXCEPTION nano$nanodbc_error,
         EXCEPTION nano$binding_error
    DO
    BEGIN
      -- if an error occurs
      -- release previously allocated resources
      /*
      rs = nano$rslt.release_(rs);
      stmt = nano$stmt.release_(stmt);
      */
      -- the above functions can be omitted, since calling
      -- nano$conn.release_ will automatically release all resources
      -- bound to the connection
      conn = nano$conn.release_(conn);
      -- call the function to terminate nanodbc
      -- instead of an explicit call in the script, this function can be called
      -- in the ON DISCONNECT trigger
      nano$udr.finalize();
      -- rethrow exception
      EXCEPTION;
    END
  END
END
15.4.2. Inserting data into a Postgresql table
This example inserts a new row into a table. The block text is provided with comments to understand what is happening.
EXECUTE BLOCK
RETURNS (
  aff_rows integer
)
AS
  DECLARE conn_str varchar(512) CHARACTER SET UTF8;
  declare variable sql_txt VARCHAR(8191) CHARACTER SET UTF8;
  DECLARE conn ty$pointer;
  DECLARE stmt ty$pointer;
  DECLARE tnx ty$pointer;
BEGIN
  conn_str = 'DRIVER={PostgreSQL ODBC Driver(UNICODE)};SERVER=localhost;DATABASE=test;UID=postgres;PASSWORD=mypassword';
  sql_txt = 'insert into t1(id, name) values(?, ?)';

  -- initialize nanodbc
  -- this function can be called in the ON CONNECT trigger
  nano$udr.initialize();

  BEGIN
    -- connect to ODBC data source
    conn = nano$conn.connection(conn_str);
    WHEN EXCEPTION nano$nanodbc_error DO
    BEGIN
      -- if the connection was unsuccessful
      -- call the function to terminate nanodbc
      -- instead of an explicit call in the script, this function can be called
      -- in the ON DISCONNECT trigger
      nano$udr.finalize();
      EXCEPTION;
    END
  END

  BEGIN
    -- allocate a pointer to an SQL statement
    stmt = nano$stmt.statement_(conn);
    -- prepare query
    nano$stmt.prepare_(stmt, sql_txt);
    -- set query parameters
    -- index starts from 0!
    nano$stmt.bind_integer(stmt, 0, 4);
    nano$stmt.bind_u8_varchar(stmt, 1, 'Row 4', 4 * 20);
    -- execute INSERT statement
    nano$stmt.just_execute(stmt);
    -- get the number of affected rows
    aff_rows = nano$stmt.affected_rows(stmt);
    -- release the previously allocated resource
    conn = nano$conn.release_(conn);
    -- call the function to terminate nanodbc
    -- instead of an explicit call in the script, this function can be called
    -- in the ON DISCONNECT trigger
    nano$udr.finalize();

    WHEN EXCEPTION nano$invalid_resource,
         EXCEPTION nano$nanodbc_error,
         EXCEPTION nano$binding_error
    DO
    BEGIN
      -- release the previously allocated resource
      conn = nano$conn.release_(conn);
      -- call the function to terminate nanodbc
      -- instead of an explicit call in the script, this function can be called
      -- in the ON DISCONNECT trigger
      nano$udr.finalize();
      EXCEPTION;
    END
  END

  suspend;
END
15.4.3. Batch insert into a Postgresql table
If the DBMS and ODBC driver support batch execution of queries, then batch operations can be used.
EXECUTE BLOCK
AS
  DECLARE conn_str varchar(512) CHARACTER SET UTF8;
  declare variable sql_txt VARCHAR(8191) CHARACTER SET UTF8;
  DECLARE conn ty$pointer;
  DECLARE stmt ty$pointer;
  DECLARE tnx ty$pointer;
BEGIN
  conn_str = 'DRIVER={PostgreSQL ODBC Driver(UNICODE)};SERVER=localhost;DATABASE=test;UID=postgres;PASSWORD=mypassword';
  sql_txt = 'insert into t1(id, name) values(?, ?)';

  -- initialize nanodbc
  -- this function can be called in the ON CONNECT trigger
  nano$udr.initialize();

  BEGIN
    -- connect to ODBC data source
    conn = nano$conn.connection(conn_str);
    WHEN EXCEPTION nano$nanodbc_error DO
    BEGIN
      -- if the connection was unsuccessful
      -- call the function to terminate nanodbc
      -- instead of an explicit call in the script, this function can be called
      -- in the ON DISCONNECT trigger
      nano$udr.finalize();
      EXCEPTION;
    END
  END

  BEGIN
    -- allocate a pointer to an SQL statement
    stmt = nano$stmt.statement_(conn);
    -- prepare query
    nano$stmt.prepare_(stmt, sql_txt);
    -- set query parameters
    -- index starts from 0!
    -- first row
    nano$stmt.bind_integer(stmt, 0, 5);
    nano$stmt.bind_u8_varchar(stmt, 1, 'Row 5', 4 * 20);
    -- second row
    nano$stmt.bind_integer(stmt, 0, 6);
    nano$stmt.bind_u8_varchar(stmt, 1, 'Row 6', 4 * 20);
    -- execute an INSERT statement with a batch size of 2
    nano$stmt.just_execute(stmt, 2);
    -- release the previously allocated resource
    conn = nano$conn.release_(conn);
    -- call the function to terminate nanodbc
    -- instead of an explicit call in the script, this function can be called
    -- in the ON DISCONNECT trigger
    nano$udr.finalize();

    WHEN EXCEPTION nano$invalid_resource,
         EXCEPTION nano$nanodbc_error,
         EXCEPTION nano$binding_error
    DO
    BEGIN
      -- release the previously allocated resource
      conn = nano$conn.release_(conn);
      -- call the function to terminate nanodbc
      -- instead of an explicit call in the script, this function can be called
      -- in the ON DISCONNECT trigger
      nano$udr.finalize();
      EXCEPTION;
    END
  END
END
15.4.4. Using transaction
EXECUTE BLOCK
AS
  DECLARE conn_str varchar(512) CHARACTER SET UTF8;
  DECLARE sql_txt VARCHAR(8191) CHARACTER SET UTF8;
  DECLARE sql_txt2 VARCHAR(8191) CHARACTER SET UTF8;
  DECLARE conn ty$pointer;
  DECLARE stmt ty$pointer;
  DECLARE stmt2 ty$pointer;
  DECLARE tnx ty$pointer;
BEGIN
  conn_str = 'DRIVER={PostgreSQL ODBC Driver(UNICODE)};SERVER=localhost;DATABASE=test;UID=postgres;PASSWORD=mypassword';
  sql_txt = 'insert into t1(id, name) values(?, ?)';
  sql_txt2 = 'insert into t2(id, name) values(?, ?)';

  -- initialize nanodbc
  -- this function can be called in the ON CONNECT trigger
  nano$udr.initialize();

  BEGIN
    -- connect to ODBC data source
    conn = nano$conn.connection(conn_str);
    WHEN EXCEPTION nano$nanodbc_error DO
    BEGIN
      -- if the connection was unsuccessful
      -- call the function to terminate nanodbc
      -- instead of an explicit call in the script, this function can be called
      -- in the ON DISCONNECT trigger
      nano$udr.finalize();
      EXCEPTION;
    END
  END

  BEGIN
    -- prepare first SQL query
    stmt = nano$stmt.statement_(conn);
    nano$stmt.prepare_(stmt, sql_txt);
    -- prepare second SQL query
    stmt2 = nano$stmt.statement_(conn);
    nano$stmt.prepare_(stmt2, sql_txt2);
    -- start transaction
    tnx = nano$tnx.transaction_(conn);
    -- execute first statement within the transaction
    nano$stmt.bind_integer(stmt, 0, 8);
    nano$stmt.bind_u8_varchar(stmt, 1, 'Row 8', 4 * 20);
    nano$stmt.just_execute(stmt);
    -- execute second statement within the transaction
    nano$stmt.bind_integer(stmt2, 0, 1);
    nano$stmt.bind_u8_varchar(stmt2, 1, 'Row 1', 4 * 20);
    nano$stmt.just_execute(stmt2);
    -- commit transaction
    nano$tnx.commit_(tnx);

    -- release the previously allocated resource
    conn = nano$conn.release_(conn);
    -- call the function to terminate nanodbc
    -- instead of an explicit call in the script, this function can be called
    -- in the ON DISCONNECT trigger
    nano$udr.finalize();

    WHEN EXCEPTION nano$invalid_resource,
         EXCEPTION nano$nanodbc_error,
         EXCEPTION nano$binding_error
    DO
    BEGIN
      -- release the previously allocated resource
      -- in case of an error, the unconfirmed transaction will be rolled back automatically
      conn = nano$conn.release_(conn);
      -- call the function to terminate nanodbc
      -- instead of an explicit call in the script, this function can be called
      -- in the ON DISCONNECT trigger
      nano$udr.finalize();
      EXCEPTION;
    END
  END
END
16. HTTP Client UDR
The IBSurgeon HTTP Client UDR library is designed to work with HTTP services, for example, via the REST-API. To implement the HTTP client, the open source library libcurl is used, which provides interaction with Web services via the HTTP protocol using the 'GET', 'HEAD', 'POST', ' PUT', 'PATCH', 'DELETE', 'OPTIONS', 'TRACE'. In addition, additional procedures and functions are provided for parsing HTTP headers, as well as parsing and constructing URLs.
The HTTP Client UDR is 100% free and open source, licensed under IDPL. The library source code is available at https://github.com/IBSurgeon/http_client_udr
Versions for Windows and Linux are available: for Windows we have ready-to-use binaries, and for Linux we need to build UDR from source depending on the specific distribution (we have a simple build instruction).
16.1. Installing the HTTP Client UDR
The HQBird installation package for Windows installs the UDR Http Client if the appropriate option has been selected. Under Linux, you are encouraged to build the library yourself from source.
In order for your database to be able to use the Http Client UDR library, you need to run the SQL registration script in it, which is located in {$fbroot}/plugins/udr/sql/http_client_install.sql.
16.2. Build on Linux
Must be installed before build
On Ubuntu
sudo apt-get install libcurl4-openssl-devOn CentOS
sudo yum install libcurl-develNow you can do the build itself.
git clone https://github.com/IBSurgeon/http_client_udr.git
cd http_client_udr
mkdir build; cd build
cmake ..
make
sudo make install
16.3. Package HTTP_UTILS
All procedures and functions for working with the HTTP Client library are located in the PSQL package HTTP_UTILS.
16.3.1. Procedure HTTP_UTILS.HTTP_REQUEST
The HTTP_UTILS.HTTP_REQUEST procedure is designed to send an HTTP request and receive an HTTP response.
  PROCEDURE HTTP_REQUEST (
    METHOD               D_HTTP_METHOD NOT NULL,
    URL                  VARCHAR(8191) NOT NULL,
    REQUEST_BODY         BLOB DEFAULT NULL,
    REQUEST_TYPE         VARCHAR(256) DEFAULT NULL,
    HEADERS              VARCHAR(8191) DEFAULT NULL,
    OPTIONS              VARCHAR(8191) DEFAULT NULL
  )
  RETURNS (
    STATUS_CODE          SMALLINT,
    STATUS_TEXT          VARCHAR(256),
    RESPONSE_TYPE        VARCHAR(256),
    RESPONSE_BODY        BLOB,
    RESPONSE_HEADERS     BLOB SUB_TYPE TEXT
  );
Input parameters:
-
METHOD- HTTP method. Required parameter. Possible values are 'GET', 'HEAD', 'POST', 'PUT', 'PATCH', 'DELETE', 'OPTIONS', 'TRACE'. -
URL- URL address. Required parameter. -
REQUEST_BODY- HTTP request body. -
REQUEST_TYPE- the content type of the request body. The value of this parameter is passed as theContent-Typeheader. -
HEADERS- other HTTP request headers. Each heading must be on a new line, that is, headings are separated by a newline character. -
OPTIONS- CURL library options.
Output parameters:
-
STATUS_CODE- response status code. -
STATUS_TEXT- response status text. -
RESPONSE_TYPE- response content type. Contains the values of theContent-Typeheader. -
RESPONSE_BODY- response body. -
RESPONSE_HEADERS- response headers.
The HTTP_UTILS.HTTP_REQUEST procedure is the main procedure by which communication with web services takes place.
Procedures HTTP_UTILS.HTTP_GET, HTTP_UTILS.HTTP_HEAD, HTTP_UTILS.HTTP_POST, HTTP_UTILS.HTTP_PUT, HTTP_UTILS.HTTP_PATCH,
HTTP_UTILS.HTTP_DELETE, HTTP_UTILS.HTTP_OPTIONS, HTTP_UTILS.HTTP_TRACE are derived from HTTP_UTILS.HTTP_REQUEST.
Inside, they call HTTP_UTILS.HTTP_REQUEST with the METHOD parameter filled in, and unnecessary input and output parameters are removed, which
simplifies access to a web resource by a specific HTTP method.
The first two parameters of the HTTP_UTILS.HTTP_REQUEST procedure are mandatory.
The REQUEST_BODY request body is not allowed for all HTTP methods. If it is, then it is desirable to also specify the REQUEST_TYPE parameter, which corresponds to the Content-Type header.
In the HEADERS parameter, you can pass additional headers as a string. Each heading must be separated by a line break.
In the OPTIONS parameter, you can pass additional options for the CURL library in the form CURLOPT_*=<value>. Each new parameter must be separated by a newline.
The response body is always returned in binary form, but you can convert it to text with the desired encoding using CAST(RESPONSE_BODY AS BLOB SUB_TYPE TEXT …).
Examples of using:
SELECT
  R.STATUS_CODE,
  R.STATUS_TEXT,
  R.RESPONSE_TYPE,
  R.RESPONSE_HEADERS,
  CAST(R.RESPONSE_BODY AS BLOB SUB_TYPE TEXT CHARACTER SET UTF8) AS RESPONSE_BODY
FROM HTTP_UTILS.HTTP_REQUEST (
  'GET',
  'https://www.cbr-xml-daily.ru/latest.js'
) R;

SELECT
  R.STATUS_CODE,
  R.STATUS_TEXT,
  R.RESPONSE_TYPE,
  R.RESPONSE_HEADERS,
  CAST(R.RESPONSE_BODY AS BLOB SUB_TYPE TEXT CHARACTER SET UTF8) AS RESPONSE_BODY
FROM HTTP_UTILS.HTTP_REQUEST (
  -- method
  'POST',
  -- URL
  'https://suggestions.dadata.ru/suggestions/api/4_1/rs/suggest/party',
  -- query body
  trim('
{
    "query": "810702819220",
    "type": "INDIVIDUAL"
}
  '),
  -- content-type
  'application/json',
  -- headers
  q'{
Authorization: Token b81a595753ff53056468a939c034c96b49177db3
  }'
) R;
An example of setting CURL parameters:
SELECT
  R.STATUS_CODE,
  R.STATUS_TEXT,
  R.RESPONSE_TYPE,
  R.RESPONSE_HEADERS,
  CAST(R.RESPONSE_BODY AS BLOB SUB_TYPE TEXT CHARACTER SET UTF8) AS RESPONSE_BODY
FROM HTTP_UTILS.HTTP_REQUEST (
  'GET',
  'https://yandex.ru',
  NULL,
  NULL,
  NULL,
  q'{
CURLOPT_FOLLOWLOCATION=0
CURLOPT_USERAGENT=Mozilla/5.0 (Windows NT 10.0; Win64; x64) AppleWebKit/537.36 (KHTML, like Gecko) Chrome/112.0.0.0 Safari/537.36 OPR/98.0.0.0
  }'
) R;
Supported CURL Options
-
CURLOPT_FOLLOWLOCATION (default value 1)
-
CURLOPT_MAXREDIRS (default value 50)
The list of supported options depends on which version of libcurl the library was built against.
16.3.2. Procedure HTTP_UTILS.HTTP_GET
The HTTP_UTILS.HTTP_GET procedure is designed to send an HTTP request using the GET method.
  PROCEDURE HTTP_GET (
    URL                  VARCHAR(8191) NOT NULL,
    HEADERS              VARCHAR(8191) DEFAULT NULL,
    OPTIONS              VARCHAR(8191) DEFAULT NULL
  )
  RETURNS (
    STATUS_CODE          SMALLINT,
    STATUS_TEXT          VARCHAR(256),
    RESPONSE_TYPE        VARCHAR(256),
    RESPONSE_BODY        BLOB,
    RESPONSE_HEADERS     BLOB SUB_TYPE TEXT
  );
Input parameters:
-
URL- URL address. Required parameter. -
HEADERS- other HTTP request headers. Each heading must be on a new line, that is, headings are separated by a newline character. -
OPTIONS- CURL library options.
Output parameters:
-
STATUS_CODE- response status code. -
STATUS_TEXT- response status text. -
RESPONSE_TYPE- response content type. Contains the values of theContent-Typeheader. -
RESPONSE_BODY- response body. -
RESPONSE_HEADERS- response headers.
Usage example:
SELECT
  R.STATUS_CODE,
  R.STATUS_TEXT,
  R.RESPONSE_TYPE,
  R.RESPONSE_HEADERS,
  CAST(R.RESPONSE_BODY AS BLOB SUB_TYPE TEXT CHARACTER SET UTF8) AS RESPONSE_BODY
FROM HTTP_UTILS.HTTP_GET('https://www.cbr-xml-daily.ru/latest.js') R;
16.3.3. Procedure HTTP_UTILS.HTTP_HEAD
The HTTP_UTILS.HTTP_HEAD procedure is designed to send an HTTP request using the HEAD method.
  PROCEDURE HTTP_HEAD (
    URL                  VARCHAR(8191) NOT NULL,
    HEADERS              VARCHAR(8191) DEFAULT NULL,
    OPTIONS              VARCHAR(8191) DEFAULT NULL
  )
  RETURNS (
    STATUS_CODE          SMALLINT,
    STATUS_TEXT          VARCHAR(256),
    RESPONSE_TYPE        VARCHAR(256),
    RESPONSE_HEADERS     BLOB SUB_TYPE TEXT
  );
Input parameters:
-
URL- URL address. Required parameter. -
HEADERS- other HTTP request headers. Each heading must be on a new line, that is, headings are separated by a newline character. -
OPTIONS- CURL library options.
Output parameters:
-
STATUS_CODE- response status code. -
STATUS_TEXT- response status text. -
RESPONSE_TYPE- response content type. Contains the values of theContent-Typeheader. -
RESPONSE_HEADERS- response headers.
16.3.4. Procedure HTTP_UTILS.HTTP_POST
The HTTP_UTILS.HTTP_POST procedure is designed to send an HTTP request using the POST method.
  PROCEDURE HTTP_POST (
    URL                  VARCHAR(8191) NOT NULL,
    REQUEST_BODY         BLOB DEFAULT NULL,
    REQUEST_TYPE         VARCHAR(256) DEFAULT NULL,
    HEADERS              VARCHAR(8191) DEFAULT NULL,
    OPTIONS              VARCHAR(8191) DEFAULT NULL
  )
  RETURNS (
    STATUS_CODE          SMALLINT,
    STATUS_TEXT          VARCHAR(256),
    RESPONSE_TYPE        VARCHAR(256),
    RESPONSE_BODY        BLOB,
    RESPONSE_HEADERS     BLOB SUB_TYPE TEXT
  );
Input parameters:
-
URL- URL address. Required parameter. -
REQUEST_BODY- HTTP request body. -
REQUEST_TYPE- the content type of the request body. The value of this parameter is passed as theContent-Typeheader. -
HEADERS- other HTTP request headers. Each heading must be on a new line, that is, headings are separated by a newline character. -
OPTIONS- CURL library options.
Output parameters:
-
STATUS_CODE- response status code. -
STATUS_TEXT- response status text. -
RESPONSE_TYPE- response content type. Contains the values of theContent-Typeheader. -
RESPONSE_BODY- response body. -
RESPONSE_HEADERS- response headers.
16.3.5. Procedure HTTP_UTILS.HTTP_PUT
The HTTP_UTILS.HTTP_PUT procedure is designed to send an HTTP request using the PUT method.
  PROCEDURE HTTP_PUT (
    URL                  VARCHAR(8191) NOT NULL,
    REQUEST_BODY         BLOB DEFAULT NULL,
    REQUEST_TYPE         VARCHAR(256) DEFAULT NULL,
    HEADERS              VARCHAR(8191) DEFAULT NULL,
    OPTIONS              VARCHAR(8191) DEFAULT NULL
  )
  RETURNS (
    STATUS_CODE          SMALLINT,
    STATUS_TEXT          VARCHAR(256),
    RESPONSE_TYPE        VARCHAR(256),
    RESPONSE_BODY        BLOB,
    RESPONSE_HEADERS     BLOB SUB_TYPE TEXT
  );
Input parameters:
-
URL- URL address. Required parameter. -
REQUEST_BODY- HTTP request body. -
REQUEST_TYPE- the content type of the request body. The value of this parameter is passed as theContent-Typeheader. -
HEADERS- other HTTP request headers. Each heading must be on a new line, that is, headings are separated by a newline character. -
OPTIONS- CURL library options.
Output parameters:
-
STATUS_CODE- response status code. -
STATUS_TEXT- response status text. -
RESPONSE_TYPE- response content type. Contains the values of theContent-Typeheader. -
RESPONSE_BODY- response body. -
RESPONSE_HEADERS- response headers.
16.3.6. Procedure HTTP_UTILS.HTTP_PATCH
The HTTP_UTILS.HTTP_PATCH procedure is designed to send an HTTP request using the PATCH method.
  PROCEDURE HTTP_PATCH (
    URL                  VARCHAR(8191) NOT NULL,
    REQUEST_BODY         BLOB DEFAULT NULL,
    REQUEST_TYPE         VARCHAR(256) DEFAULT NULL,
    HEADERS              VARCHAR(8191) DEFAULT NULL,
    OPTIONS              VARCHAR(8191) DEFAULT NULL
  )
  RETURNS (
    STATUS_CODE          SMALLINT,
    STATUS_TEXT          VARCHAR(256),
    RESPONSE_TYPE        VARCHAR(256),
    RESPONSE_BODY        BLOB,
    RESPONSE_HEADERS     BLOB SUB_TYPE TEXT
  );
Input parameters:
-
URL- URL address. Required parameter. -
REQUEST_BODY- HTTP request body. -
REQUEST_TYPE- the content type of the request body. The value of this parameter is passed as theContent-Typeheader. -
HEADERS- other HTTP request headers. Each heading must be on a new line, that is, headings are separated by a newline character. -
OPTIONS- CURL library options.
Output parameters:
-
STATUS_CODE- response status code. -
STATUS_TEXT- response status text. -
RESPONSE_TYPE- response content type. Contains the values of theContent-Typeheader. -
RESPONSE_BODY- response body. -
RESPONSE_HEADERS- response headers.
16.3.7. Procedure HTTP_UTILS.HTTP_DELETE
The HTTP_UTILS.HTTP_DELETE procedure is designed to send an HTTP request using the DELETE method.
  PROCEDURE HTTP_DELETE (
    URL                  VARCHAR(8191) NOT NULL,
    REQUEST_BODY         BLOB DEFAULT NULL,
    REQUEST_TYPE         VARCHAR(256) DEFAULT NULL,
    HEADERS              VARCHAR(8191) DEFAULT NULL,
    OPTIONS              VARCHAR(8191) DEFAULT NULL
  )
  RETURNS (
    STATUS_CODE          SMALLINT,
    STATUS_TEXT          VARCHAR(256),
    RESPONSE_TYPE        VARCHAR(256),
    RESPONSE_BODY        BLOB,
    RESPONSE_HEADERS     BLOB SUB_TYPE TEXT
  );
Input parameters:
-
URL- URL address. Required parameter. -
REQUEST_BODY- HTTP request body. -
REQUEST_TYPE- the content type of the request body. The value of this parameter is passed as theContent-Typeheader. -
HEADERS- other HTTP request headers. Each heading must be on a new line, that is, headings are separated by a newline character. -
OPTIONS- CURL library options.
Output parameters:
-
STATUS_CODE- response status code. -
STATUS_TEXT- response status text. -
RESPONSE_TYPE- response content type. Contains the values of theContent-Typeheader. -
RESPONSE_BODY- response body. -
RESPONSE_HEADERS- response headers.
16.3.8. Procedure HTTP_UTILS.HTTP_OPTIONS
The HTTP_UTILS.HTTP_OPTIONS procedure is designed to send an HTTP request using the OPTIONS method.
  PROCEDURE HTTP_OPTIONS (
    URL                  VARCHAR(8191) NOT NULL,
    HEADERS              VARCHAR(8191) DEFAULT NULL,
    OPTIONS              VARCHAR(8191) DEFAULT NULL
  )
  RETURNS (
    STATUS_CODE          SMALLINT,
    STATUS_TEXT          VARCHAR(256),
    RESPONSE_TYPE        VARCHAR(256),
    RESPONSE_BODY        BLOB,
    RESPONSE_HEADERS     BLOB SUB_TYPE TEXT
  );
Input parameters:
-
URL- URL address. Required parameter. -
HEADERS- other HTTP request headers. Each heading must be on a new line, that is, headings are separated by a newline character. -
OPTIONS- CURL library options.
Output parameters:
-
STATUS_CODE- response status code. -
STATUS_TEXT- response status text. -
RESPONSE_TYPE- response content type. Contains the values of theContent-Typeheader. -
RESPONSE_BODY- response body. -
RESPONSE_HEADERS- response headers.
16.3.9. Procedure HTTP_UTILS.HTTP_TRACE
The HTTP_UTILS.HTTP_TRACE procedure is designed to send an HTTP request using the TRACE method.
  PROCEDURE HTTP_TRACE (
    URL                  VARCHAR(8191) NOT NULL,
    HEADERS              VARCHAR(8191) DEFAULT NULL,
    OPTIONS              VARCHAR(8191) DEFAULT NULL
  )
  RETURNS (
    STATUS_CODE          SMALLINT,
    STATUS_TEXT          VARCHAR(256),
    RESPONSE_TYPE        VARCHAR(256),
    RESPONSE_BODY        BLOB,
    RESPONSE_HEADERS     BLOB SUB_TYPE TEXT
  );
Input parameters:
-
URL- URL address. Required parameter. -
HEADERS- other HTTP request headers. Each heading must be on a new line, that is, headings are separated by a newline character. -
OPTIONS- CURL library options.
Output parameters:
-
STATUS_CODE- response status code. -
STATUS_TEXT- response status text. -
RESPONSE_TYPE- response content type. Contains the values of theContent-Typeheader. -
RESPONSE_BODY- response body. -
RESPONSE_HEADERS- response headers.
16.3.10. Function HTTP_UTILS.URL_ENCODE
The HTTP_UTILS.URL_ENCODE function is for URL encoding of a string.
  FUNCTION URL_ENCODE (
    STR VARCHAR(8191)
  )
  RETURNS VARCHAR(8191);
Usage example:
SELECT
  HTTP_UTILS.URL_ENCODE('N&N') as encoded
FROM RDB$DATABASE;
16.3.11. Function HTTP_UTILS.URL_DECODE
The HTTP_UTILS.URL_DECODE function is for URL string decoding.
  FUNCTION URL_DECODE (
    STR VARCHAR(8191)
  )
  RETURNS VARCHAR(8191);
Usage example:
SELECT
  HTTP_UTILS.URL_DECODE('N%26N') as decoded
FROM RDB$DATABASE;
16.3.12. Procedure HTTP_UTILS.PARSE_URL
The HTTP_UTILS.PARSE_URL procedure is designed to parse a URL into its component parts,
according to the specification RFC 3986.
Requirement: minimum version of libcurl is 7.62.0.
  PROCEDURE PARSE_URL (
    URL                  VARCHAR(8191)
  )
  RETURNS (
    URL_SCHEME           VARCHAR(64),
    URL_USER             VARCHAR(64),
    URL_PASSWORD         VARCHAR(64),
    URL_HOST             VARCHAR(256),
    URL_PORT             INTEGER,
    URL_PATH             VARCHAR(8191),
    URL_QUERY            VARCHAR(8191),
    URL_FRAGMENT         VARCHAR(8191)
  );
Input parameters:
-
URL- URL address, in the format<URL> ::= <scheme>:[//[<user>:<password>@]<host>[:<port>]][/]<path>[?<query>][#<fragment>].
Output parameters:
-
URL_SCHEMEis a scheme that defines the protocol. -
URL_USER- username. -
URL_PASSWORD- password. -
URL_HOST- host. -
URL_PORT- port number (1-65535) specified in the URL, if the port is not specified, then returns NULL. -
URL_PATH- URL path. The path part will be '/' even if no path is specified in the URL. The URL path always starts with a forward slash. -
URL_QUERY- query (parameters). -
URL_FRAGMENT- fragment (anchor).
Usage example:
SELECT
    URL_SCHEME,
    URL_USER,
    URL_PASSWORD,
    URL_HOST,
    URL_PORT,
    URL_PATH,
    URL_QUERY,
    URL_FRAGMENT
FROM HTTP_UTILS.PARSE_URL('https://user:password@server:8080/part/put?a=1&b=2#fragment');
16.3.13. Function HTTP_UTILS.BUILD_URL
The HTTP_UTILS.BUILD_URL function builds a URL from its component parts, according to the specification RFC 3986.
Requirement: The minimum version of libcurl is 7.62.0.
  FUNCTION BUILD_URL (
    URL_SCHEME           VARCHAR(64) NOT NULL,
    URL_USER             VARCHAR(64),
    URL_PASSWORD         VARCHAR(64),
    URL_HOST             VARCHAR(256) NOT NULL,
    URL_PORT             INTEGER DEFAULT NULL,
    URL_PATH             VARCHAR(8191) DEFAULT NULL,
    URL_QUERY            VARCHAR(8191) DEFAULT NULL,
    URL_FRAGMENT         VARCHAR(8191) DEFAULT NULL
  )
  RETURNS VARCHAR(8191);
Input parameters:
-
URL_SCHEMEis a scheme that defines the protocol. -
URL_USER- username. -
URL_PASSWORD- password. -
URL_HOST- host. -
URL_PORT- port number (1-65535) specified in the URL, if the port is not specified, then returns NULL. -
URL_PATH- URL path. The path part will be '/' even if no path is specified in the URL. The URL path always starts with a forward slash. -
URL_QUERY- query (parameters). -
URL_FRAGMENT- fragment (anchor).
Result: URL string according to the specification RFC 3986, i.e. in the format
<URL> ::= <scheme>:[//[<user>:<password>@]<host>[:<port>]][/]<path>[?<query>][#<fragment>].
Usage example:
SELECT
  HTTP_UTILS.BUILD_URL(
    'https',
    NULL,
    NULL,
    'localhost',
    8080,
    '/',
    'query=database',
    'DB'
  ) AS URL
FROM RDB$DATABASE;
16.3.14. Function HTTP_UTILS.URL_APPEND_QUERY
The HTTP_UTILS.URL_APPEND_QUERY function is designed to add parameters to the URL address, while previously
the existing QUERY part of the URL is preserved.
Requirement: The minimum version of libcurl is 7.62.0.
  FUNCTION URL_APPEND_QUERY (
    URL                  VARCHAR(8191) NOT NULL,
    URL_QUERY            VARCHAR(8191),
    URL_ENCODE           BOOLEAN NOT NULL DEFAULT FALSE
  )
  RETURNS VARCHAR(8191);
Input parameters:
-
URL- URL address, in the format<URL> ::= <scheme>:[//[<user>:<password>@]<host>[:<port>]][/]<path> [?<query>][#<fragment>]. -
URL_QUERY- added parameters or parameter. -
URL_ENCODE- ifTRUE, then URL encoding of the added parameterURL_QUERYis performed. The part of the string before the first=is not encoded.
Result: URL with added parameters.
Usage example:
EXECUTE BLOCK
RETURNS (
  URL VARCHAR(8191)
)
AS
BEGIN
  URL = 'https://example.com/?shoes=2';
  URL = HTTP_UTILS.URL_APPEND_QUERY(URL, 'hat=1');
  URL = HTTP_UTILS.URL_APPEND_QUERY(URL, 'candy=N&N', TRUE);
  SUSPEND;
END
The result will be a URL https://example.com/?shoes=2&hat=1&candy=N%26N.
16.3.15. Function HTTP_UTILS.APPEND_QUERY
The HTTP_UTILS.APPEND_QUERY function collects parameter values into a single string.
Further, this string can be added to the URL as parameters or passed to the request body if the request is sent using the POST method with
Content-Type: application/x-www-form-urlencoded.
Requirement: The minimum version of libcurl is 7.62.0.
  FUNCTION APPEND_QUERY (
    URL_QUERY            VARCHAR(8191),
    NEW_QUERY            VARCHAR(8191),
    URL_ENCODE           BOOLEAN NOT NULL DEFAULT FALSE
  )
  RETURNS VARCHAR(8191);
Input parameters:
-
URL_QUERY- existing parameters to which you need to add new ones. If theURL_QUERYparameter isNULL, then the result will be a string containing only the parameters to be added. -
NEW_QUERY- added parameters or parameter. -
URL_ENCODE- ifTRUE, then URL encoding of the added parameterNEW_QUERYis performed. The part of the string before the first=is not encoded.
Result: string with added parameters.
Usage example:
EXECUTE BLOCK
RETURNS (
  QUERY VARCHAR(8191)
)
AS
BEGIN
  QUERY = HTTP_UTILS.APPEND_QUERY(NULL, 'shoes=2');
  QUERY = HTTP_UTILS.APPEND_QUERY(QUERY, 'hat=1');
  QUERY = HTTP_UTILS.APPEND_QUERY(QUERY, 'candy=N&N', TRUE);
  SUSPEND;
END
The result will be the string shoes=2&hat=1&candy=N%26N.
16.3.16. Procedure HTTP_UTILS.PARSE_HEADERS
The HTTP_UTILS.PARSE_HEADERS procedure is designed to parse headers returned in an HTTP response.
The procedure returns each header as a separate entry in the HEADER_LINE parameter. If the header is of the form <header name>: <header value>,
then the header name is returned in the HEADER_NAME parameter, and the value is HEADER_VALUE.
  PROCEDURE PARSE_HEADERS (
    HEADERS              BLOB SUB_TYPE TEXT
  )
  RETURNS (
    HEADER_LINE          VARCHAR(8191),
    HEADER_NAME          VARCHAR(256),
    HEADER_VALUE         VARCHAR(8191)
  );
Input parameters:
-
HEADERS- HTTP headers.
Output parameters:
-
HEADER_LINE- HTTP header. -
HEADER_NAME- HTTP header name. -
HEADER_VALUE- HTTP header value.
Usage example:
WITH
  T AS (
    SELECT
      RESPONSE_HEADERS
    FROM HTTP_UTILS.HTTP_GET (
      'https://www.cbr-xml-daily.ru/latest.js'
    )
  )
SELECT
  H.HEADER_LINE,
  H.HEADER_NAME,
  H.HEADER_VALUE
FROM
  T
  LEFT JOIN HTTP_UTILS.PARSE_HEADERS(T.RESPONSE_HEADERS) H ON TRUE;
16.3.17. Function HTTP_UTILS.GET_HEADER_VALUE
The HTTP_UTILS.GET_HEADER_VALUE function returns the value of the first found header with the given name. If the header is not found, then NULL is returned.
  FUNCTION GET_HEADER_VALUE (
    HEADERS              BLOB SUB_TYPE TEXT,
    HEADER_NAME          VARCHAR(256)
  )
  RETURNS VARCHAR(8191);
Input parameters:
-
HEADERS- HTTP headers. -
HEADER_NAME- HTTP header name.
Result: The value of the first found header with the given name, or NULL if no header was found.
Usage example:
WITH
  T AS (
    SELECT
      RESPONSE_HEADERS
    FROM HTTP_UTILS.HTTP_GET (
      'https://www.cbr-xml-daily.ru/latest.js'
    )
  )
SELECT
  HTTP_UTILS.GET_HEADER_VALUE(T.RESPONSE_HEADERS, 'age') AS HEADER_VALUE
FROM T;
16.4. Examples
16.4.1. Getting exchange rates
SELECT
  STATUS_CODE,
  STATUS_TEXT,
  RESPONSE_TYPE,
  RESPONSE_HEADERS,
  RESPONSE_BODY
FROM HTTP_UTILS.HTTP_REQUEST (
  'GET',
  'https://www.cbr-xml-daily.ru/latest.js'
);
16.4.2. Obtaining information about the company by TIN
SELECT
  STATUS_CODE,
  STATUS_TEXT,
  RESPONSE_TYPE,
  RESPONSE_HEADERS,
  RESPONSE_BODY
FROM HTTP_UTILS.HTTP_REQUEST (
  'POST',
  'https://suggestions.dadata.ru/suggestions/api/4_1/rs/suggest/party',
  trim('
{
    "query": "810712829220",
    "type": "INDIVIDUAL"
}
  '),
  'application/json',
  q'{
Authorization: Token b81a595753ff53056469a939c064c96b49177db3
  }'
)
The token has been intentionally changed to non-working. It must be obtained when registering on the dadata.ru service.
17. Firebird Streaming
Firebird streaming is a technology for asynchronously publishing events that occur during the analysis of the replication log.
The service (daemon) fb_streaming is used for event processing. The service monitors for new replication log files, analyzes them and generates events that are processed by one of the plugins.
Available plugins:
-
kafka_cdc_plugin— publishing CDC (Change Data Capture) events in Kafka; -
rabbitmq_plugin— publishing replication events in RabbitMQ; -
mongodb_events_plugin— saving replication events in MongoDB; -
fts_lucene_plugin— automatic updating of full-text indexes without triggers (IBSurgeon Full Text Search UDR); -
simple_json_plugin— saving replication logs in JSON format.
Firebird Streaming technology is designed to work with replication logs in Firebird 4.0 format and higher. It will not work with Firebird 2.5 and 3.0 replication segments.
The fb_streaming service and its plugins are not included in the HQBird 2024 distribution. They can be provided to our clients upon separate request.
17.1. How fb_streaming works?
The fb_streaming service (daemon) checks the contents of the directory specified for the task in the fb_streaming.conf configuration file, and if this directory contains unprocessed replication log files, then it analyzes them and generates appropriate events that are processed by the specified plugin . The last replication segment number processed is written to a control file named <database guid>. The location of this file can be specified in the lockDir configuration parameter. If this parameter is not specified, then by default the control file <database guid> will be created in the directory specified as the archive log directory for the task.
|
Replication log files must be in an archived state. |
The control file is necessary to restore operation after a sudden shutdown of the service (for example, the lights were turned off or the server was rebooted). It contains the following information:
-
control information (database GUID, size, etc.);
-
number of the last processed segment and position in it;
-
the number of the segment with the oldest active transaction (a transaction can start in one segment and end in another);
-
a list of all active transactions in the form of pairs
{tnxNumber, segmentNumber}, wheresegmentNumberis the number of the segment in which the transaction began.
If an emergency situation occurs and the fb_streaming service has been stopped, then the next time it starts, it reads the control file and rereads all replication segments, starting with the number of the segment with the oldest active transaction, and ending with the number of the last processed segment. In the process of reading these segments, fb_streaming repeats all events from the list of active transactions, after which it goes into normal operation.
A replication segment file is deleted if its number is less than the segment number with the oldest active transaction.
During the analysis of replication logs, the following events may occur:
-
transaction start (START);
-
preparation of a two-phase transaction (PREPARE);
-
transaction commit (COMMIT);
-
transaction rollback (ROLLBACK);
-
set savepoint (SAVE);
-
rollback to savepoint (UNDO);
-
release savepoint (RELEASE);
-
set value of the generator (SET SEQUENCE);
-
execution of the SQL statement (EXECUTE SQL). Such events occur only for DDL statements;
-
save BLOB (BLOB);
-
inserting a new record into the table (INSERT);
-
updating records in the table (UPDATE);
-
deleting a record from a table (DELETE).
Which of them will be processed and which are simply ignored depends on the selected plugin.
17.2. Installing and starting a service on Windows
Go to the fb_streaming installation directory.
Perform the settings in the fb_streaming.conf configuration file.
After setting up the configuration file, you can install and start the service.
For help using and installing the service, type the command
fb_streaming helpYou will be shown information on installing, removing, starting and stopping the service:
================================================================================
 Firebird streaming service

 Copyright (c) 2023 IBSurgeon ltd.
================================================================================

usage: fb_streaming <command> [service_name]
Possible commands are:
    install            install service
    remove             remove service
    start              start service
    stop               stop service
After setting up the configuration file, you can install and start the service by running the following commands:
c:\streaming>fb_streaming install
Success install service!

c:\streaming>fb_streaming start
Service start pending...
Service started successfully.
Once installed, you can manage the service through the graphical utility - services (services.msc).
To remove a service, run the following commands:
c:\streaming>fb_streaming stop
Service is already stopped.

c:\streaming>fb_streaming remove
Service deleted successfully
|
If you have multiple |
17.3. Installing and starting a service on Linux
Go to the fb_streaming installation directory. On Linux this is usually the /opt/fb_streaming directory.
Perform the settings in the fb_streaming.conf configuration file.
After setting up the configuration file, you can install and start the service by running the following commands:
sudo systemctl enable fb_streaming

sudo systemctl start fb_streaming
To remove a service, run the following commands:
sudo systemctl stop fb_streaming

sudo systemctl disable fb_streaming
17.4. Configuring the service (daemon) fb_streaming
To configure the service, use the fb_streaming.conf file, which should be located in the fb_streaming root directory.
The configuration file syntax is exactly the same as for Firebird configuration files.
The # character denotes a comment, that is, everything that follows this character to the end of the line is ignored.
The structure of the fb_streaming.conf configuration file looks like this:
# logLevel = info

# pluginDir = $(root)/stream_plugins

task = <sourceDir_1>
{
# other parameters of task 1
}

task = <sourceDir_2>
{
# other parameters of task 2
}
General parameters of the fb_streaming service (daemon):
-
logLevel— logging level (default info). Allowed logging levels: trace, debug, info, warning, error, critical, off. -
pluginDir— directory wherefb_streamingplugins are located. Defaults to$(root)/stream_plugins. The macro substitution$(root)denotes the root directory of the service (daemon).
Next are the task configurations. One service instance can serve several tasks at once. Each task runs in its own thread. A separate task is created for each directory with replication log files.
Here sourceDir_N is the directory with replication log files. These directories must be unique. The same directory cannot be processed by more than one task.
The main parameters of the task:
-
controlFileDir— the directory in which the control file will be created (by default, the same directory assourceDir); -
errorTimeout— timeout after error in seconds. After this timeout expires, the segments will be re-scanned and the task will be restarted. The default is 60 seconds; -
database— database connection string (required); -
username— user name for connecting to the database; -
password— password for connecting to the database; -
plugin— plugin that processes events that occur during the analysis of the replication log (required); -
deleteProcessedFile— whether to delete the log file after processing (trueby default).
The task may also contain other parameters specific to the plugin being used.
Plugins for handling events from the replication log are located in dynamic libraries. The name of the dynamic library file depends on the operating system and is built as follows:
-
for Windows
<plugin name>.dll -
for Linux
lib<plugin name>.so
The dynamic library file must be located in the stream_plugins directory, or in the one specified in the pluginDir parameter.
17.5. Firebird configuration tricks
Please note: replication log archives folder should only be processed by a single fb_streaming service task. If you want to have logical replication running at the same time, or multiple services running on the log archive, then duplication of archive logs in different directories is necessary.
This can be done in the replication.conf file as follows
...
journal_archive_directory = <archiveDir>
journal_archive_command = "copy $(pathname) $(archivepathname) && copy $(pathname) <archiveDirTask>
...
Here archiveDir is the directory of archives for asynchronous replication, archiveDirTask is the directory of archives for the service task fb_streaming.
17.6. Plugin kafka_cdc_plugin
The kafka_cdc_plugin plugin is designed to register data change events in Firebird database tables and save them in Kafka. This process is also known as Change Data Capture, henceforth CDC.
Each event is a document in JSON format, which is as close as possible to the debezium event format. In the next version it is planned to add the ability to serialize events in AVRO format.
17.6.1. How it works
The fb_streaming service (daemon) checks the contents of the directory specified for the task in the fb_streaming.conf configuration file, and if this directory contains unprocessed replication log files, then it analyzes them and generates appropriate events that are processed by the specified plugin. The last replication segment number processed is written to a control file named <database guid>. The location of this file can be specified in the lockDir configuration parameter. If this parameter is not specified, then by default the control file <database guid> will be created in the directory specified as the archive log directory for the task.
|
Important: Replication log files must be in an archived state. |
The control file is necessary to restore operation after a sudden shutdown of the service (for example, the lights were turned off or the server was rebooted). It contains the following information:
-
control information (database GUID, size, etc.);
-
number of the last processed segment and position in it;
-
the number of the segment with the oldest active transaction (a transaction can start in one segment and end in another);
-
a list of all active transactions in the form of pairs
{tnxNumber, segmentNumber}, wheresegmentNumberis the number of the segment in which the transaction began.
If an emergency situation occurs and the fb_streaming service has been stopped, then the next time it starts, it reads the control file and rereads all replication segments, starting with the number of the segment with the oldest active transaction, and ending with the number of the last processed segment. In the process of reading these segments, fb_streaming repeats all events from the list of active transactions, after which it goes into normal operation.
A replication segment file is deleted if its number is less than the segment number with the oldest active transaction.
The kafka_cdc_plugin generates only data change events for the given tables for each of the INSERT, UPDATE and DELETE operations. Each active transaction has its own buffer in which these events accumulate, and they are sent to Kafka only when the transaction completes, after which the buffer is cleared.
Events can enter Kafka in two formats:
-
JSON without schema (parameters
key_converter_schemas_enableandvalue_converter_schemas_enableequal tofalse); -
JSON with a schema (parameters
key_converter_schemas_enableandvalue_converter_schemas_enableequal totrue).
Future versions also plan to add support for event serialization in AVRO format, as well as support for schema registries.
17.6.2. Topic names
By default, kafka_cdc_plugin writes change events for all INSERT, UPDATE and DELETE operations, in one Apache Kafka theme. kafka_cdc_plugin uses the scheme described in the kafka_topic_cdc_event parameter equal to $[topicPrefix].cdc for the names of data change event topics.
Where $[topicPrefix] is a substitution that is replaced by a prefix for topics. This prefix is set by the kafka_topic_prefix parameter, by default it is fb_streaming. Thus, by default, all data change events are write in the topic fb_streaming.cdc (after applying substitution).
There are other substitutions. The substitution $[tableName] indicates the name of the table for which the event is generated. Thus, by specifying in the configuration
kafka_topic_cdc_event = $[topicPrefix].cdc.$[tableName]
each table has its own topic of data change events.
Examples of topics with data change events:
fb_streaming.cdc.products
fb_streaming.cdc.products_on_hand
fb_streaming.cdc.customers
fb_streaming.cdc.orders
The topic name for the metadata change event is specified in the kafka_topic_transaction parameter. Only the substitution $[topicPrefix] is available in this parameter.
17.6.3. Transaction metadata
The kafka_cdc_plugin can generate events that represent transaction boundaries and that enrich data change event messages. By default, generation of transaction boundary events is disabled. It can be enabled by setting the transaction_metadata_enable parameter to true.
The kafka_cdc_plugin generates transaction boundary events for the BEGIN and END delimiters in every transaction. Transaction boundary events contain the following fields:
status-
BEGINorEND; id-
Unique transaction identifier;
ts_ms-
The time of a transaction boundary event (
BEGINorENDevent). Since there is no such time in the replication logs, the time when the event is processed by thekafka_cdc_pluginplugin is processed; event_count(forENDevents)-
Total number of events emitted by the transaction;
data_collections(forENDevents)-
An array of pairs of
data_collectionandevent_count`elements that indicates the number of events that the `kafka_cdc_pluginemits for changes that originate from a data collection.
{
    "status": "BEGIN",
    "id": 901,
    "ts_ms": 1713099401529,
    "event_count": null,
    "data_collections": null
}

{
    "status": "END",
    "id": 901,
    "ts_ms": 1713099404605,
    "event_count": 2,
    "data_collections": [
        {
            "data_collection": "fbstreaming.cdc.CUSTOMERS",
            "event_count": 2
        }
    ]
}
Unless overridden by the kafka_topic_transaction parameter, kafka_cdc_plugin sends transaction events to the $[topicPrefix].transaction topic.
Change data event enrichment
When transaction metadata is enabled (transaction_metadata_enable = true), the Envelope of the data message is populated with a new transaction field. This field provides information about each event as a collection of fields:
id
|
Unique transaction identifier; |
total_order
|
The absolute position of the event among all events generated by the transaction; |
data_collection_order
|
The per-data collection position of the event among all events that were emitted by the transaction. |
{
    "before": null,
    "after": {
        "ID": 20,
        "FIRST_NAME": "Anne",
        "LAST_NAME": "Kretchmar",
        "EMAIL": "[email protected]"
    },
    "source": {
       ...
    },
    "op": "c",
    "ts_ms": 1713099401533,
    "transaction": {
        "id": 901,
        "total_order": 1,
        "data_collection_order": 1
    }
}
17.6.4. Data Change Events
The kafka_cdc_plugin generates a data change event for each INSERT, UPDATE and DELETE operation at the record level. Each event contains a key and a value. The key and value structure depends on the modified table.
The fb_streaming service and the kafka_cdc_plugin plugin are designed for continuous streams of event messages. However, the structure of these events may change over time, which may be difficult for consumers to process. To solve this problem, each event contains a schema for its content or, if you are using a schema registry, a schema identifier that the consumer can use to retrieve the schema from the registry. This makes each event self-contained.
The following JSON skeleton shows the four main parts of a change event. The schema field is only in the change event when you configure the kafka_cdc_plugin plugin to create it. Likewise, the event key and event payload are only found in the change event if you have configured the kafka_cdc_plugin plugin to generate them. If you are using the JSON format and have configured the kafka_cdc_plugin to generate all four main parts of change events, the change events have the following structure:
{
  "schema": { (1)
    ...
   },
  "payload": { (2)
    ...
  }
}
{
  "schema": { (3)
    ...
  },
  "payload": { (4)
    ...
  }
}| Item | Field name | Description |
|---|---|---|
1 |
schema |
The first |
2 |
payload |
The first |
3 |
schema |
The second |
4 |
payload |
The second |
Change event keys
For a given table, the change event key has a structure that contains a field for each column of the table’s primary key at the time the event was created.
Consider the CUSTOMERS table, and an example of a change event key for that table.
CREATE TABLE CUSTOMERS (
  ID BIGINT GENERATED BY DEFAULT AS IDENTITY,
  FIRST_NAME VARCHAR(255) NOT NULL,
  LAST_NAME VARCHAR(255) NOT NULL,
  EMAIL VARCHAR(255) NOT NULL,
  CONSTRAINT PK_CUSTOMERS PRIMARY KEY(ID)
);
{
"schema": { (1)
"type": "struct",
"name": "fbstreaming.CUSTOMERS.Key", (2)
"optional": "false", (3)
"fields": [ (4)
{
"type": "int64",
"optional": false,
"field": "ID"
}
]
},
"payload": { (5)
"ID": 1
}
}| Item | Field name | Description |
|---|---|---|
1 |
|
The schema that describes what is in key’s payload portion. The schema will only be included in the event if the configuration option is set to |
2 |
|
Name of the schema that defines the structure of the key’s payload. This schema describes the structure of the primary key for the table that was changed. Key schema names have the format |
3 |
|
Indicates whether the event key must contain a value in its |
4 |
|
Specifies each field that is expected in the payload, including each field’s name, type, and whether it is required. |
5 |
|
Contains the key for the row for which this change event was generated. In this example, the key, contains a single |
Change event values
The value in a change event is a bit more complicated than the key. Like the key, the value has a schema section and a payload section. The schema section contains the schema that describes the Envelope structure of the payload section, including its nested fields. Change events for operations that create, update or delete data all have a value payload with an envelope structure.
Consider the same sample table that was used to show an example of a change event key:
CREATE TABLE CUSTOMERS (
  ID BIGINT GENERATED BY DEFAULT AS IDENTITY,
  FIRST_NAME VARCHAR(255) NOT NULL,
  LAST_NAME VARCHAR(255) NOT NULL,
  EMAIL VARCHAR(255) NOT NULL,
  CONSTRAINT PK_CUSTOMERS PRIMARY KEY(ID)
);
The value portion of a change event for a change to this table is described for:
-
create events
-
update events
-
delete events
To demonstrate these events, let’s run the following set of SQL queries:
insert into CUSTOMERS (FIRST_NAME, LAST_NAME, EMAIL)
values ('Anne', 'Kretchmar', '[email protected]');

commit;

update CUSTOMERS
set FIRST_NAME = 'Anne Marie';

commit;

delete from CUSTOMERS;

commit;
Create events
The following example shows part of the change event value that fb_streaming generates for an operation that creates data in the CUSTOMERS table:
{
    "schema": { (1)
        "type": "struct",
        "fields": [
            {
                "type": "struct",
                "fields": [
                    {
                        "type": "int64",
                        "optional": false,
                        "field": "ID"
                    },
                    {
                        "type": "string",
                        "optional": false,
                        "field": "FIRST_NAME"
                    },
                    {
                        "type": "string",
                        "optional": false,
                        "field": "LAST_NAME"
                    },
                    {
                        "type": "string",
                        "optional": false,
                        "field": "EMAIL"
                    }
                ],
                "optional": true,
                "name": "fbstreaming.CUSTOMERS.Value", (2)
                "field": "before"
            },
            {
                "type": "struct",
                "fields": [
                    {
                        "type": "int64",
                        "optional": false,
                        "field": "ID"
                    },
                    {
                        "type": "string",
                        "optional": false,
                        "field": "FIRST_NAME"
                    },
                    {
                        "type": "string",
                        "optional": false,
                        "field": "LAST_NAME"
                    },
                    {
                        "type": "string",
                        "optional": false,
                        "field": "EMAIL"
                    }
                ],
                "optional": true,
                "name": "fbstreaming.CUSTOMERS.Value",
                "field": "after"
            },
            {
                "type": "struct",
                "fields": [
                    {
                        "type": "string",
                        "optional": false,
                        "field": "dbguid"
                    },
                    {
                        "type": "int64",
                        "optional": false,
                        "field": "sequence"
                    },
                    {
                        "type": "string",
                        "optional": false,
                        "field": "filename"
                    },
                    {
                        "type": "string",
                        "optional": false,
                        "field": "table"
                    },
                    {
                        "type": "int64",
                        "optional": false,
                        "field": "tnx"
                    },
                    {
                        "type": "int64",
                        "optional": false,
                        "field": "ts_ms"
                    }
                ],
                "optional": false,
                "name": "fbstreaming.Source", (3)
                "field": "source"
            },
            {
                "type": "string",
                "optional": false,
                "field": "op"
            },
            {
                "type": "int64",
                "optional": true,
                "field": "ts_ms"
            }
        ],
        "optional": false,
        "name": "fbstreaming.CUSTOMERS.Envelope" (4)
    },
    "payload": { (5)
       "before": null, (6)
       "after": { (7)
           "ID": 1,
           "FIRST_NAME": "Anne",
           "LAST_NAME": "Kretchmar",
           "EMAIL": "[email protected]"
        },
        "source": { (8)
           "dbguid": "{9D66A972-A8B9-42E0-8542-82D1DA5F1692}",
           "sequence": 1,
           "filename": "TEST.FDB.journal-000000001",
           "table": "CUSTOMERS",
           "tnx": 200,
           "ts_ms": 1711288254908
        },
        "op": "c" <9>,
        "ts_ms": 1711288255056  (10)
    }
}| Item | Field name | Description |
|---|---|---|
1 |
|
The value’s schema, which describes the structure of the value’s payload. A change event’s value schema is the same in every change event that the connector generates for a particular table. The schema will only be included in the event if the configuration option is set to |
2 |
|
In the
The schema names for the |
3 |
|
|
4 |
|
|
5 |
|
The value’s actual data. This is the information that the change event is providing. |
6 |
|
An optional field that specifies the state of the row before the event occurred. When the |
7 |
|
An optional field that specifies the state of the row after the event occurred. In this example, the |
8 |
|
Mandatory field that describes the source metadata for the event. This field contains information that you can use to compare this event with other events, with regard to the origin of the events, the order in which the events occurred, and whether events were part of the same transaction. The source metadata includes:
|
9 |
|
Mandatory string that describes the type of operation that caused the connector to generate the event. In this example,
|
10 |
|
Displays the time at which In the |
Update events
The change event value for the update operation in the example table CUSTOMERS has the same schema as the create event for that table. Likewise, the event value payload has the same structure. However, the event value payload contains different values in the update event. Here is an example of the change event value in the event that fb_streaming generates for an update on the CUSTOMERS table:
{
    "schema": { ... },
    "payload": {
        "before": { (1)
            "ID": 1,
            "FIRST_NAME": "Anne",
            "LAST_NAME": "Kretchmar",
            "EMAIL": "[email protected]"
        },
        "after": { (2)
            "ID": 1,
            "FIRST_NAME": "Anne Marie",
            "LAST_NAME": "Kretchmar",
            "EMAIL": "[email protected]"
        },
        "source": { (3)
            "dbguid": "{9D66A972-A8B9-42E0-8542-82D1DA5F1692}",
            "sequence": 2,
            "filename": "TEST.FDB.journal-000000002",
            "table": "CUSTOMERS",
            "tnx": 219,
            "ts_ms": 1711288254908
        },
        "op": "u", (4)
        "ts_ms": 1711288256121 (5)
    }
}| Item | Field name | Description |
|---|---|---|
1 |
|
An optional field that specifies the state of the row before the event occurred. In an update event value, the |
2 |
|
An optional field that specifies the state of the row after the event occurred. You can compare the |
3 |
|
Mandatory field that describes the source metadata for the event. This field contains information that you can use to compare this event with other events, with regard to the origin of the events, the order in which the events occurred, and whether events were part of the same transaction. The source metadata includes:
|
4 |
|
Mandatory string that describes the type of operation. In an update event value, the |
5 |
|
Displays the time at which In the |
Delete events
The value in a delete change event has the same schema portion as create and update events for the same table. The payload portion in a delete event for the sample CUSTOMERS table looks like this:
{
    "schema": { ... },
    "payload": { (1)
        "before": {
            "ID": 1,
            "FIRST_NAME": "Anne Marie",
            "LAST_NAME": "Kretchmar",
            "EMAIL": "[email protected]"
        },
        "after": null, (2)
        "source": { (3)
            "dbguid": "{9D66A972-A8B9-42E0-8542-82D1DA5F1692}",
            "sequence": 3,
            "filename": "TEST.FDB.journal-000000003",
            "table": "CUSTOMERS",
            "tnx": 258,
            "ts_ms": 1711288254908
        },
        "op": "d", (4)
        "ts_ms": 1711288256152 (5)
    }
}| Item | Field name | Description |
|---|---|---|
1 |
|
Optional field that specifies the state of the row before the event occurred. In a delete event value, the |
2 |
|
Optional field that specifies the state of the row after the event occurred. In a delete event value, the |
3 |
|
Mandatory field that describes the source metadata for the event. This field contains information that you can use to compare this event with other events, with regard to the origin of the events, the order in which the events occurred, and whether events were part of the same transaction. The source metadata includes:
|
4 |
|
Mandatory string that describes the type of operation. The |
5 |
|
Displays the time at which In the |
17.6.5. Data type mappings
| Firebird data type | Literal type | Semantic type |
|---|---|---|
BOOLEAN |
boolean |
|
SMALLINT |
int16 |
|
INTEGER |
int32 |
|
BIGINT |
int64 |
|
INT128 |
string |
|
FLOAT |
float32 |
|
DOUBLE PRECISION |
float64 |
|
NUMERIC(N,M) |
string |
|
DECIMAL(N,M) |
string |
|
DECFLOAT(16) |
string |
|
DECFLOAT(34) |
string |
|
CHAR(N) |
string |
|
VARCHAR(N) |
string |
|
BINARY(N) |
string |
Each byte is encoded with a hexadecimal |
VARBINARY(N) |
string |
Each byte is encoded with a hexadecimal |
TIME |
string |
String representation of time in the format |
TIME WITH TIME ZONE |
string |
String representation of time in the format |
DATE |
string |
String representation of date in |
TIMESTAMP |
string |
String representation of the date and time in the format |
TIMESTAMP WITH TIMEZONE |
string |
String representation of the date and time in the format |
BLOB SUB_TYPE TEXT |
string |
The |
BLOB SUB_TYPE 0 |
string |
The |
17.6.6. Run Change Data Capture
We will describe in detail the steps required to launch Change Data Capture on your database:
-
Setting up Kafka
-
Setting up Firebird and preparing the database
-
Configuring the
fb_streamingservice and thekafka_cdc_pluginplugin -
Launch Kafka
-
Installation and start of the
fb_streamingservice -
Start publishing in the database
Setting up Kafka
To test the kafka_cdc_plugin plugin, a configured Kafka installation in docker is used. To do this, use docker-compose.yml with the following content:
version: "2"

services:

  zookeeper:
    image: confluentinc/cp-zookeeper:7.2.1
    hostname: zookeeper
    container_name: zookeeper
    ports:
      - "2181:2181"
    environment:
      ZOOKEEPER_CLIENT_PORT: 2181
      ZOOKEEPER_TICK_TIME: 2000

  kafka:
    image: confluentinc/cp-server:7.2.1
    hostname: kafka
    container_name: kafka
    depends_on:
      - zookeeper
    ports:
      - "9092:9092"
      - "9997:9997"
    environment:
      KAFKA_BROKER_ID: 1
      KAFKA_ZOOKEEPER_CONNECT: 'zookeeper:2181'
      KAFKA_LISTENER_SECURITY_PROTOCOL_MAP: PLAINTEXT:PLAINTEXT,PLAINTEXT_HOST:PLAINTEXT
      KAFKA_ADVERTISED_LISTENERS: PLAINTEXT://kafka:29092,PLAINTEXT_HOST://localhost:9092
      KAFKA_OFFSETS_TOPIC_REPLICATION_FACTOR: 1
      KAFKA_GROUP_INITIAL_REBALANCE_DELAY_MS: 0
      KAFKA_CONFLUENT_LICENSE_TOPIC_REPLICATION_FACTOR: 1
      KAFKA_CONFLUENT_BALANCER_TOPIC_REPLICATION_FACTOR: 1
      KAFKA_TRANSACTION_STATE_LOG_MIN_ISR: 1
      KAFKA_TRANSACTION_STATE_LOG_REPLICATION_FACTOR: 1
      KAFKA_JMX_PORT: 9997
      KAFKA_JMX_HOSTNAME: kafka

  kafka-ui:
    container_name: kafka-ui
    image: provectuslabs/kafka-ui:latest
    ports:
      - 8080:8080
    environment:
      DYNAMIC_CONFIG_ENABLED: 'true'
    volumes:
      - "d:\\docker\\kafka\\config.yml:/etc/kafkaui/dynamic_config.yaml"
The included file config.yml contains:
auth:
  type: DISABLED
kafka:
  clusters:
  - bootstrapServers: kafka:29092
    name: Kafka CDC Cluster
    properties: {}
    readOnly: false
rbac:
  roles: []
webclient: {}
Setting up Firebird and preparing the database
Now you need to configure asynchronous replication for your database; to do this, you need to add the following lines to the replication.conf file:
database = c:\fbdata\5.0\test.fdb
{
   journal_directory = d:\fbdata\5.0\replication\test\journal
   journal_archive_directory = d:\fbdata\5.0\replication\test\archive
   journal_archive_command = "copy $(pathname) $(archivepathname) && copy $(pathname) d:\fbdata\5.0\replication\test\kafka_source"
   journal_archive_timeout = 10
}
Please note: this involves duplicating log archive files so that logical replication and the task of sending events to Kafka can work simultaneously. This is necessary because log archive files are deleted after processing and cannot be used by another task.
If replication logs are not used for replication itself, but are only needed for Change Data Capture, then the configuration can be simplified:
database = c:\fbdata\5.0\test.fdb
{
   journal_directory = d:\fbdata\5.0\replication\test\journal
   journal_archive_directory = d:\fbdata\5.0\replication\test\kafka_source
   journal_archive_timeout = 10
}
Now you need to include the necessary tables in the publication. For the example above, just add the CUSTOMERS table to the publication. This is done with the following statement:
ALTER DATABASE INCLUDE CUSTOMERS TO PUBLICATION;or you can include all database tables in the publication at once:
ALTER DATABASE INCLUDE ALL TO PUBLICATION;Configuring the fb_streaming service and the kafka_cdc_plugin plugin
Next, we’ll configure the fb_streaming.conf configuration so that fb_streaming automatically sends data change events to Kafka.
task = d:\fbdata\5.0\replication\test\kafka_source
{
    database = inet://localhost:3055/test
    username = SYSDBA
    password = masterkey
    deleteProcessedFile = true
    plugin = kafka_cdc_plugin
    dumpBlobs = true
    kafka_brokers = localhost:9092
    kafka_topic_prefix = fb_streaming
    kafka_topic_cdc_event = $[topicPrefix].cdc
    kafka_topic_transaction = $[topicPrefix].transaction
    key_cdc_events_enable = true
    key_converter_schemas_enable = true
    value_converter_schemas_enable = true
    transaction_metadata_enable = true
}
On Linux this configuration would look like this:
task = /mnt/d/fbdata/5.0/replication/test/kafka_source
{
    database = inet://localhost:3055/test
    username = SYSDBA
    password = masterkey
    deleteProcessedFile = true
    plugin = kafka_cdc_plugin
    dumpBlobs = true
    kafka_brokers = localhost:9092
    kafka_topic_prefix = fb_streaming
    kafka_topic_cdc_event = $[topicPrefix].cdc
    kafka_topic_transaction = $[topicPrefix].transaction
    key_cdc_events_enable = true
    key_converter_schemas_enable = true
    value_converter_schemas_enable = true
    transaction_metadata_enable = true
}
The task parameter describes the task to be performed by the fb_streaming service. It specifies the folder where the replication segment files are located for the plugin to process. There may be several such tasks. This parameter is complex and itself describes the configuration of a specific task. Let’s describe the parameters available for the task performed by the kafka_cdc_plugin plugin:
-
controlFileDir— the directory in which the control file will be created (by default, the same directory assourceDir); -
database— database connection string (required); -
username— user name for connecting to the database; -
password— password for connecting to the database; -
plugin— plugin that processes events that occur during the analysis of the replication log (required); -
deleteProcessedFile— whether to delete the log file after processing (trueby default). It is useful to set this parameter tofalsefor debugging, when the same logs need to be processed multiple times without deleting them; -
warn_tnx_not_found— generate a warning instead of an error if the transaction is not found in the replication segments. If this parameter is set totrue, then an appropriate warning will be written to thefb_streaminglog, the contents of the lost transaction will be ignored, and the plugin will continue to work. Default isfalse; -
errorTimeout— timeout after an error, in seconds. After this timeout expires, the segments will be re-scanned and the task will be restarted. Default is 60 seconds; -
include_tables— a regular expression that defines the names of the tables for which events need to be tracked; -
exclude_tables— a regular expression that defines the names of tables for which events do not need to be tracked; -
dumpBlobs— whether to publish new BLOB field values (defaultfalse); -
kafka_brokers— addresses of Kafka brokers. You can specify multiple addresses. Addresses are separated by commas; -
kafka_topic_prefix— Kafka topic prefix. It specifies a macro substitution$[topicPrefix]that can be used for topic names; -
kafka_topic_cdc_event— the name of the Kafka topic(s) in which data change events are stored. Macro substitutions$[topicPrefix]and$[tableName]can be used; -
kafka_topic_transactionis the name of the Kafka topic in which transaction metadata is stored. Macro substitution$[topicPrefix]can be used; -
async_producer— if you set this parameter totrue, then messages in Kafka will be sent asynchronously, that is,fb_streamingwill not wait for confirmation that the message was successfully sent, but will immediately proceed to processing the next message. Messages are sent asynchronously until the internal buffer of unsent messages is full. By default, the size of this buffer is 500; -
key_cdc_events_enable- if this option is set totrue, each data change event contains key information, otherwise the event key will benull. This can be useful because Kafka uses the event key for partitioning. -
key_converter_schemas_enable— whether to include a schema in the data update event key; -
value_converter_schemas_enable— whether to include the schema in the data update event value; -
transaction_metadata_enable— whether to send transaction start and end events (transaction metadata).
The following describes the parameters of the LibRdKafka library used by this plugin. Each parameter is prefixed with kafka_. Dots inside the parameter are replaced with underscores _. See: https://docs.confluent.io/platform/current/clients/librdkafka/html/md_CONFIGURATION.html.
-
kafka_security_protocol- Protocol used to communicate with brokers. Valid values are:plaintext,ssl,sasl_plaintext,sasl_ssl. In theLibRdKafkalibrary, this parameter has the namesecurity.protocol. Default value:plaintext. -
kafka_ssl_cipher_suites- A list of cipher suites. This is a named combination of authentication, encryption, MAC and key exchange algorithm used to negotiate the security settings for a network connection using TLS or SSL network protocol. By default all the available cipher suites are supported. In theLibRdKafkalibrary, this parameter has the namessl.cipher.suites. -
kafka_ssl_curves_list- The supported-curves extension in the TLS ClientHello message specifies the curves (standard/named, or explicit GF(2^k) or GF(p)) the client is willing to have the server use. See manual page for SSL_CTX_set1_curves_list(3). OpenSSL >= 1.0.2 required. In theLibRdKafkalibrary, this parameter has the namessl.curves.list. -
kafka_ssl_sigalgs_list- The client uses the TLS ClientHello signature_algorithms extension to indicate to the server which signature/hash algorithm pairs may be used in digital signatures. See manual page for SSL_CTX_set1_sigalgs_list(3). OpenSSL >= 1.0.2 required. In theLibRdKafkalibrary, this parameter has the namessl.sigalgs.list. -
kafka_ssl_key_location- Path to client’s private key (PEM) used for authentication. In theLibRdKafkalibrary, this parameter has the namessl.key.location. -
kafka_ssl_key_password- Private key passphrase (for use withssl.key.locationandset_ssl_cert()). In theLibRdKafkalibrary, this parameter has the namessl.key.password. -
kafka_ssl_certificate_location- Path to client’s public key (PEM) used for authentication. In theLibRdKafkalibrary, this parameter has the namessl.certificate.location. -
kafka_ssl_ca_location- File or directory path to CA certificate(s) for verifying the broker’s key. Defaults: On Windows the system’s CA certificates are automatically looked up in the Windows Root certificate store. On Mac OSX this configuration defaults to probe. It is recommended to install openssl using Homebrew, to provide CA certificates. On Linux install the distribution’s ca-certificates package. If OpenSSL is statically linked orssl.ca.locationis set to probe a list of standard paths will be probed and the first one found will be used as the default CA certificate location path. If OpenSSL is dynamically linked the OpenSSL library’s default path will be used (seeOPENSSLDIRin openssl version-a). In theLibRdKafkalibrary, this parameter has the namessl.ca.location. -
kafka_ssl_ca_certificate_stores- Comma-separated list of Windows Certificate stores to load CA certificates from. Certificates will be loaded in the same order as stores are specified. If no certificates can be loaded from any of the specified stores an error is logged and the OpenSSL library’s default CA location is used instead. Store names are typically one or more of: MY, Root, Trust, CA. In theLibRdKafkalibrary, this parameter has the namessl.ca.certificate.stores. Default value:Root. -
kafka_ssl_crl_location- Path to CRL for verifying broker’s certificate validity. In theLibRdKafkalibrary, this parameter has the namessl.crl.location. -
kafka_ssl_keystore_location- Path to client’s keystore (PKCS#12) used for authentication. In theLibRdKafkalibrary, this parameter has the namessl.keystore.location. -
kafka_ssl_keystore_password- Client’s keystore (PKCS#12) password. In theLibRdKafkalibrary, this parameter has the namessl.keystore.password. -
kafka_ssl_providers- Comma-separated list of OpenSSL 3.0.x implementation providers. E.g.,default,legacy. In theLibRdKafkalibrary, this parameter has the namessl.providers. -
kafka_ssl_engine_id- OpenSSL engine id is the name used for loading engine. In theLibRdKafkalibrary, this parameter has the namessl.engine.id. Default value:dynamic. -
kafka_enable_ssl_certificate_verification- Enable OpenSSL’s builtin broker (server) certificate verification. Valid values are:true,false. In theLibRdKafkalibrary, this parameter has the nameenable.ssl.certificate.verification. Default value:true. -
kafka_ssl_endpoint_identification_algorithm- Endpoint identification algorithm to validate broker hostname using broker certificate. Valid values are:none,https.https- Server (broker) hostname verification as specified in RFC2818.none- No endpoint verification. OpenSSL >= 1.0.2 required. In theLibRdKafkalibrary, this parameter has the namessl.endpoint.identification.algorithm. Default value:https. -
kafka_sasl_mechanism- SASL mechanism to use for authentication. Supported:GSSAPI,PLAIN,SCRAM-SHA-256,SCRAM-SHA-512,OAUTHBEARER. NOTE: Despite the name only one mechanism must be configured. In theLibRdKafkalibrary, this parameter has the namesasl.mechanism. Default value:GSSAPI. -
kafka_sasl_username- SASL username for use with thePLAINandSASL-SCRAM-..mechanisms. In theLibRdKafkalibrary, this parameter has the namesasl.username. -
kafka_sasl_password- SASL password for use with thePLAINandSASL-SCRAM-..mechanisms. In theLibRdKafkalibrary, this parameter has the namesasl.password. -
kafka_sasl_kerberos_service_name- Kerberos principal name that Kafka runs as, not including/hostname@REALM. In theLibRdKafkalibrary, this parameter has the namesasl.kerberos.service.name. Default value:kafka. -
kafka_sasl_kerberos_principal- This client’s Kerberos principal name. (Not supported on Windows, will use the logon user’s principal). In theLibRdKafkalibrary, this parameter has the namesasl.kerberos.principal. Default value:kafkaclient. -
kafka_sasl_oauthbearer_config- SASL/OAUTHBEARER configuration. The format is implementation-dependent and must be parsed accordingly. The default unsecured token implementation (see https://tools.ietf.org/html/rfc7515#appendix-A.5) recognizes space-separatedname=valuepairs with valid names includingprincipalClaimName,principal,scopeClaimName,scope, andlifeSeconds. The default value forprincipalClaimNameissub, the default value forscopeClaimNameisscope, and the default value forlifeSecondsis3600. The scope value is CSV format with the default value being no/empty scope. For example:principalClaimName=azp principal=admin scopeClaimName=roles scope=role1,role2 lifeSeconds=600
In addition, SASL extensions can be communicated to the broker via
extension_NAME=value. For example:principal=admin extension_traceId=123
In the
LibRdKafkalibrary, this parameter has the namesasl.oauthbearer.config. -
kafka_sasl_oauthbearer_method- Set todefaultoroidcto control which login method to be used. If set tooidc, the following properties must also be be specified:kafka_sasl_oauthbearer_client_id,kafka_sasl_oauthbearer_client_secretandkafka_sasl_oauthbearer_token_endpoint_url(sasl.oauthbearer.client.id,sasl.oauthbearer.client.secret, andsasl.oauthbearer.token.endpoint.url). In theLibRdKafkalibrary, this parameter has the namesasl.oauthbearer.method. Default value:default. -
kafka_sasl_oauthbearer_client_id- Public identifier for the application. Must be unique across all clients that the authorization server handles. Only used whenkafka_sasl_oauthbearer_method(sasl.oauthbearer.method) is set tooidc. In theLibRdKafkalibrary, this parameter has the namesasl.oauthbearer.client.id. -
kafka_sasl_oauthbearer_client_secret- Client secret only known to the application and the authorization server. This should be a sufficiently random string that is not guessable. Only used whenkafka_sasl_oauthbearer_method(sasl.oauthbearer.method) is set tooidc. In theLibRdKafkalibrary, this parameter has the namesasl.oauthbearer.client.secret. -
kafka_sasl_oauthbearer_scope- Client use this to specify the scope of the access request to the broker. Only used whenkafka_sasl_oauthbearer_method(sasl.oauthbearer.method) is set tooidc. In theLibRdKafkalibrary, this parameter has the namesasl.oauthbearer.scope. -
kafka_sasl_oauthbearer_extensions- Allow additional information to be provided to the broker. Comma-separated list ofkey=valuepairs. E.g.,supportFeatureX=true,organizationId=sales-emea. Only used whenkafka_sasl_oauthbearer_method(sasl.oauthbearer.method) is set tooidc. In theLibRdKafkalibrary, this parameter has the namesasl.oauthbearer.extensions. -
kafka_sasl_oauthbearer_token_endpoint_url- OAuth/OIDC issuer token endpoint HTTP(S) URI used to retrieve token. Only used whenkafka_sasl_oauthbearer_method(sasl.oauthbearer.method) is set tooidc. In theLibRdKafkalibrary, this parameter has the namesasl.oauthbearer.token.endpoint.url.
Launch Kafka
Now you can run docker with a Kafka container:
docker-compose up -dTo stop docker run:
docker-compose downInstalling and starting the fb_streaming service
The next step is to install and start the fb_streaming service.
In Windows, this is done with the following commands (Administrator privileges are required):
fb_streaming install
fb_streaming start
On Linux:
sudo systemctl enable fb_streaming

sudo systemctl start fb_streaming|
To test how |
Start publication in the database
Once you have everything set up and running, you need to enable publishing to your database. This is done with the following SQL query:
ALTER DATABASE ENABLE PUBLICATION;From this moment on, the fb_streaming service will monitor changes in the specified tables and publish them in the fb_streaming.cdc topic, on the servers specified in kafka_brokers.
17.7. rabbitmq_plugin plugin
The rabbitmq_plugin plugin is designed to register events in the Firebird database and send them to the RabbitMQ queue server.
Each event is a JSON document.
The event contains the following information:
-
event type (
INSERT,UPDATE,DELETE,SET SEQUENCE,EXECUTE SQL); -
for
INSERT,UPDATE,DELETEevents:-
the name of the table for which this event occurred;
-
the number of the transaction in which this event occurred;
-
old and new values of the table record fields;
-
an array of changed fields for the
UPDATEevent; -
new values of BLOB fields;
-
-
for the
SET SEQUENCEevent:-
sequence (generator) name;
-
sequence value;
-
-
for the
EXECUTE SQLevent:-
the number of the transaction in which this event occurred;
-
SQL query text.
-
Only new field values are present in the INSERT event.
The UPDATE event contains both old and new field values.
Only the old field values are present in the DELETE event.
The EXECUTE SQL event occurs only for DDL queries.
|
For BLOB fields, the |
17.7.1. The algorithm of the rabbitmq_plugin plugin
Each event is packaged in JSON format and sent to the RabbitMQ queue server exchange specified in the exchange_name parameter. Depending on the exchanger type, the event is either sent to all queues associated with the exchanger, or to the queue bound by the routing_key routing key. If the queue_name parameter is specified, then the queue with the given name is declared and bound by the routing_key key to the exchanger exchange_name.
-
the
fb_streamingservice analyzes the replication log directory set for the task for unprocessed files; -
for unprocessed replication files, the following events are analyzed:
-
start of transaction. Allocates a structure in memory to store savepoints;
-
create a savepoint. A structure in memory is allocated for storing documents;
-
release the savepoint. Documents saved in this savepoint are copied to a higher-level savepoint;
-
rollback of the savepoint (the savepoint is destroyed along with all documents);
-
commit the transaction. Documents created in the
INSERT,UPDATE,DELETEandEXECUTE SQLevents are sent to the RabbitMQ exchanger; -
transaction rollback. All savepoints and documents stored in them are destroyed;
-
DDL query execution (
EXECUTE SQL). A new document is created and saved to the list of documents for the savepoint. The statement text, event type, and transaction number are stored in the document; -
setting a new sequence value (
SET SEQUENCE). A new document is created and immediately sent to the RabbitMQ exchange. The sequence name, event type, and new sequence value are stored in the document; -
INSERT,UPDATEandDELETEevents. The table name is checked in theinclude_tablesandexclude_tablesfilters, and if the table name satisfies the filtering criteria, then a new document is created and saved to the list of documents for the savepoint. The document saves the table name, event type, transaction number, old and new field values.
-
-
after processing the file, its number is fixed in the control file.
Other replication events are ignored.
17.7.2. Setting up the rabbitmq_plugin plugin
First of all, you need to set up asynchronous replication for your database, for this you need to add the following lines to the replication.conf file:
database = d:\fbdata\4.0\horses.fdb
{
    journal_directory = d:\fbdata\4.0\replication\horses\journal
    journal_archive_directory = d:\fbdata\4.0\replication\horses\archive
    journal_archive_command = "copy $(pathname) $(archivepathname) && copy $(pathname) d:\fbdata\4.0\replication\horses\archive_rabbit
}
Please note: that there is a duplication of log archive files so that logical replication and the task of sending events to RabbitMQ work at the same time. This is necessary because log archive files are deleted after processing and cannot be used by another task.
Now you need to enable replication in the database:
ALTER DATABASE INCLUDE ALL TO PUBLICATION;
ALTER DATABASE ENABLE PUBLICATION;
Next, configure the fb_streaming.conf configuration so that fb_streaming automatically sends events to the RabbitMQ exchanger.
Before configuring, open the "RabbitMQ Management" tool in your browser. If you installed it on the same computer, then by default you need to type in the browser http://localhost:15672, login "guest" password "guest". This tool allows you to manage exchanges, queues and bindings, as well as view queues.
task = d:\fbdata\4.0\replication\horses\archive_rabbit
{
    database = inet://localhost:3054/d:\fbdata\4.0\horses.fdb
    username = SYSDBA
    password = masterkey
    deleteProcessedFile = true
    plugin = rabbitmq_plugin
    dumpBlobs = true
    register_ddl_events = true
    register_sequence_events = true
    # include_tables =
    # exclude_tables =
    rabbit_uri = amqp://guest:guest@localhost
    exchange_name = horses
    exchange_type = direct
    queue_name = horses_events
    routing_key = 123
}
On Linux, this configuration will look like this:
task = /mnt/d/fbdata/4.0/replication/horses/archive
{
    database = inet://192.168.1.48:3054/horses
    username = SYSDBA
    password = masterkey
    deleteProcessedFile = true
    plugin = rabbitmq_plugin
    dumpBlobs = true
    register_ddl_events = true
    register_sequence_events = true
    # include_tables =
    # exclude_tables =
    rabbit_uri = amqp://test:[email protected]
    exchange_name = horses
    exchange_type = direct
    queue_name = horses_events
    routing_key = 123
}
There are a number of additional settings for this plugin:
-
rabbit_uri— URI to connect to the RabbitMQ server; -
exchange_name— exchanger name. If the exchanger does not yet exist, then it will be created; -
exchange_type— exchanger type. Valid values:fanout,topic,direct(defaultfanout); -
queue_name— queue name. If specified, the queue is declared and bound to the exchanger by the keyrouting_key; -
routing_key— routing key; -
dumpBlobs— whether to publish new values of BLOB fields (falseby default); -
register_ddl_events— whether to register DDL events (trueby default); -
register_sequence_events— whether to register sequence value setting events (trueby default); -
include_tables— a regular expression that defines the names of tables for which it is necessary to track events; -
exclude_tables— a regular expression that defines the names of tables for which events should not be tracked.
Now you can install and start the service:
c:\streaming>fb_streaming install
Success install service!

c:\streaming>fb_streaming start
Service start pending...
Service started successfully.
On Linux:
sudo systemctl enable fb_streaming

sudo systemctl start fb_streaming
While the service is running, the horses_events queue will receive messages.
The content of the messages will be something like this:
{
  "event": "EXECUTE SQL",
  "sql": "CREATE SEQUENCE SEQ1",
  "tnx": 6590
}
{
  "event": "EXECUTE SQL",
  "sql": "CREATE TABLE TABLE1 (\r\n  ID INT NOT NULL,\r\n  S VARCHAR(10),\r\n  PRIMARY KEY(ID)\r\n)",
  "tnx": 6591
}
{
  "event": "EXECUTE SQL",
  "sql": "ALTER TABLE TABLE1\r\nENABLE PUBLICATION",
  "tnx": 6594
}
{
  "event": "SET SEQUENCE",
  "sequence": "SEQ1",
  "value": 1
}
{
  "event": "INSERT",
  "table": "TABLE1",
  "tnx": 6597,
  "record": {
    "ID": 1,
    "S": "Hello"
  }
}
{
  "event": "UPDATE",
  "table": "COLOR",
  "tnx": 11771,
  "changedFields": [ "NAME_DE" ],
  "oldRecord": {
     "NAME_EN": "dun",
     "NAME": "dun",
     "CODE_COLOR": 14,
     "CODE_SENDER": 1,
     "NAME_DE": "",
     "SHORTNAME_EN": "dun",
     "SHORTNAME": "d."
  },
  "record": {
     "NAME_EN": "dun",
     "NAME": "dun",
     "CODE_COLOR": 14,
     "CODE_SENDER": 1,
     "NAME_DE": "g",
     "SHORTNAME_EN": "dun",
     "SHORTNAME": "d."
  }
}
{
  "event": "INSERT",
  "table": "CLIP",
  "tnx": 11821,
  "record": {
     "AVALUE": 44,
     "CODE_CLIP": 1,
     "CODE_CLIPTYPE": 1,
     "CODE_RECORD": 345,
     "REMARK": null
  }
}
{
  "event": "DELETE",
  "table": "CLIP",
  "tnx": 11849,
  "record": {
     "AVALUE": 44,
     "CODE_CLIP": 1,
     "CODE_CLIPTYPE": 1,
     "CODE_RECORD": 345,
     "REMARK": null
  }
}
{
  "event": "UPDATE",
  "table": "BREED",
  "tnx": 11891,
  "changedFields": [ "MARK" ],
  "oldRecord": {
     "NAME": "Orlov trotter",
     "CODE_DEPARTURE": 15,
     "CODE_BREED": 55,
     "CODE_SENDER": 1,
     "NAME_EN": "Orlov trotter",
     "SHORTNAME_EN": "orl. trot.",
     "SHORTNAME": "orl.trot.",
     "MARK": ""
  },
  "record": {
     "NAME": "Orlov trotter",
     "CODE_DEPARTURE": 15,
     "CODE_BREED": 55,
     "CODE_SENDER": 1,
     "NAME_EN": "Orlov trotter",
     "SHORTNAME_EN": "orl. trot.",
     "SHORTNAME": "orl.trot.",
     "MARK": "5"
  }
}
Field descriptions:
-
event— event type; -
table— the name of the table for which the event occurred; -
tnx— transaction number in which the event occurred; -
record— a new record in theINSERTandUPDATEevents, an old one in theDELETEevent; -
oldRecord— old record in theUPDATEevent; -
changedFields— list of column names that were changed in theUPDATEevent; -
newBlobs— new values of BLOB fields; -
sql— SQL query text for DDL operators; -
sequence— name of the sequence; -
value— new value of the sequence.
17.8. Plugin mongodb_events_plugin
The mongodb_events_plugin plugin is designed to register events in the Firebird database and write them to the MongoDB NoSQL DBMS.
Each event is a document in the events collection.
The event contains the following information:
-
event type (
INSERT,UPDATE,DELETE,SET SEQUENCE,EXECUTE SQL); -
for
INSERT,UPDATE,DELETEevents:-
the name of the table for which this event occurred;
-
the number of the transaction in which this event occurred;
-
old and new values of the table record fields;
-
an array of changed fields for the
UPDATEevent; -
new values of BLOB fields;
-
-
for the
SET SEQUENCEevent:-
sequence (generator) name;
-
sequence value;
-
-
for the
EXECUTE SQLevent:-
the number of the transaction in which this event occurred;
-
SQL query text.
-
Only new field values are present in the INSERT event.
The UPDATE event contains both old and new field values.
Only the old field values are present in the DELETE event.
The EXECUTE SQL event occurs only for DDL queries.
|
For BLOB fields, the |
17.8.1. Algorithm for the mongodb_events_plugin
Each event in the MongoDB database is stored as a document in the events collection.
-
the
fb_streamingservice analyzes the replication log directory set for the task for unprocessed files; -
for unprocessed replication files, the following events are analyzed:
-
start of transaction. Allocates a structure in memory to store savepoints;
-
create a savepoint. A structure in memory is allocated for storing documents;
-
release the savepoint. Documents saved in this savepoint are copied to a higher-level savepoint;
-
rollback savepoint. The savepoint is destroyed along with all documents;
-
commit the transaction. Documents created in the
INSERT,UPDATE,DELETEandEXECUTE SQLevents are written to the MongoDB database; -
transaction rollback. All savepoints and documents stored in them are destroyed;
-
DDL query execution (
EXECUTE SQL). A new document is created and saved to the list of documents for the savepoint. The statement text, event type, and transaction number are stored in the document; -
setting a new sequence value (
SET SEQUENCE). A new document is created and immediately written to the MongoDB database. The sequence name, event type, and new sequence value are stored in the document; -
INSERT,UPDATEandDELETEevents. The table name is checked in theinclude_tablesandexclude_tablesfilters, and if the table name satisfies the filtering criteria, then a new document is created and saved to the list of documents for the savepoint. The document saves the table name, event type, transaction number, old and new field values.
-
-
after processing the file, its number is fixed in the control file.
Other replication events are ignored.
17.8.2. mongodb_events_plugin configuration
First of all, you need to set up asynchronous replication for your database, for this you need to add the following lines to the replication.conf file:
database = d:\fbdata\4.0\horses.fdb
{
    journal_directory = d:\fbdata\4.0\replication\horses\journal
    journal_archive_directory = d:\fbdata\4.0\replication\horses\archive
    journal_archive_command = "copy $(pathname) $(archivepathname) && copy $(pathname) d:\fbdata\4.0\replication\horses\archive_mongo
}
Please note: the log archive files are duplicated here so that logical replication and the task of logging events to MongoDB work at the same time. This is necessary because log archive files are deleted after processing and cannot be used by another task.
Now you need to enable replication in the database:
ALTER DATABASE INCLUDE ALL TO PUBLICATION;
ALTER DATABASE ENABLE PUBLICATION;
Next, configure fb_streaming.conf so that fb_streaming automatically logs events to MongoDB.
task = d:\fbdata\4.0\replication\horses\archive_mongo
{
   database = inet://localhost:3054/d:\fbdata\4.0\horses.fdb
   username = SYSDBA
   password = masterkey
   plugin = mongodb_events_plugin
   mongo_uri = mongodb://localhost:27017
   mongo_database = horses
   dumpBlobs = true
   register_ddl_events = true
   register_sequence_events = true
   # include_tables =
   # exclude_tables =
}
There are a number of additional settings for this plugin:
-
mongo_uri— URI to connect to the MongoDB server; -
mongo_database— the name of the database in MongoDB to which the events are saved; -
dumpBlobs— whether to publish new BLOB field values (falseby default); -
register_ddl_events— whether to register DDL events (trueby default); -
register_sequence_events— whether to register sequence value setting events (trueby default); -
include_tables— a regular expression that defines the names of tables for which it is necessary to track events; -
exclude_tables— a regular expression that defines the names of tables for which events should not be tracked.
|
If the database specified in the |
Now you can install and start the service:
c:\streaming>fb_streaming install
Success install service!

c:\streaming>fb_streaming start
Service start pending...
Service started successfully.
On Linux:
sudo systemctl enable fb_streaming

sudo systemctl start fb_streaming
17.8.3. An example of the contents of the event log in the MongoDB database
To get all events, type the following commands in mongosh
use horses;
'switched to db horses'
db.events.find();
Here, with the first command, we switched to the horses database in which events were recorded.
The second command is a request to fetch data from the events collection. The mongodb_events_plugin plugin writes its events to this collection.
The content of the collection looks like this:
{ _id: ObjectId("638f37f5022b0000ad005775"),
  event: 'EXECUTE SQL',
  sql: 'CREATE SEQUENCE SEQ1',
  tnx: 6590 }
{ _id: ObjectId("638f37f9022b0000ad005776"),
  event: 'EXECUTE SQL',
  sql: 'CREATE TABLE TABLE1 (\r\n  ID INT NOT NULL,\r\n  S VARCHAR(10),\r\n  PRIMARY KEY(ID)\r\n)',
  tnx: 6591 }
{ _id: ObjectId("638f37f9022b0000ad005777"),
  event: 'EXECUTE SQL',
  sql: 'ALTER TABLE TABLE1\r\nENABLE PUBLICATION',
  tnx: 6594 }
{ _id: ObjectId("638f37f9022b0000ad005778"),
  event: 'SET SEQUENCE',
  sequence: 'SEQ1',
  value: 1 }
{ _id: ObjectId("638f37f9022b0000ad005779"),
  event: 'INSERT',
  table: 'TABLE1',
  tnx: 6597,
  record: { ID: 1, S: 'Hello' } }
{ _id: ObjectId("638f3823022b0000ad00577b"),
  event: 'EXECUTE SQL',
  sql: 'DROP TABLE TABLE1',
  tnx: 6608 }
{ _id: ObjectId("638f3827022b0000ad00577c"),
  event: 'EXECUTE SQL',
  sql: 'DROP SEQUENCE SEQ1',
  tnx: 6609 }
{ _id: ObjectId("633d8c86873d0000d8004172"),
  event: 'UPDATE',
  table: 'COLOR',
  tnx: 11771,
  changedFields: [ 'NAME_DE' ],
  oldRecord:
   { NAME: 'dun',
     CODE_COLOR: 14,
     CODE_SENDER: 1,
     NAME_DE: '',
     SHORTNAME: 'dun' },
  record:
   { NAME: 'dun',
     CODE_COLOR: 14,
     CODE_SENDER: 1,
     NAME_DE: 'g',
     SHORTNAME: 'dun' } }
{ _id: ObjectId("633d8c8a873d0000d8004173"),
  event: 'UPDATE',
  table: 'COLOR',
  tnx: 11790,
  changedFields: [ 'NAME_DE' ],
  oldRecord:
   { NAME: 'dun',
     CODE_COLOR: 14,
     CODE_SENDER: 1,
     NAME_DE: 'g',
     SHORTNAME: 'dun' },
  record:
   { NAME: 'dun',
     CODE_COLOR: 14,
     CODE_SENDER: 1,
     NAME_DE: '',
     SHORTNAME: 'dun' } }
{ _id: ObjectId("633d8c8a873d0000d8004174"),
  event: 'INSERT',
  table: 'CLIP',
  tnx: 11821,
  record:
   { AVALUE: 44,
     CODE_CLIP: 1,
     CODE_CLIPTYPE: 1,
     CODE_RECORD: 345,
     REMARK: null } }
{ _id: ObjectId("633d8c8a873d0000d8004175"),
  event: 'DELETE',
  table: 'CLIP',
  tnx: 11849,
  record:
   { AVALUE: 44,
     CODE_CLIP: 1,
     CODE_CLIPTYPE: 1,
     CODE_RECORD: 345,
     REMARK: null } }
{ _id: ObjectId("633d8c8a873d0000d8004176"),
  event: 'UPDATE',
  table: 'BREED',
  tnx: 11891,
  changedFields: [ 'MARK' ],
  oldRecord:
   { CODE_DEPARTURE: 15,
     CODE_BREED: 55,
     CODE_SENDER: 1,
     NAME: 'Orlov trotter',
     SHORTNAME: 'orl. trot.'
     MARK: '' },
  record:
   { CODE_DEPARTURE: 15,
     CODE_BREED: 55,
     CODE_SENDER: 1,
     NAME: 'Orlov trotter',
     SHORTNAME: 'orl. trot.',
     MARK: '5' } }
{ _id: ObjectId("633d8c8a873d0000d8004177"),
  event: 'INSERT',
  table: 'CLIP',
  tnx: 11913,
  record:
   { AVALUE: 1,
     CODE_CLIP: 2,
     CODE_CLIPTYPE: 1,
     CODE_RECORD: 1,
     REMARK: null } }
{ _id: ObjectId("633d8c8a873d0000d8004178"),
  event: 'DELETE',
  table: 'CLIP',
  tnx: 11942,
  record:
   { AVALUE: 1,
     CODE_CLIP: 2,
     CODE_CLIPTYPE: 1,
     CODE_RECORD: 1,
     REMARK: null } }
{ _id: ObjectId("633d8c8a873d0000d8004179"),
  event: 'INSERT',
  table: 'CLIP',
  tnx: 12001,
  record:
   { AVALUE: 3,
     CODE_CLIP: 5,
     CODE_CLIPTYPE: 1,
     CODE_RECORD: 1,
     REMARK: null } }
{ _id: ObjectId("633d8c8a873d0000d800417a"),
  event: 'DELETE',
  table: 'CLIP',
  tnx: 12039,
  record:
   { AVALUE: 3,
     CODE_CLIP: 5,
     CODE_CLIPTYPE: 1,
     CODE_RECORD: 1,
     REMARK: null } }
{ _id: ObjectId("633d8c8a873d0000d800417b"),
  event: 'UPDATE',
  table: 'COLOR',
  tnx: 11799,
  changedFields: [ 'NAME_DE' ],
  oldRecord:
   { NAME: 'clay with mixed hairs',
     CODE_COLOR: 118,
     CODE_SENDER: 1,
     NAME_DE: '',
     SHORTNAME: 'c.m.h.' },
  record:
   { NAME: 'clay with mixed hairs',
     CODE_COLOR: 118,
     CODE_SENDER: 1,
     NAME_DE: '3',
     SHORTNAME: 'c.m.h.' } }
{ _id: ObjectId("633d8c8a873d0000d800417c"),
  event: 'INSERT',
  table: 'CLIP',
  tnx: 12087,
  record:
   { AVALUE: 1,
     CODE_CLIP: 6,
     CODE_CLIPTYPE: 1,
     CODE_RECORD: 2,
     REMARK: null } }
{ _id: ObjectId("633d8c8a873d0000d800417d"),
  event: 'INSERT',
  table: 'CLIP',
  tnx: 12087,
  record:
   { AVALUE: 3,
     CODE_CLIP: 7,
     CODE_CLIPTYPE: 1,
     CODE_RECORD: 3,
     REMARK: 'Other' } }
{ _id: ObjectId("633d8c8a873d0000d800417e"),
  event: 'UPDATE',
  table: 'BREED',
  tnx: 12197,
  changedFields: [ 'MARK' ],
  oldRecord:
   { CODE_DEPARTURE: 17,
     CODE_BREED: 58,
     CODE_SENDER: 1,
     NAME: 'Trotter',
     SHORTNAME: 'rus.rys.',
     MARK: '' },
  record:
   { CODE_DEPARTURE: 17,
     CODE_BREED: 58,
     CODE_SENDER: 1,
     NAME_EN: 'Trotter',
     SHORTNAME: 'rus.rys.',
     MARK: '3' } }
{ _id: ObjectId("633d8c8a873d0000d800417f"),
  event: 'UPDATE',
  table: 'COLOR',
  tnx: 12218,
  changedFields: [ 'NAME_DE', 'SHORTNAME' ],
  oldRecord:
   { NAME: 'red grey',
     CODE_COLOR: 3,
     CODE_SENDER: 1,
     NAME_DE: '',
     SHORTNAME: '' },
  record:
   { NAME: 'red grey',
     CODE_COLOR: 3,
     CODE_SENDER: 1,
     NAME_DE: '5',
     SHORTNAME_EN: 'r.g.' } }
{ _id: ObjectId("633d8c8a873d0000d8004180"),
  event: 'INSERT',
  table: 'CLIP',
  tnx: 12287,
  record:
   { AVALUE: 0,
     CODE_CLIP: 8,
     CODE_CLIPTYPE: 1,
     CODE_RECORD: 5,
     REMARK: null } }
{ _id: ObjectId("633d8c8a873d0000d8004181"),
  event: 'UPDATE',
  table: 'CLIP',
  tnx: 12287,
  changedFields: [ 'REMARK' ],
  oldRecord:
   { AVALUE: 3,
     CODE_CLIP: 7,
     CODE_CLIPTYPE: 1,
     CODE_RECORD: 3,
     REMARK: 'Other' },
  record:
   { AVALUE: 3,
     CODE_CLIP: 7,
     CODE_CLIPTYPE: 1,
     CODE_RECORD: 3,
     REMARK: 'Other 2' } }
{ _id: ObjectId("633d8c8a873d0000d8004182"),
  event: 'DELETE',
  table: 'CLIP',
  tnx: 12287,
  record:
   { AVALUE: 1,
     CODE_CLIP: 6,
     CODE_CLIPTYPE: 1,
     CODE_RECORD: 2,
     REMARK: null } }
Description of fields:
-
_id— internal primary key for the MongoDB collection; -
event— event type; -
table— table name for which the event occurred; -
tnx— transaction number in which the event occurred; -
record— new record inINSERTandUPDATEevents, old one - inDELETEevent; -
oldRecord— old record in the UPDATE event; -
changedFields— list of column names that were changed in theUPDATEevent; -
newBlobs— new values of BLOB fields; -
sql— SQL query text for DDL statements; -
sequence— sequence name; -
value— new value of the sequence.
17.9. Plugin fts_lucene_plugin
The fts_lucene_plugin plugin is designed to maintain full-text indexes created with the library IBSurgeon Full Text Search UDR (see https://github.com/IBSurgeon/lucene_udr), up to date.
|
|
17.9.1. Algorithm of the fts_lucene_plugin plugin
-
the
fb_streamingservice analyzes the replication log directory set for the task for unprocessed files; -
at each iteration, the metadata of full-text indexes are re-read;
-
only full-text indexes in the active state are selected;
-
a list of tables for which these indexes are created is created, then this list is used to filter events (
INSERT,UPDATE,DELETE);
-
-
for unprocessed replication files, the following events are analyzed:
-
start of a transaction (a structure in memory is allocated to store savepoints);
-
set savepoint (a structure in memory is allocated for storing documents of full-text indexes);
-
release savepoint (documents saved in this save point are copied to a higher level save point);
-
rollback to savepoint (the save point is destroyed along with all documents);
-
committing the transaction (changes are applied to all affected full-text indexes: new documents are added to the corresponding index, changed ones are updated, and deleted ones are deleted);
-
transaction rollback;
-
inserting a new record (only for tables that participate in full-text indexes). For each index, a new document is created and saved to the list of added documents for the savepoint.
-
record update (only for tables that participate in full-text indexes). A new document is created for each index. The new document and search key are saved to the list of documents to update for the savepoint.
-
deleting a record (only for tables that participate in full-text indexes). The key value for finding and deleting the corresponding document is saved to the current savepoint.
-
Other replication events are ignored.
Work features:
-
if all indexed fields in the created document are empty, the document will not be added to the index;
-
if not a single indexed field in the document has changed, then such a document will not be updated in the index;
-
if in the updated document all indexed fields are empty, then such a document will be deleted.
17.9.2. fts_lucene_plugin configuration
For example, we will use the database fts_demo_4.0
First of all, you need to install the IBSurgeon Full Text Search UDR library for this database and create the full text indexes we need. This process is described in https://github.com/IBSurgeon/lucene_udr
Now let’s set up asynchronous replication for this database, for this, the following lines must be added to the replication.conf file:
database = d:\fbdata\4.0\fts_demo.fdb
{
	journal_directory = d:\fbdata\4.0\replication\fts_demo\journal
	journal_archive_directory = d:\fbdata\4.0\replication\fts_demo\archive
	journal_archive_command = "copy $(pathname) $(archivepathname) && copy $(pathname) d:\fbdata\4.0\replication\fts_demo\archive_fts
}
Please note: the log archive files are duplicated here so that logical replication and the full-text index update task work at the same time. This is necessary because log archive files are deleted after processing and cannot be used by another task.
Now you need to enable replication in the database:
ALTER DATABASE INCLUDE ALL TO PUBLICATION;
ALTER DATABASE ENABLE PUBLICATION;
Next, configure fb_streaming.conf so that fb_streaming automatically updates full-text indexes.
task = d:\fbdata\4.0\replication\fts_demo\archive_fts
{
   database = inet://localhost:3054/d:\fbdata\4.0\fts_demo.fdb
   username = SYSDBA
   password = masterkey
   plugin = fts_lucene_plugin
}
Now you can install and start the service:
c:\streaming>fb_streaming install
Success install service!

c:\streaming>fb_streaming start
Service start pending...
Service started successfully.
On Linux:
sudo systemctl enable fb_streaming

sudo systemctl start fb_streaming
While the service is running, all active full-text indexes, except of indexes created on views and indexes where the RDB$DB_KEY pseudo-column is selected as a key, will be automatically updated when data in the fts_demo.fdb database tables changes.
17.10. simple_json_plugin plugin
The simple_json_plugin plugin is designed to automatically translate binary replication log files into the equivalent JSON format
and save the logs to a given directory with the same name, but with a .json extension.
Each json file contains a root object consisting of two fields: header and events.
The header field is an object describing the header of the replication segment. It contains the following fields:
-
guid— database GUID; -
sequence— replication segment number; -
state— the state the segment is in. Possible values:free,used,full,archive; -
version— replication log protocol version.
The events field is an array of objects, each representing one of the replication events.
The event object can contain the following fields:
-
event— event type. The following options are available:-
SET SEQUENCE— setting the value of the sequence (generator); -
START TRANSACTION— transaction start; -
PREPARE TRANSACTION— execution of the first phase of confirmation of a two-phase transaction; -
SAVEPOINT— setting a save point; -
RELEASE SAVEPOINT— release a savepoint; -
ROLLBACK SAVEPOINT— rollback savepoint; -
COMMIT— transaction confirmation; -
ROLLBACK— transaction rollback; -
INSERT— inserting a new record into the table; -
UPDATE— updating a record in a table; -
DELETE— deleting a record from a table; -
EXECUTE SQL— execute SQL statement. Such events occur only for DDL statements; -
STORE BLOB— saving BLOB.
-
-
tnx— transaction number. Available for all events exceptSET SEQUENCE, because generators operate outside the context of transactions; -
sequenceis the name of the sequence. Only available in theSET SEQUENCEevent; -
value— the value of the sequence. Only available in theSET SEQUENCEevent; -
sql— SQL query text. Only available in theEXECUTE SQLevent; -
blobId— BLOB identifier. Only available in theSTORE BLOBevent; -
data— BLOB segment data in hexadecimal representation. Only available in theSTORE BLOBevent; -
table— table name. Available inINSERT,UPDATEandDELETEevents; -
record— values of record fields. ForINSERTandUPDATEevents this is the new entry, and forDELETEevents it is the old one; -
oldRecord— old record field values. Only available in theUPDATEevent; -
changedFields— array of changed field names. Only available in theUPDATEevent.
Note that for BLOB fields, the BLOB ID is specified as the value.
An example of the contents of a .json file:
{
    "events": [
        {
            "event": "START TRANSACTION",
            "tnx": 6259
        },
        {
            "event": "SAVEPOINT",
            "tnx": 6259
        },
        {
            "event": "SAVEPOINT",
            "tnx": 6259
        },
        {
            "changedFields": [
                "SHORTNAME"
            ],
            "event": "UPDATE",
            "oldRecord": {
                "CODE_COLOR": 3,
                "CODE_SENDER": 1,
                "NAME": "red grey",
                "SHORTNAME": ""
            },
            "record": {
                "CODE_COLOR": 3,
                "CODE_SENDER": 1,
                "NAME": "red grey",
                "SHORTNAME": "rg"
            },
            "table": "COLOR",
            "tnx": 6259
        },
        {
            "event": "RELEASE SAVEPOINT",
            "tnx": 6259
        },
        {
            "event": "RELEASE SAVEPOINT",
            "tnx": 6259
        },
        {
            "event": "COMMIT",
            "tnx": 6259
        }
    ],
    "header": {
        "guid": "{AA08CB53-C875-4CA3-B513-877D0668885D}",
        "sequence": 3,
        "state": "archive",
        "version": 1
    }
}
17.10.1. Plugin setup
Plugin setup example:
task = d:\fbdata\4.0\replication\testdb\archive
{
	deleteProcessedFile = true
	database = inet://localhost:3054/test
	username = SYSDBA
	password = masterkey
	plugin = simple_json_plugin
	dumpBlobs = true
	register_ddl_events = true
	register_sequence_events = true
	outputDir = d:\fbdata\4.0\replication\testdb\json_archive
	# include_tables =
	# exclude_tables =
}
Description of parameters:
-
controlFileDir— directory in which the control file will be created (by default, the same directory assourceDir); -
database— database connection string (mandatory); -
username— username to connect to the database; -
password— password to connect to the database; -
plugin— plugin that handles events that occur during replication log analysis (mandatory); -
deleteProcessedFile— whether to delete the log file after processing (defaulttrue); -
outputDir— directory where ready JSON files will be located; -
dumpBlobs— whether to publish BLOB field data (falseby default); -
register_ddl_events— whether to register DDL events (trueby default); -
register_sequence_events— whether to register sequence value setting events (trueby default); -
include_tables— a regular expression that defines the names of tables for which you want to track events; -
exclude_tables— a regular expression that defines the names of tables for which events should not be tracked.
Appendix A: CRON Expressions
All jobs in FBDataGuard have time settings in CRON format. CRON is very easy and powerful format to schedule execution times.
CRON Format
A CRON expression is a string comprised of 6 or 7 fields separated by white space. Fields can contain any of the allowed values, along with various combinations of the allowed special characters for that field. The fields are as follows:
| Field Name | Mandatory | Allowed Values | Allowed Special Characters |
|---|---|---|---|
Seconds |
YES |
0-59 |
, - * / |
Minutes |
YES |
0-59 |
, - * / |
Hours |
YES |
0-23 |
, - * / |
Day of month |
YES |
1-31 |
, - * / L W |
Month |
YES |
1-12 or JAN-DEC |
, - * / |
Day of week |
YES |
1-7 or SUN-SAT |
, - * / L # |
Year |
NO |
empty, 1970-2099 |
, - * / |
So cron expressions can be as simple as this: \* * * * ? * or more complex, like this: 0 0/5 14,18,3-39,52 ? JAN,MAR,SEP MON-FRI 2002-2010
Special characters
-
*(“all values”) — used to select all values within a field. For example, “*” in the minute field means “every minute”. -
?(“no specific value”) — useful when you need to specify something in one of the two fields in which the character is allowed, but not the other. For example, if I want my trigger to fire on a particular day of the month (say, the 10th), but don’t care what day of the week that happens to be, I would put “10” in the day-of-month field, and “?” in the day-of-week field. See the examples below for clarification. -
-— used to specify ranges. For example, “10-12” in the hour field means “the hours 10, 11 and 12”. -
,— used to specify additional values. For example, “MON,WED,FRI” in the day-of-week field means “the days Monday, Wednesday, and Friday”. -
/— used to specify increments. For example, “0/15” in the seconds field means “the seconds 0, 15, 30, and 45”. And “5/15” in the seconds field means “the seconds 5, 20, 35, and 50”. You can also specify “/” after the “*” character – in this case “*” is equivalent to having “0” before the “/”. “1/3” in the day-of-month field means “fire every 3 days starting on the first day of the month”. -
L(“last”) — has different meaning in each of the two fields in which it is allowed. For example, the value “L” in the day-of-month field means “the last day of the month” — day 31 for January, day 28 for February on non-leap years. If used in the day-of-week field by itself, it simply means “7” or “SAT”. But if used in the day-of-week field after another value, it means “the last xxx day of the month” — for example “6L” means “the last Friday of the month”. When using the “L” option, it is important not to specify lists, or ranges of values, as you’ll get confusing results. -
W(“weekday”) — used to specify the weekday (Monday-Friday) nearest the given day. As an example, if you were to specify “15W” as the value for the day-of-month field, the meaning is: “the nearest weekday to the 15th of the month”. So if the 15th is a Saturday, the trigger will fire on Friday the 14th. If the 15th is a Sunday, the trigger will fire on Monday the 16th. If the 15th is a Tuesday, then it will fire on Tuesday the 15th. However, if you specify “1W” as the value for day-of-month, and the 1st is a Saturday, the trigger will fire on Monday the 3rd, as it will not “jump” over the boundary of a month’s days. The “W” character can only be specified when the day-of-month is a single day, not a range or list of days.
|
The “L” and “W” characters can also be combined in the day-of-month field to yield “LW”, which translates to “last weekday of the month”. |
-
#— used to specify “the nth” XXX day of the month. For example, the value of “6#3” in the day-of-week field means “the third Friday of the month” (day 6 = Friday and “#3” = the 3rd one in the month). Other examples: “2#1” = the first Monday of the month and “4#5” = the fifth Wednesday of the month. Note that if you specify “#5” and there is not 5 of the given day-of-week in the month, then no firing will occur that month.
|
The legal characters and the names of months and days of the week are not case sensitive. “MON” is the same as “mon”. |
CRON Examples
Here are some full examples:
| Expression | Meaning |
|---|---|
|
Fire at 12pm (noon) every day |
|
Fire at 10:15am every day |
|
Fire at 10:15am every day |
|
Fire at 10:15am every day |
|
Fire at 10:15am every day during the year 2005 |
|
Fire every minute starting at 2pm and ending at 2:59pm, every day |
|
Fire every 5 minutes starting at 2pm and ending at 2:55pm, every day |
|
Fire every 5 minutes starting at 2pm and ending at 2:55pm, AND fire every 5 minutes starting at 6pm and ending at 6:55pm, every day |
|
Fire every minute starting at 2pm and ending at 2:05pm, every day |
|
Fire at 2:10pm and at 2:44pm every Wednesday in the month of March. |
|
Fire at 10:15am every Monday, Tuesday, Wednesday, Thursday and Friday |
|
Fire at 10:15am on the 15th day of every month |
|
Fire at 10:15am on the last day of every month |
|
Fire at 10:15am on the last Friday of every month |
|
Fire at 10:15am on every last Friday of every month during the years 2002, 2003, 2004 and 2005 |
|
Fire at 10:15am on the third Friday of every month |
|
Fire at 12pm (noon) every 5 days every month, starting on the first day of the month. |
|
Fire every November 11th at 11:11am. |
|
Pay attention to the effects of '?' and '*' in the day-of-week and day-of-month fields! |
Notes
Support for specifying both a day-of-week and a day-of-month value is not complete (you must currently use the '?' character in one of these fields).
Be careful when setting fire times between mid-night and 1:00 AM - “daylight savings” can cause a skip or a repeat depending on whether the time moves back or jumps forward.
More information is here http://www.quartz-scheduler.org/docs/tutorials/crontrigger.html
Appendix B: HQbird web API
HQbird FBDataGuard allows you to automate many administration tasks, run them on a schedule or on demand from the DataGuard Web console.
In some cases, applications need to run administrative tasks that are already implemented in HQbird FBDataGuard. For developers of such applications, HQbird FBDataGuard provides a Web API to run tasks configured in FBDataGuard.
Tasks to be run can be agent, server or database level. To run a task successfully it must be "enabled" (enabled in the configuration). For database level tasks, you need to know the database registration ID.
All tasks are launched through the same handler, which is a Web API via the HTTP protocol using the GET method. The URL of this handler is as follows:
<schema>://<host>:<port>/agent/runnow?<parameters>

<parameters> ::= <parameter>[&<parameter> [&<parameter> ...]]

<parameter> ::= <param_name>=<param_value>
Здесь
-
<schema>- scheme (in our case, the http or https protocol); -
<host>- host name or IP address where HQbird FBDataGuard is running; -
<port>- port number on which the HQbird FBDataGuard service run; -
<param_name>- parameter name; -
<param_value>- the parameter value, which must be URL-encoded using the encoding described in RFC 3986.
For the default configuration, this URL takes the following form:
http://127.0.0.1:8082/agent/runnow?<parameters>
The following parameters are required to run tasks:
-
src- source (task level); -
job- task name; -
additional task-specific parameters, such as
lvl=1; -
an optional parameter, which is some unique integer (timestamp) - which prevents browsers from caching the result.
The src source must have only the full form of the task path, examples:
/agent/jobs/check-agent-space
or
/agent/servers/hqbirdsrv/jobs/check-server-log
or
/agent/servers/hqbirdsrv/databases/a8005009-c850-42ec-8def-133bd8405253/jobs/lockprint
Depending on the content of the source (parameter src) determines the task level:
-
if the source is of the form
/agent/servers/hqbirdsrv/databases/<database_guid>/jobs/…, where<database_guid>is the database identifier, then it is a database-level task. In the example above, the database has the IDa8005009-c850-42ec-8def-133bd8405253. The database ID can be found by the corresponding directory name in the DataGuard configuration file tree; -
if the source is of the form
/agent/servers/hqbirdsrv/jobs/…, then it is a server-level task; -
if the source is of the form
/agent/jobs/…, then this is an agent level task.
Here are some examples of running tasks on demand. These examples assume that FBDataGuard is running on node 127.0.0.1:8082.
Task URL:
http://127.0.0.1:8082/agent/runnow?r=1727043834949&src=%2Fagent%2Fservers%2Fhqbirdsrv%2Fjobs%2Fcheck-server-log&job=check-server-log
Where
-
src=/agent/servers/hqbirdsrv/jobs/check-server-log -
job=check-server-log -
r=1727043834949- parameter to prevent the browser from caching repeated requests.
The server will return a json string in response indicating the time, tag, path to the task configuration file, and a possible error message.
Example of response:
{
    "Queried": "1727044250754",
    "Tag": "check-server-log@[ hqbirdsrv / * ]",
    "JobConfigFile": "E:\\HQBirdData\\config\\agent\\servers\\hqbirdsrv\\jobs\\check-server-log\\job.properties",
    "ErrorMessage": ""
}
Example of a response with an error message when trying to start a disabled task:
{
    "Queried":"1727044440296",
    "Tag":"check-replica-log@[ hqbirdsrv / * ]",
    "JobConfigFile":"E:\\HQBirdData\\config\\agent\\servers\\hqbirdsrv\\jobs\\check-replica-log\\job.properties",
    "ErrorMessage":"Disabled job cannot be started! Enable job first! \nJob id: \"check-replica-log@[ hqbirdsrv / * ]\""
}
Below are examples of running a task for a database registered in Dataguard under the Dataguard ID: 2409230136_EMPLOYEE3_FDB.
Task URL:
http://127.0.0.1:8082/agent/runnow?r=1727044656798&src=%2Fagent%2Fservers%2Fhqbirdsrv%2Fdatabases%2F2409230136_EMPLOYEE3_FDB%2Fjobs%2Fcronsweep&job=cronsweep
Where
-
src=/agent/servers/hqbirdsrv/databases/2409230136_EMPLOYEE3_FDB/jobs/cronsweep -
job=cronsweep
Task URL:
http://127.0.0.1:8082/agent/runnow?r=1727045317158&src=%2Fagent%2Fservers%2Fhqbirdsrv%2Fdatabases%2F2409230136_EMPLOYEE3_FDB%2Fjobs%2Fnbackup&job=nbackup&lvl=2
Where
-
src=/agent/servers/hqbirdsrv/databases/2409230136_EMPLOYEE3_FDB/jobs/nbackup -
job=nbackup -
lvl=2- sets the backup level (2).
Task URL:
http://127.0.0.1:8082/agent/runnow?r=1727045751740&src=%2Fagent%2Fservers%2Fhqbirdsrv%2Fdatabases%2F2409230136_EMPLOYEE3_FDB%2Fjobs%2Fnbackup3&job=nbackup3&lvl=3
Where
-
src=/agent/servers/hqbirdsrv/databases/2409230136_EMPLOYEE3_FDB/jobs/nbackup3 -
job=nbackup3 -
lvl=3- sets the backup level (3). It is somewhat redundant, transmitted by the browser/web console, but is not used by the server and can be skipped, since advanced nbackup levels are implemented by separate streams with unique names, i.e. tasks nbackup0..nbackup4 - and for them the levels in lvl must match the level in the path/name.
On-demand task launches are logged in the FBDataGuard log.
The full list of task paths/names can be reconstructed from the catalog of the current version of DataGuard configuration — they may differ in different versions of DataGuard because tasks have changed, been deleted, or new ones have been added.
How to debug
The following URLs can help with debigging of commands:
-
Run commands
http://localhost:8082/static/config.html#hqbirdsrv
-
View representation of API in raw format
http://localhost:8082/agent/
The service page can be opened (opens in a new tab) directly from the FbDataGuard console web window by left-clicking with the Ctrl key pressed on the DataGuard version text in the lower left corner of the page.
Appendix C: Support contacts
We will answer all your questions regarding HQbird FBDataGuard. Please send all your inquiries to [email protected]
Please note, that customers with active Firebird Support have the priority in the technical support https://ib-aid.com/en/firebird-support-service/