1. What is IBSurgeon FirstAID?
IBSurgeon FirstAID is a tool that can automatically diagnose and repair corrupted Firebird or InterBase databases.
It can repair corruptions that neither gbak nor gfix can handle. It uses its own layer for low-level database access without using the InterBase or Firebird engine, enabling it to perform real "surgical" operations and repair databases when all other standard mechanisms cannot.
1.1. Supported Versions
FirstAID 8.0 supports the following versions of Firebird and InterBase:
-
Firebird 5.0, 4.0, 3.0, 2.5, 2.1, 2.0, 1.5, 1.0
-
InterBase 4.x, 6.x, 7.0, 7.1, 7.5, 2007, 2009, XE/XE3, XE7, 2017, 2020
If you have problems with InterBase 5.x or other versions, please contact [email protected].
1.2. FirstAID overview
IBSurgeon FirstAID 8.0 can perform 3 kinds of recovery operations:
-
Direct recovery: Intended to fix original corrupted database in place. After direct recovery, you need to finalize it with gfix and gbak (standard tools from Firebird distribution).
-
Data extraction: Designed to view and export data from the corrupted database to a database with the same structure (empty or old good copy), or partially extract data.
-
Fixing of nbackup errors: Intended to fix Firebird databases hanged in the backup state (when nbackup -n or -fixup does not work properly).
If you have a corrupted database and need to check it for recoverable data, open the database, select the necessary database and use the Preview tab (this function is available in the free version, without registration).
If you can see the data you are looking for and decide to recover the database, it’s recommended to perform direct recovery first (always use a copy of the corrupted database file!) and only if there will be problems, use Extract to export data to a new database.
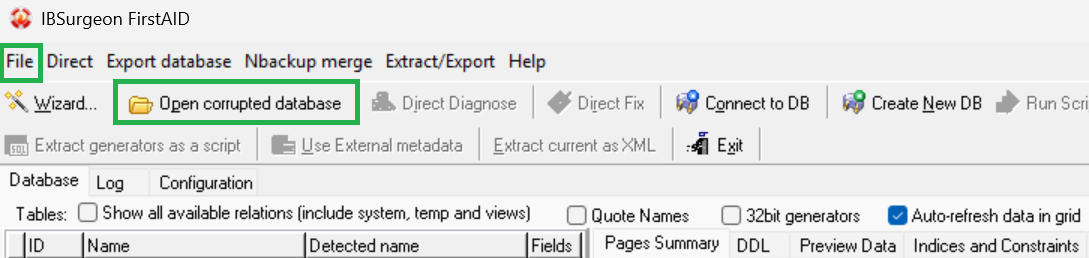
2. How to view data in corrupted Firebird/InterBase database with FirstAID
If you need to view data in the corrupted database, you can do it with the free version of FirstAID. Run FirstAID, click "Open corrupted Database" (if you have a multi-volume database, choose File\Open multi-file database from the menu).
After that, FirstAID will ask you to confirm the ODS version.
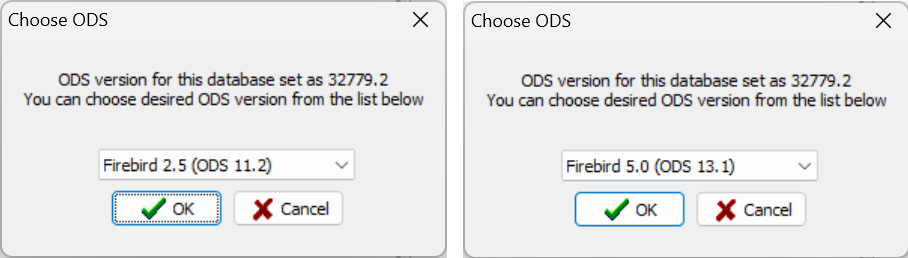
If the header page is corrupted, FirstAID will show an empty line, and you must select the correct version of your database from the drop-down list.
Then it asks you to confirm the page size:
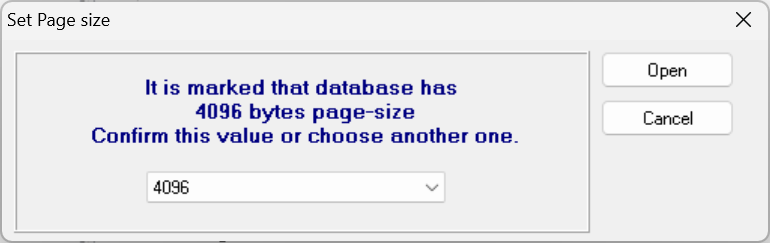
If the header of the database is corrupted, you’ll need to select the correct page size from the drop-down box. Most often the page size is:
-
4096 for Firebird 2.x
-
1024 for InterBase and Firebird 1.x
-
8192 for Firebird 3, 4, and 5
If you select the wrong page size, you’ll see a high percentage in the "Bad pages" line of the "Pages Summary" tab. If your first choice looks incorrect, try opening the database with different page sizes to find the correct value.
After opening the database, you’ll see a list of tables on the left and a summary view of database pages on the right:
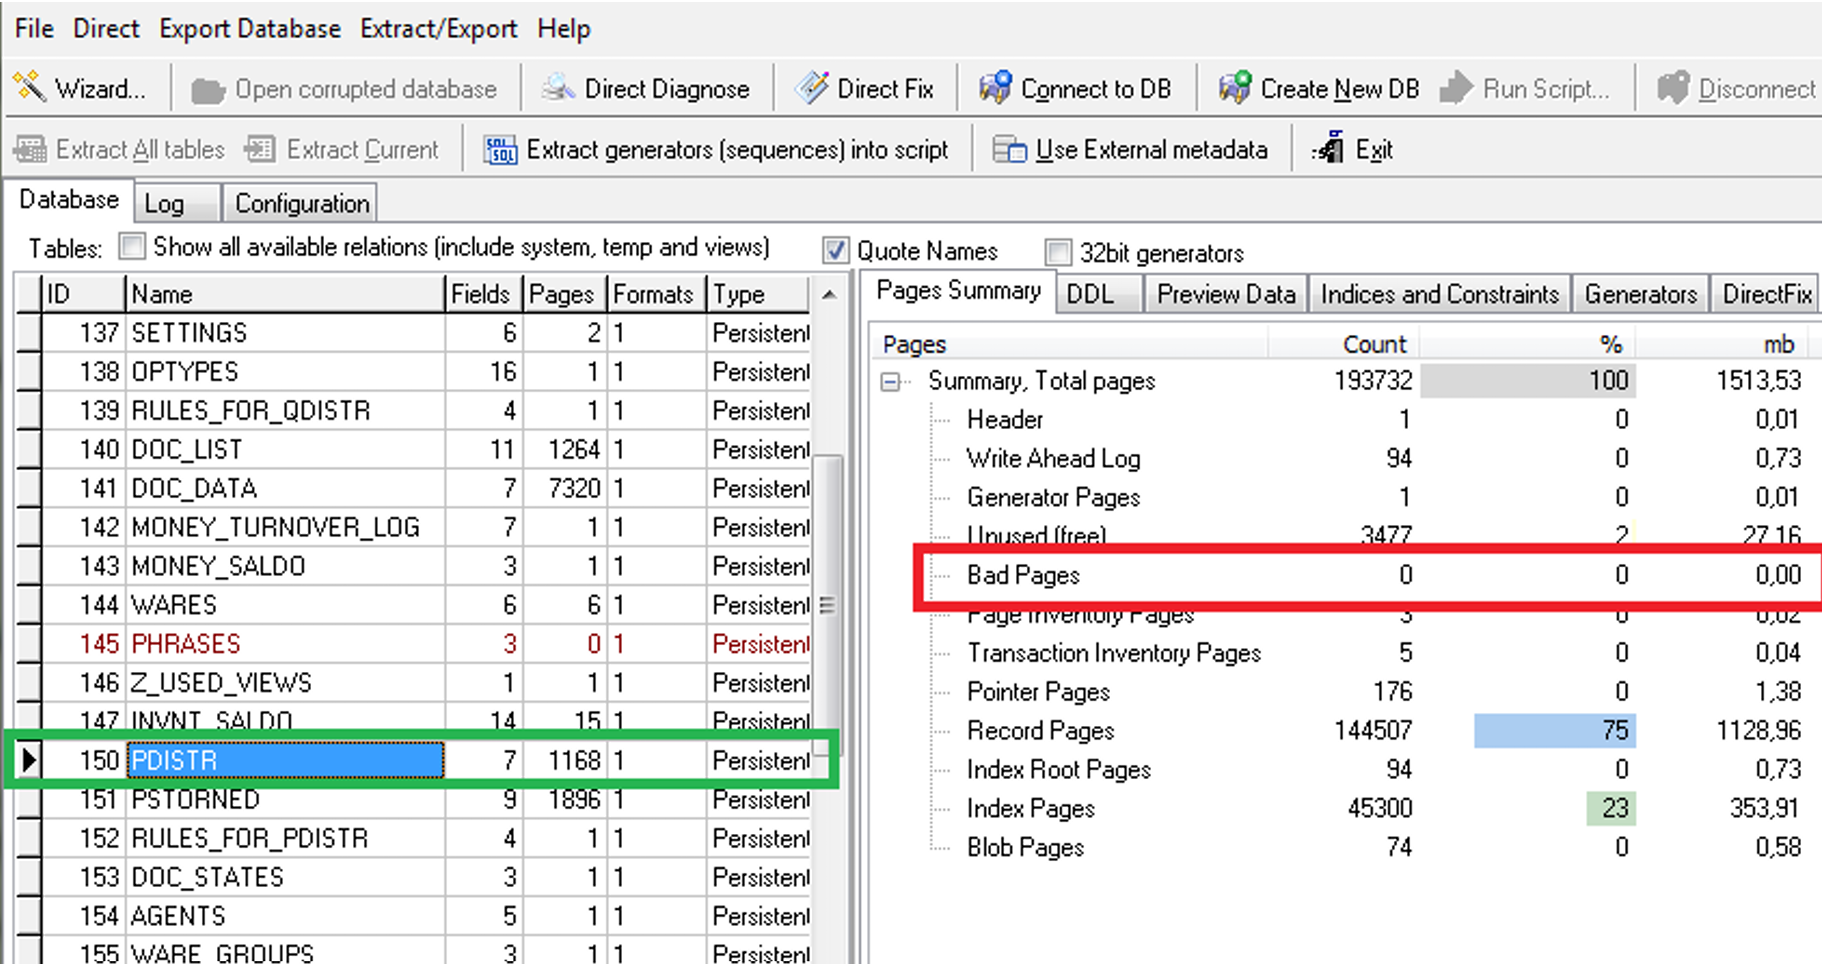
The most important information is the percentage of "Bad pages" - it gives an idea of how many data pages cannot be read and therefore what data losses you might expect.
-
0% of bad pages usually means problems are on the records level or in the system area,
-
1-2% means that database was truncated or disk is corrupted(this % slightly corresponds to losses in the database),
-
50% or 75% usually indicates you’ve selected the wrong page size,
-
In some cases, nearly the whole database can be damaged, and therefore cannot be recovered.
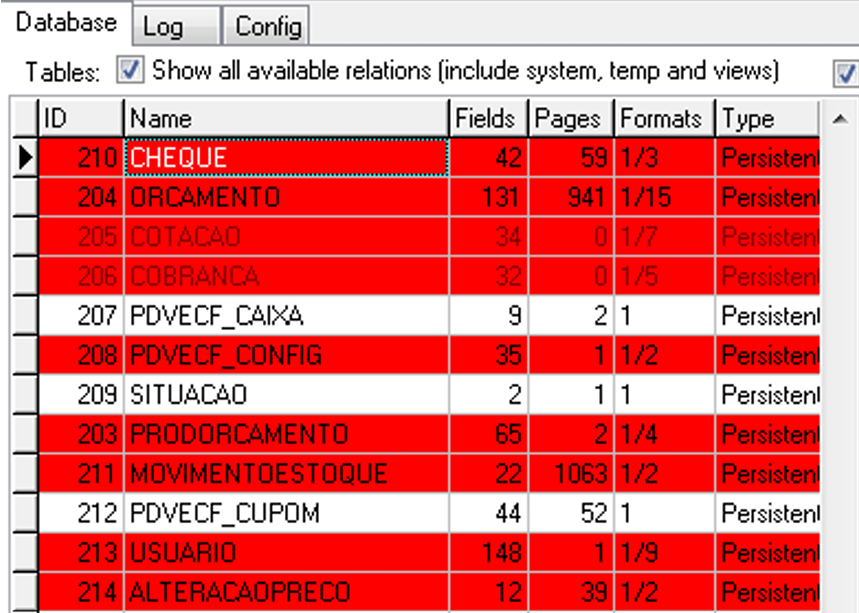
Useful information about list of tables:
-
Double-click on a table name to see data from the first data page of that table. You can browse data pages using the navigator (arrows <<, <, >, >>) on the "Preview" tab.
Use preview to see the latest records and estimate amount of good data for the table.
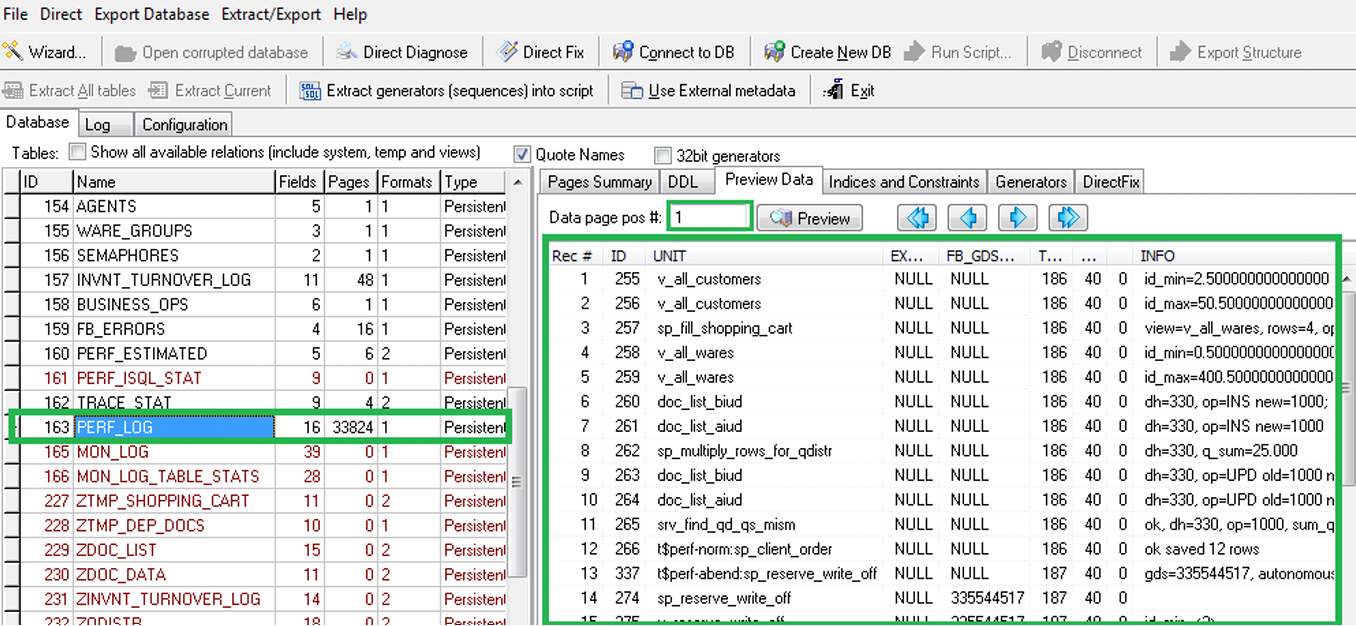
-
In the column «Pages» it shows a number of data pages found for selected table, it corresponds with the size of the table.

-
FirstAID highlights empty tables names with light red, while tables with data have black font.
-
In case of a heavy corruption of system tables FirstAID will highlight by bright red all tables with problems.
-
In the column «Formats» it shows a number of expected record formats and number of existing formats.
In case of missed Formats, or if you don’t see normal tables names or data in them, read “External metadata” section in the end of this guide!
3. How to get a full version of FirstAID
After previewing your data and confirming it’s worth recovering the database, purchase the appropriate FirstAID license. You’ll receive an automatic deployment confirmation email from [email protected].
Usually it takes around 10-15 minutes to receive the email with license. Check spam folder if you did not receive it!
FirstAID is licensed on “per database” basis, with the following purchase options (https://ib-aid.com/en/ibsurgeon-firstaid/):
-
From 1 to 3 databases,
-
Up to 50 databases,
-
More recoveries are available in the frames of Enterprise subscription.
Upgrades and extra packages
If you have any old version of FirstAID, or you have used all activations for recovery, you can buy the upgrade for 5, 50 or 100 database recoveries with discount here: https://ib-aid.com/en/upgrades-ibsurgeon/
Usually order is processed during several minutes, and then you will get automatic email from online shop (PayProGlobal) with the necessary information (essentially, it is username and password) to perform recovery (see details below in section “Registration”).
If you did not receive the password in 1-2 hours, please check your antispam folder (and settings), and then write email to [email protected] with your order number, to speed up delivery.
If you installed FirstAID from www.ib-aid.com and then purchased the license, there is no need to reinstall FirstAID from Download section of Deploy Center – just enter email and password when requested. Reinstall FirstAID only if you have an older version installed.
|
Try to recover database with Direct Fix before trying to extract all data: DirectFix can be faster than Extract process (but don’t forget to make a copy before DirectFix!). |
4. DirectFix recovery with FirstAID
To directly recover a Firebird database:
-
Stop the Firebird server and make a copy of the original database file! This is important for possible future steps (extraction, etc.).
-
Start FirstAID.
-
Open the corrupted database and wait for it to load.
-
After database opening, FirstAID will enable menu actions to diagnose, repair and export.
-
Choose "Direct→Direct Diagnose" from the menu.
-
Look at the FirstAID log for information messages and errors.
Example of information message:
12:40:55 DEBUG: Checking INVNT_SALDO (147)...
12:40:56 INFO: Relation INVNT_SALDO (147) is OK
Example of error message:
18.02.2014 18:45:31 ERROR: Found 1 record errors on datapage#2069
18.02.2014 18:45:31 ERROR: Error on data page #2069
18.02.2014 18:45:32 INFO: Pointer page #243 checking: found 177 errors.
18.02.2014 18:45:32 ERROR: Error in checking relation #160 Found 1 errors.
18.02.2014 18:45:32 ERROR: Relation MOVIMENTA1 (160) is CORRUPT
-
After "Direct Diagnose", choose "Direct→Direct Fix".
 Figure 8. Direct Diagnose (only checking) and DirectFix (in-place recovery)
 -
To start recovery, enter here your email (which was used for license purchase) and password (from the email from IBSurgeon).
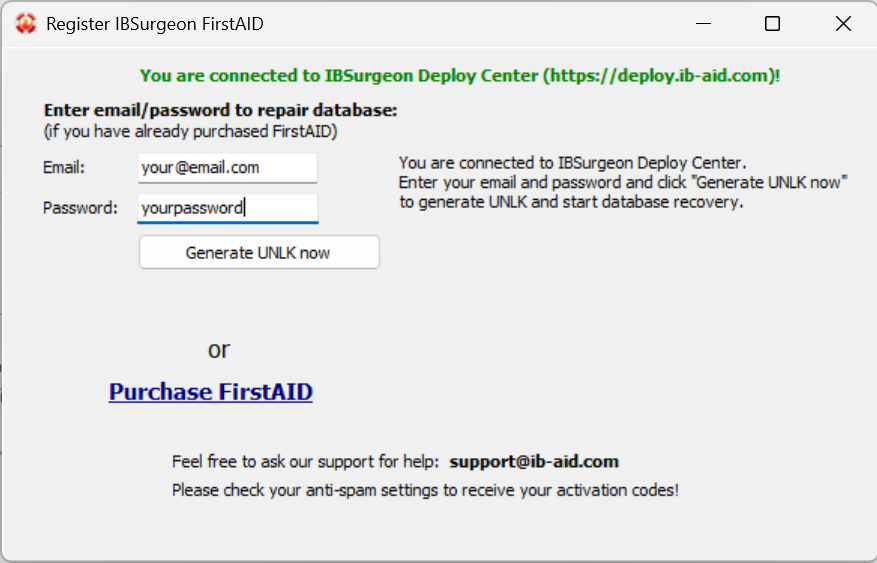 Figure 9. Enter here email and password which you have received in email from IBSurgeon
Then Click "Generate UNLK now".
Please note that FirstAID will save UNLK file for this database in the folder C:\ProgramData\FBFirstAID3\Unlocks, so next time when you will open this database file at the same computer, FirstAID will not ask you for the registration.
-
The repair process will take approximately the same time as diagnostics.
-
After repair, click "Direct\Final Steps" and follow the instructions:

Final steps after FirstAID Direct Fix:
After IBSurgeon FirstAID DirectFix repair procedure you need to run standard means to complete recovery. Please save the results of each step for possible future use.
Even if gfix steps fail, try to run gbak (steps 3 and 4) anyway!
-
Run gfix.exe (it is located in "Bin" directory of Firebird/InterBase installation) using the following command line:
gfix.exe -v -full-user SYSDBA -password your_sysdba_password Disk:\Path\your_database.fdb
-
After that run gfix.exe with another switches combination:
gfix.exe -mend -ig -user SYSDBA -password your_sysdba_password Disk:\Path\your_database.fdb
-
Gfix fixes minor corruptions and prepares database for backup. Then you need to backup database using gbak.exe (in the same directory with gfix.exe). Run backup with the following command:
gbak.exe -b -g -ig -user SYSDBA -password your_sysdba_password Disk:\Path\your_database.fdb Disk:\Path\backup.fbk
-
Restore database from backup. Run command:
gbak -c -user SYSDBA -password your_sysdba_password Disk:\Path\backup.fbk Disk:\Path\your_database.fdb
-
Only if you have InterBase database! – FirstAID can set InterBase database to the read-only mode during recovery, to set it back to read-write, run the following command:
gfix.exe -mode read_write -user SYSDBA -password your_sysdba_password Disk:\Path\your_database.fdb
That’s all - now your database is repaired.
5. Recovery through Extraction
If you already tried to fix database with DirectFix and it was not possible to create backup of the database with final steps, proceed with Extraction.
|
We assume that you have an untouched file copy of the original corrupted database which you have created before Direct Fix step. If so, please make a copy of it again and perform all further operations with the copy. It’s important to run FirstAID on the intact original (before Direct Fix) copy of the corrupted database! |
5.1. Overview of data extraction process
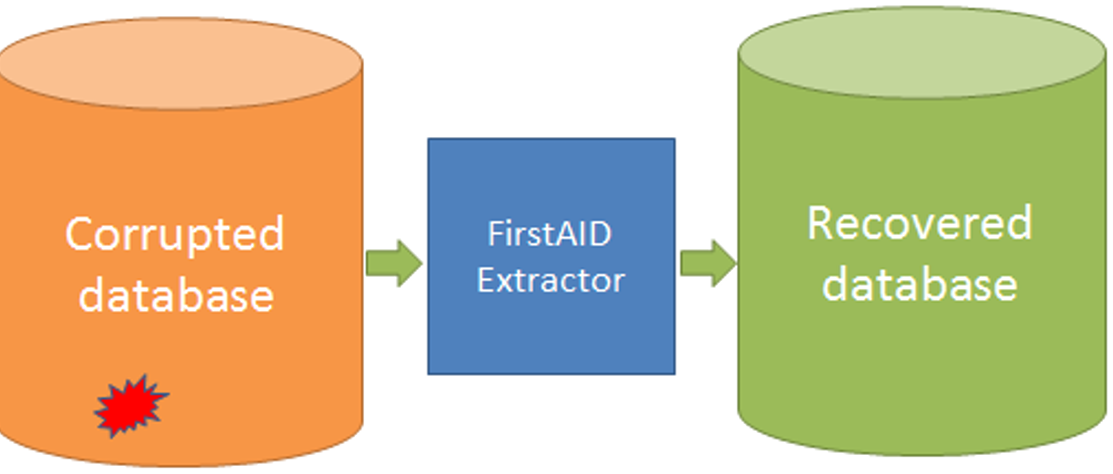
FirstAID reads the database at the low level (using its own data access layer, not the Firebird engine) and exports all good records to a new database.
There are several things to consider:
-
What will the target database for the exported data?
-
Connect and export data to an empty database with the same structure (metadata) as the corrupted database (preferred option).
-
Create a new empty database without metadata (FirstAID can create it, but metadata might be incomplete) and export to it
-
-
More data VS More consistency.
In the corrupted database some primary keys could be missing and some database constraints (like NOT NULL, CHECK, FOREIGN KEY, etc.) could be violated, so there is a choice: turn off violated constraints and let potentially inconsistent data to be inserted to the database, or enforce all rules and skip inconsistent data.
-
More data. This is a preferred option, because after export you will be able to review results and enforce database constraints manually. It is common that some non-relevant constraints exist in the damaged database, so it’s better to save as much data as possible.
-
More integrity. If you don’t see many errors, you can try this option. All constraints and Foreign keys will be enforced, and those records, which do not correspond database constraints will be deleted in the destination database.
-
Manual mode. You have options to tune export process manually. We assume you know what you are doing if you choose manual mode and set parameters by yourself.
-
5.2. Export to the empty database with the same metadata
-
Open the corrupted database in FirstAID. Important: if you are recovering Firebird database from versions 5, 4, 3, which require use of embedded Firebird server for extraction, run FirstAID with administrator priviledges!
-
Choose "Connect to DB":
 Figure 12. Choose "Connect to DB"
 -
Select the destination database for export
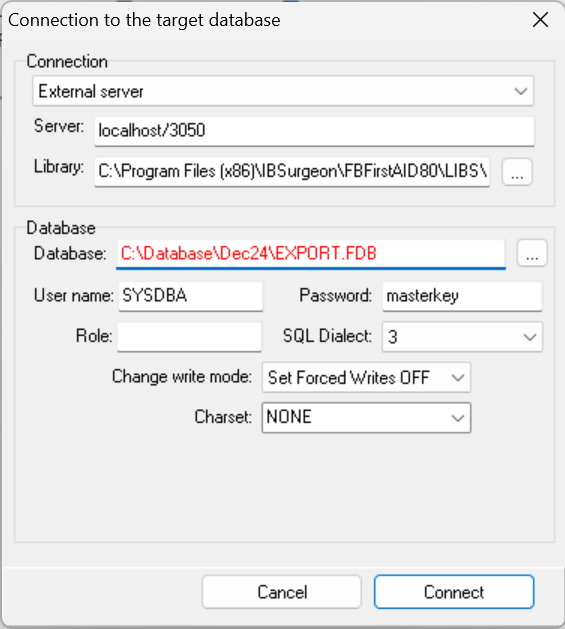 Figure 13. Select the existing database to be the targer of extract
Connection
In the drop-down list of "Connection" field, you can specify External server or use the embedded FirstAID local server (listed as Internal Firebird 3, 4, 5).
|
For Firebird version 3, 4, 5, it is necessary to select embedded local server (Internal Firebird N) with the appropriate version. And, you need to run FirstAID with administrative priviledges in order to use embedded servers (for Firebird versions 5, 4, 3) for extraction. |
Server name/IP and port
If you have select "External server", you need to specify connection details for the target database. By default, it is set to localhost and 3050 (default Firebird/InterBase port).
Path to client
Path to client library (fbclient.dll or gds32.dll) is set automatically; it depends on the version of the source database file (necessary client libraries are shipped with FirstAID).
If you prefer to export data with another server version than the original corrupted database, you need to choose the correct client library from that server.
FirstAID will adjust "SQL Dialect" and "Default charset" parameters automatically, if header page of corrupted database is not damaged, otherwise you need to set these parameters by yourself.
By default, FirstAID will set target database in Forced Writes OFF mode, in order to speed up export process. You can change to Forced Writes ON after recovery complete, before going to production, with command
gfix -write sync databasenamepath.fdb -user SYSDBA -pass your_password
Make sure that Firebird (or InterBase) server is running at this moment!
Click “Connect”.
Please note - if you are using embedded Firebird (options Integrated Firebird 3, 4, 5), you need to run FirstAID with administrative priviledges.
UDFs
After establishing connection with the destination database, FirstAID checks for UDF (user-defined functions in external dll). If there are UDFs, the following message will appear:
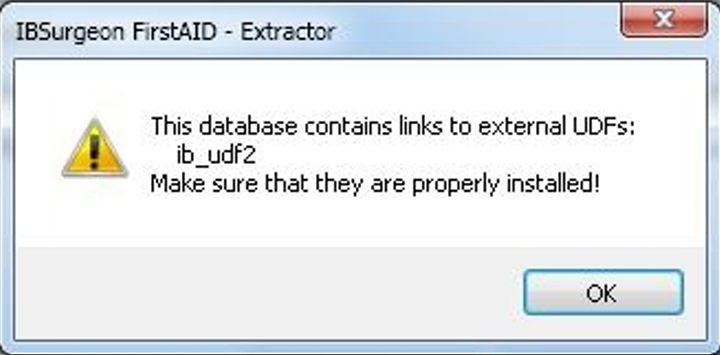
It means that there are UDF in the destination database, and you must provide UDFs dll file(s) to ensure correct extraction. FirstAID shows you the name(s) of UDF libraries; in this case it is “ib_udf2.dll”.
Missing UDF DLLs may prevent proper export processing!
You need to go to UDF folder of your Firebird/InterBase installation and check that the required dll file is in this folder. If not, copy it from the server where originally your corrupted database was located. For Firebird versions 4 and 5, you will need to setup access to UDF in firebird.conf.
5.2.1. What if I don’t have empty good copy of a database?
If you don’t have an empty good copy, you can create it:
-
Find any good copy of the corrupted database (probably it will be old good copy).
-
Make a backup with metadata-only option:
gbak -b -g -m -user SYSDBA -pass your_password Disk:\Path_to_good_db.fdb Disk:\backup.fbk
-
Restore with metadata-only option:
gbak -c -m Disk:\backup.fbk Disk:\path_to_empty_metadata_db.fdb -user SYSDBA -pass your_password
Use this new empty database as the target for export.
5.2.2. Export process
After that the following dialog will appear:
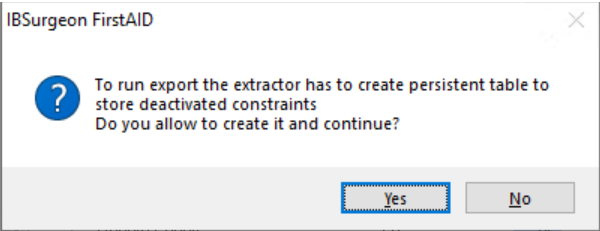
FirstAID needs to create service table to store necessary export information. This table will contain information about database constraints, triggers, indices, etc.
Click “Yes”.
After that FirstAID will open new tab “Destination database”:
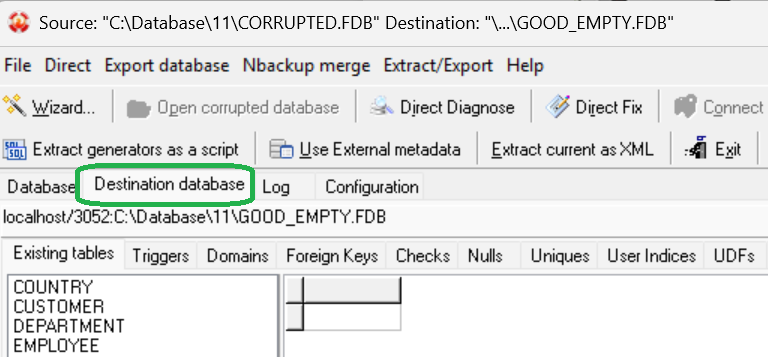
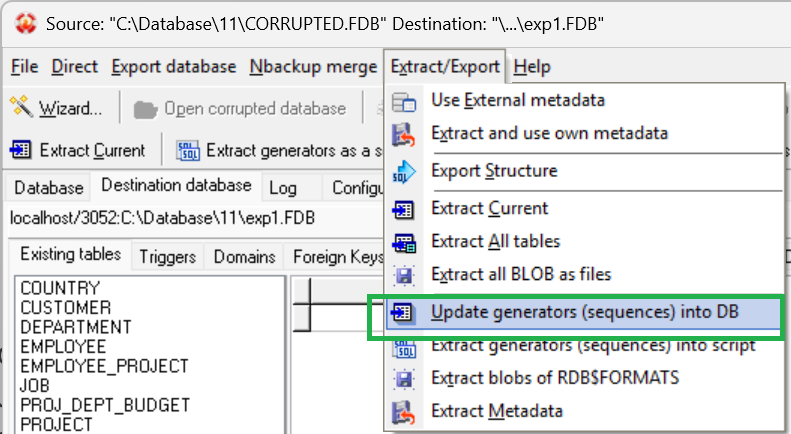
At this tab you can see the list of tables of target database, as well as triggers, foreign keys, checks and NOT NULL constraints, unique keys, domains, UDFs and generators (sequences).
Then, click “Extract All Tables”:

5.2.3. Registration
The following dialog will appear (if you have Internet connection at the computer where you run FirstAID, otherwise read section "Offline registration" below):
Enter here your email (which was used for license purchase) and password (from the email from [email protected]).
Then click "Generate UNLK now".
Please note that FirstAID will save UNLK file for this database in the folder C:\ProgramData\FBFirstAID3\Unlocks, so next time when you will open this database file at the same computer, FirstAID will not ask you for the registration.
If you already registered this corrupted database on the same computer, registration dialog will not appear!
Then this dialog will appear:
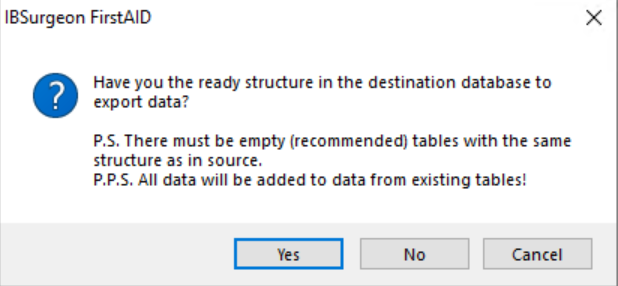
It’s the confirmation that you are agree to export data from corrupted database to the selected one, and it also informs you that data will be added to the existing tables (if there were already records, they will be not deleted automatically!). Click "Yes".
If you click “No”, FirstAID will try to create structure using corrupted database metadata as template. “Cancel” will cancel the operation.
After that there will be one more dialog with the final confirmation and reminder about the structure:
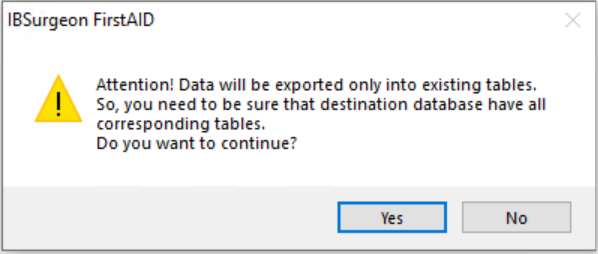
Click “Yes”.
Then you will see very important dialog with export options:
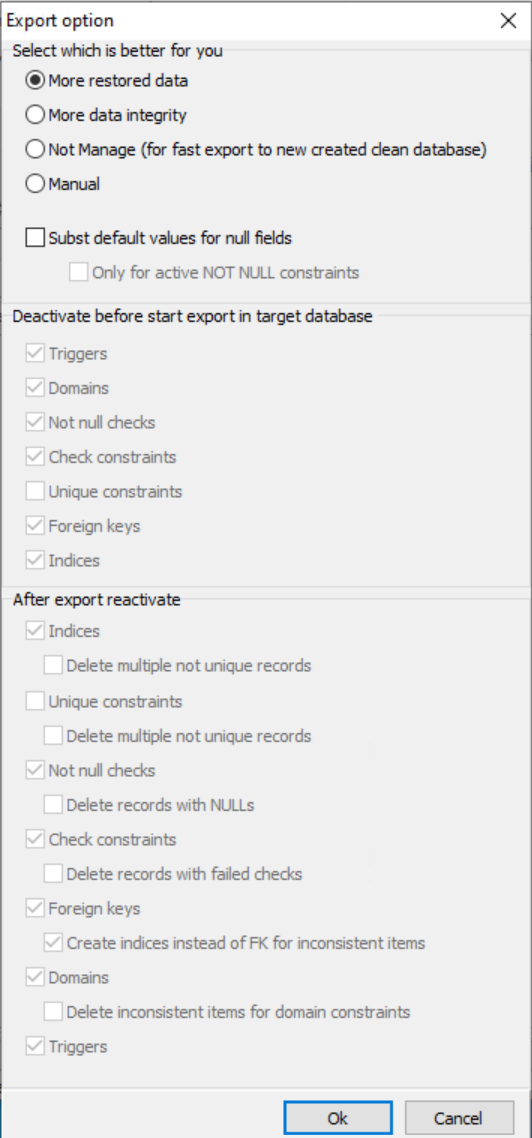
We recommend option “More restored data”, it will switch off all database constraints (except primary keys) and FirstAID will try to export all available data.
After export all constraints will be switched on again (for those data that allow it). At the tab “Destination database” you can review result and correct or drop all data that you decided to be odd or unwanted - see section "After export" below.
“More data integrity” mode will restore all constraints after export and will skip data that will not correspond to database constraints.
Click “Ok”
After that, monitor extraction process.
5.2.4. How long will extraction take?
Extraction time depends on the size of the database and performance of the computer; it can be several minutes for small databases and several hours for very big database. At the good hardware (with SSD drive) export speed is approximately 1Gb per 5 minutes.
Please note that FirstAID by default extracts only records from the users’ tables, and it does not extract primary and foreign keys indices, triggers and stored procedures.
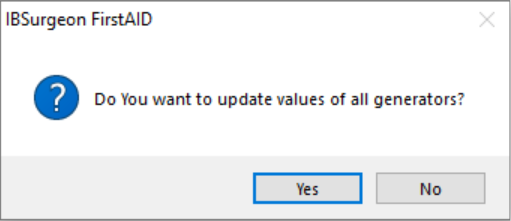
Generators values will be exported if you choose export all tables (you will be asked about it):
or if you can extract them manually later:
5.3. Export to the new empty database without metadata
If you do not have empty database with the same metadata, it is possible to create new database, create metadata in it using the information from corrupted database, and export data there.
This method is good for the situation when you just need to extract as much as possible data from the corrupted database and then process them in some other way.
5.3.1. Export structure
Open database in FirstAID and then click "Create New DB":

First you will see this message:
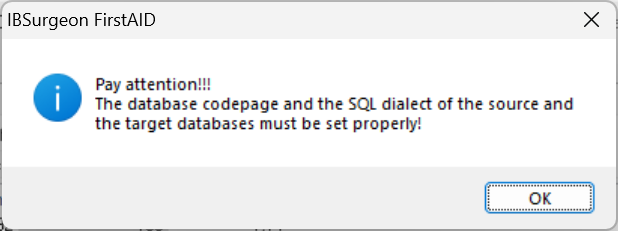
It warns you to pay attention to dialect and codepage properties of the next dialog – this is important if you have corrupted header page, otherwise it will be adjusted automatically.
Click “Ok”.
Then you will see dialog “Create new database and login”:
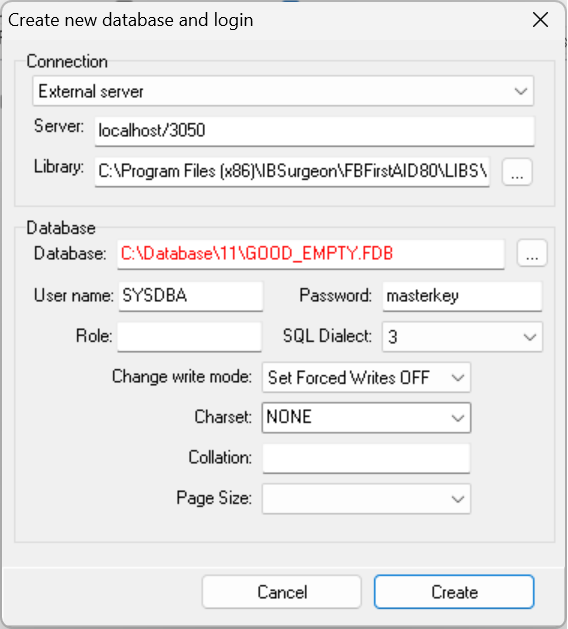
It will create the new empty database where data from corrupted database will be pumped to.
Specify path to new database for export, and, if needed, its collation (choose NONE if you don’t know) and page size (8192 usually a good option).
Path to client library (fbclient.dll or gds32.dll) is specified automatically (it is shipped with FirstAID).
Click “Create”.
If FirstAID will be not able to create database, review settings (dialect, password, charset, page size), and try again. Please note - if you are using embedded Firebird (options Integrated Firebird 3, 4, 5), you need to run FirstAID with administrative priviledges.
When the database will be created, you will see the following dialog:
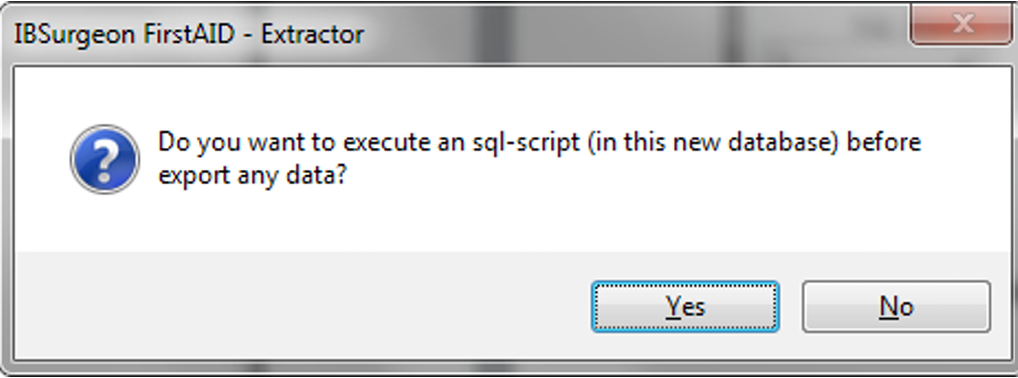
Click "No".
After that click the button "Export Structure" on the main toolbar:

Then wait for the finish of database metadata export:

Click “Ok”
If you will see that number of created tables is 0, go to section “Quote names” of this guide, try to change it and repeat the "Export structure" process.
5.4. Final steps with empty database export
As it was mentioned above, extraction to the empty database will not create many important metadata. Where to get them?
You can find generators values and SQL definitions for primary and foreign keys and indices on tabs "Generators" and "Indices and Constraints":
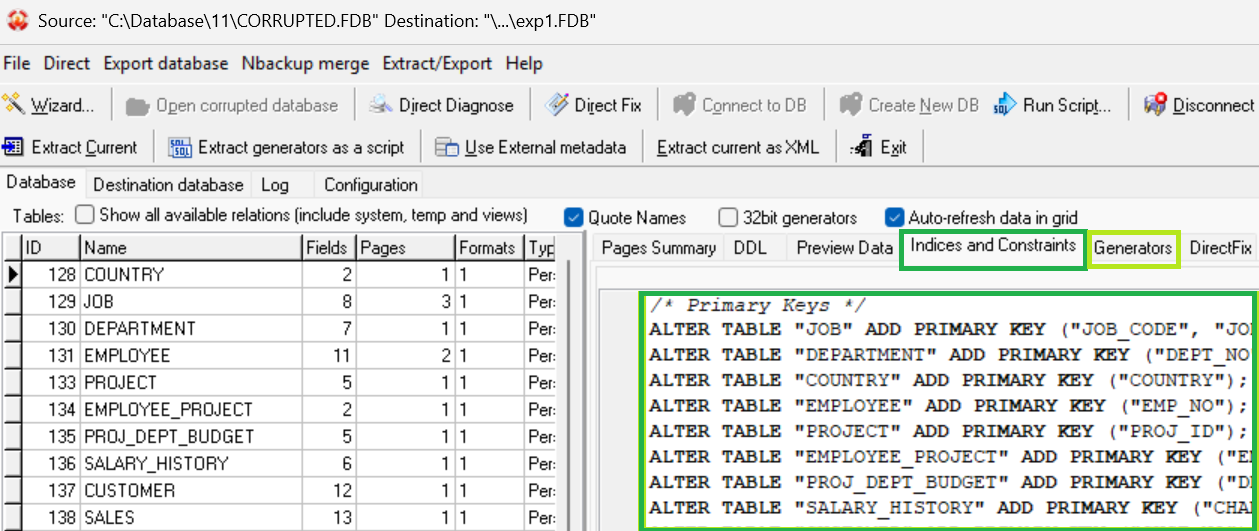
It is possible to create these objects in export database - you need to run these scripts in your database (with isql.exe from Firebird’s Bin folder, for example).
However, there is easier way to complete recovery - just pump exported data to the new empty database with all necessary metadata using free tool IBDataPump.
You can download it (https://github.com/hvlad/Interbase-DataPump/releases/tag/tag_3501), run and set exported database as source and new empty database as a target.
However, if you have reached this point and decided to use IBDataPump, probably it would be better to choose export to the empty database with ready metadata.
6. After extraction
After extraction, review its results.
First of all, open tab Log and search for errors. The type of extraction errors will give you the hint what is wrong – the most popular reason for error is a difference in table structures of the corrupted and empty databases.
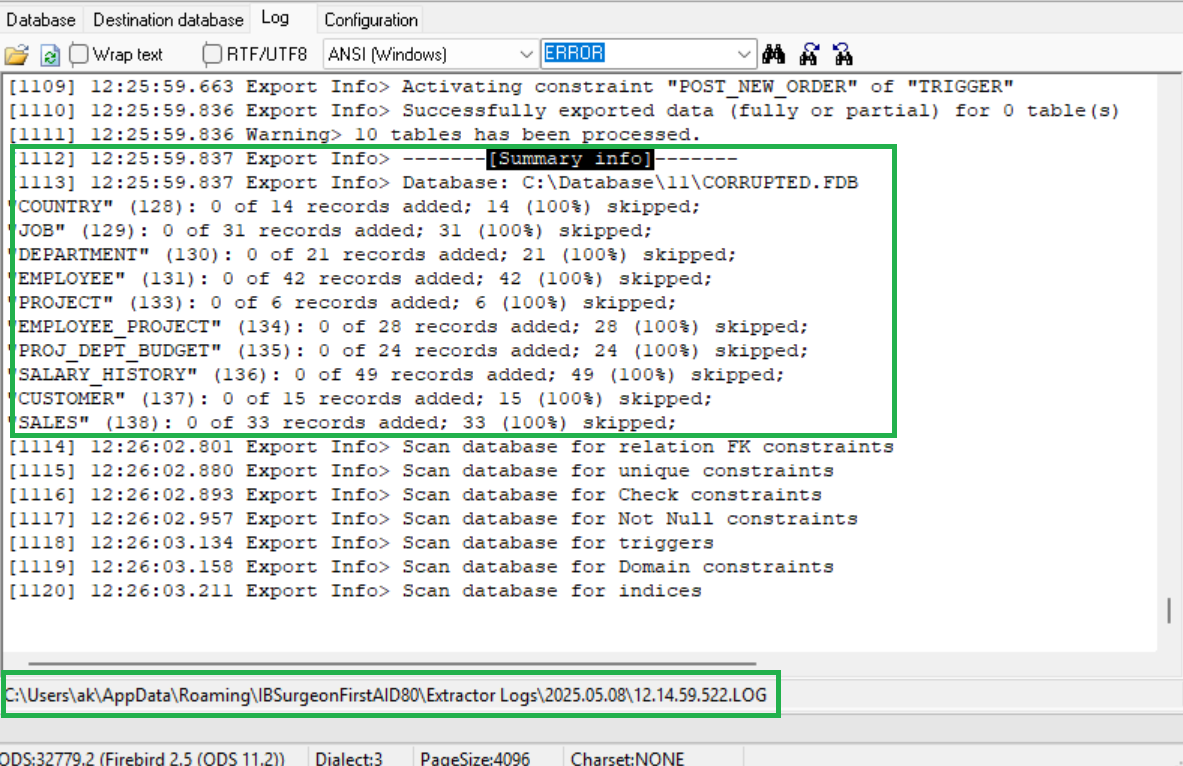
In the end of the log, there is "Summary info" section with results of export for every table, where you can see how many records were extracted and how many skipped. If you see that majority of records were added to the target database, and only a few were skipped, it is a good sign.
If log is big, you can get the file with it - the path to it is specified in the bottom of the tab.
Then, open tab "Destination database" and review all tabs there for errors:
The data in these tabs are stored in the special table, created by FirstAID during the export.
You can connect to the exported database several times to fix various inconsistencies in the exported database.
6.1. Tab «Existing tables»
Shows exported data. For big databases, it’s not practical to scroll through all tables.
6.2. Tab «Triggers»
Shows trigger states. Triggers are deactivated during export and reactivated after. Errors usually indicate missing UDF libraries.
If you see errors and inactive triggers, most likely it means that trigger uses some UDF library, which was not found, and trigger was failed to activate. To fix this problem, put the necessary UDF to the server and recompile triggers.
6.3. Tab «Domains»
You can notice problems on tab «Domains» if there are CHECKs or NOT NULL constraints on the domains level, and these constraints lead to some problems.
There are several options what you can do:
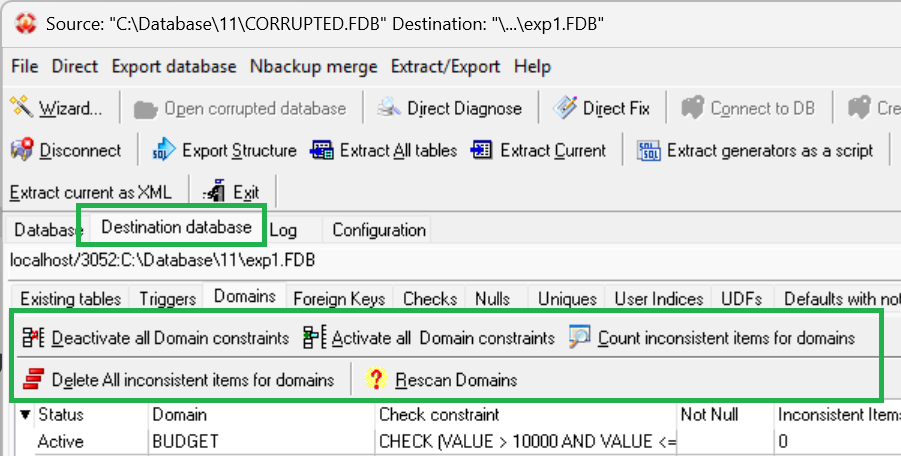
There are the following available operations:
-
Deactivate all Domain constraints. It will deactivate all constraints. It is useful if constraint was created by mistake– for example, NOT NULL for the column with NULLs in pre-3 versions of Firebird.
-
Activate all Domain constraints. If you have fixed problems, for example, deleted all inconsistent records, you can try to activate all constraints.
-
Count inconsistent items for domains. This command will calculate the number of records with problems caused by domain constraints, and show the number in the column Inconsistent Items.
-
Delete All inconsistent Items for domains. If you think that number of inconsistent items is small, it is possible to delete records which violate the domain constraint.
-
Rescan Domains. If you have connected to the exported database in other application, and modified domains, you can click this button to rescan domains, and update the status of Domains.
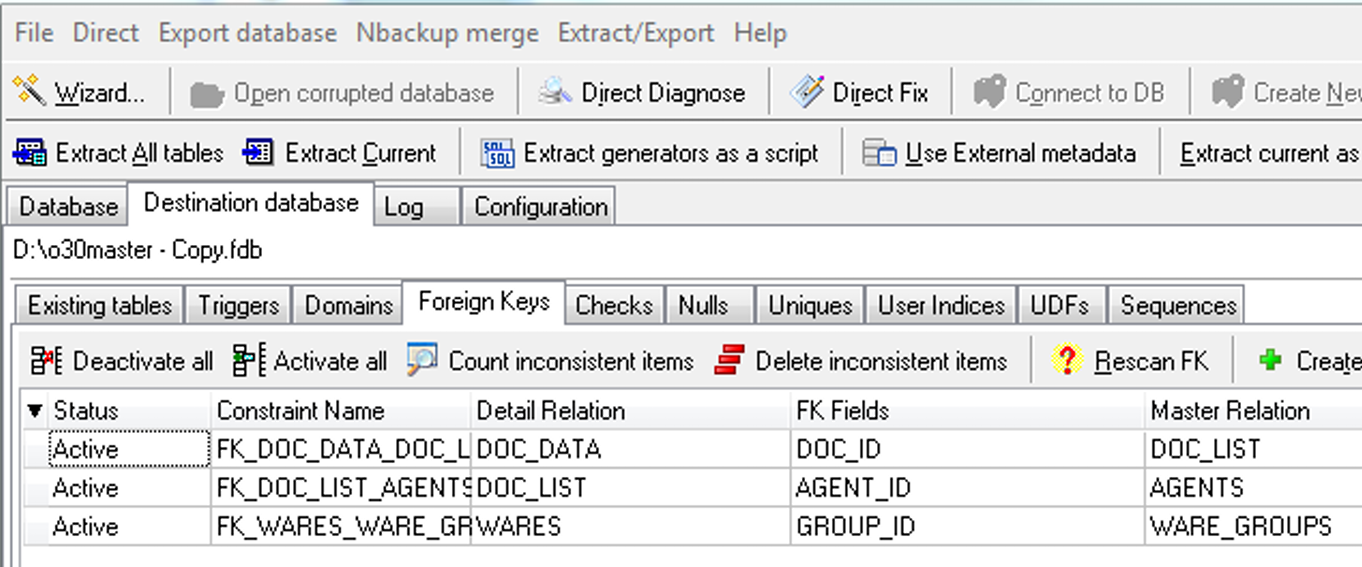
6.4. Tab «Foreign Keys»
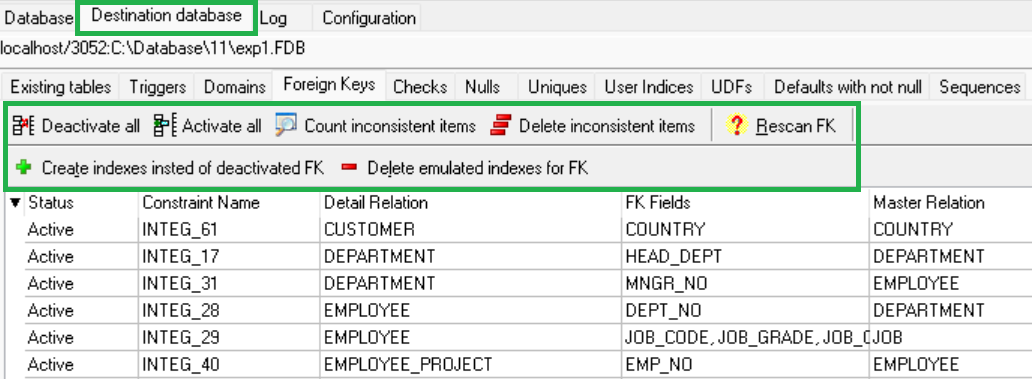
This tab is the most interesting, because it addresses the often problem with extracted database – inconsistency in Foreign Keys. Such inconsistency is caused by lost records in some tables, so other tables with foreign keys which reference the tables with lost records give errors: usually «Cannot commit foreign key XXX».
The reason of "Cannot commit index…» error is obvious: corruption affects database referential integrity, and records disappear in magic (from the server’s point of view) way.
For example, you have a table "Customers" and associated table "Orders" referenced by Foreign key. Without corruption it’s not possible to violate Foreign key and delete record from Customers without prior deleting all orders which refers to particular customer. The corruption affects database files at low-level and kills records directly. What a nice surprise for server to see unresolved links to master records from foreign key records.
When FirstAID does Extraction, it exports only available records and skips corrupted records, so in the exported database can occur this problem with Foreign Keys.
There are several options how to deal with this problem.
-
Delete inconsistent records
-
Deactivate the Foreign Key constraint, and, optionally, create substitute indices for deactivated Foreign Keys
The first option is to simply delete records with inconsistent records from the exported database. You can do it in FirstAID – for all tables, just choose «Delete inconsistent items», or right-click on the table and select «Delete inconsistent items for FOREIGNKEY_NAME»
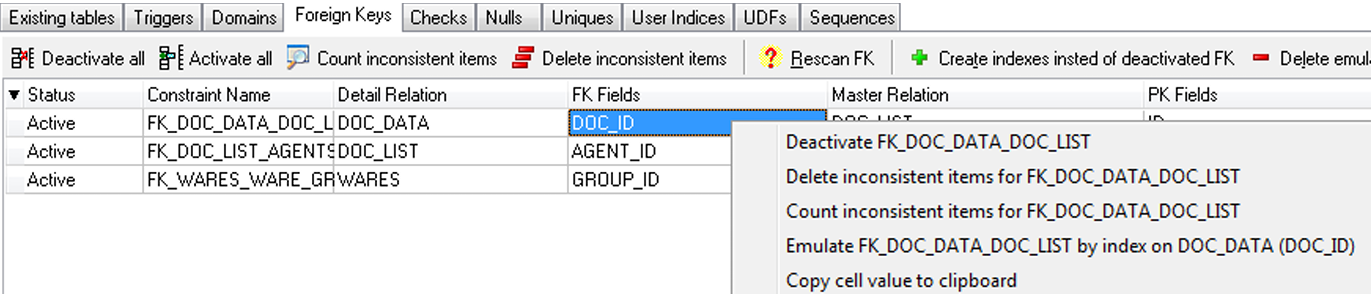
The second option is to deactivate the appropriate Foreign Key constraint, so it will be possible to perform normal backup/restore later. For this you need to select «Deactivate FOREIGNKEY_NAME» in the right click menu.
However, the deactivated foreign key can play important role in the queries plans, so it is necessary to create substitute indices for deactivated FK – for this choose «Emulate FKNAME by index on table TABLENAME».
Practically, more often there is a situation when it is easier to delete records which violates the Foreign Key constrains: for this click on «Delete inconsistent items» to delete records in all tables, or choose tables one by one, and in the right-click menu choose «Delete inconsistent items…».
After deleting inconsistent records, click on «Count inconsistent items» to see the actual situation with foreign key errors. There are options «Deactivate all» and «Activate all», which activate or deactivate all foreign keys in the database.
Please note that index can have the third state– non-active, which is different from active and inactive. Non-active indices occur when restore process stops abnormally. FirstAID will detect such indices and show in the list, so it will be possible to activate them.
7. Fixing Nbackup Merge problems
Since version 2.0, Firebird has the mechanism of incremental backups (nbackup), but it became good enough for the production usage only in version 2.5.2. Since that time its popularity increased, and we have started to receive more recovery requests for it, and since version 6.0 the functionality for fixing nbackup was included into FirstAID.
There are 2 main possible problems with corrupted incremental backups (usually it happens due to abnormal shutdown during the merge operation):
-
Delta file won’t merge into the main database with nbackup –n command. If delta file won’t merge, it is not possible to use database, and, in case of a corruption, it is not possible to use FirstAID to repair the database.
-
Delta file was merged to the main database file, but it still contains the link to the delta, and database does not work with various errors.
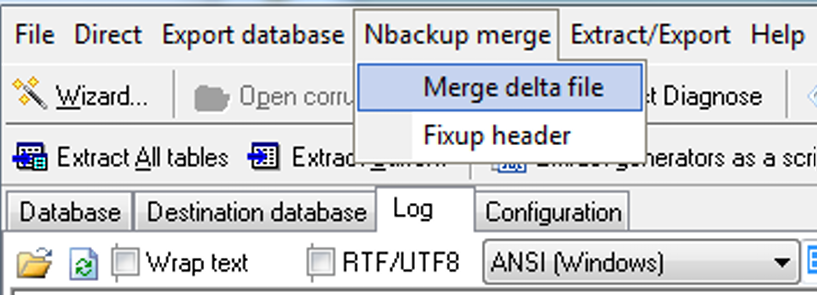
To fix these problems, FirstAID has 2 features: «Merge delta file» and «Fix up database header».
7.1. Merge delta file
If you have a corrupted Firebird database with delta file which cannot be merged with standard command (nbackup –n database…), use this feature to perform forced merge of the database.
Important! Create the backup copy of the main database file and delta file before the forced merge!
To use this feature, first open corrupted database as usual: File → "Open corrupted database". Then, choose in the main menu "Nbackup merge"→"Merge delta" file and select delta file for this database.
Please be careful– if you will select delta file from the different database, forced merge will ruin the main database file!
That’s why we ask to always create a backup copy of the main database file before forced merge! The merge process will be visualized with the progress bar and records in the log:
[466] 19:57:45.411 Export Info> === 0 ===
[467] 19:57:45.411 Export Info>deltaPos = 1 iP = 1 actNum0 targ0
[468] 19:57:45.421 Export Info>deltaPos = 2 iP = 2 actNum3305 targ3305
[469] 19:57:45.426 Export Info>deltaPos = 3 iP = 3 actNum155 targ155
[470] 19:57:45.435 Export Info>deltaPos = 4 iP = 4 actNum14 targ14
[471] 19:57:45.444 Export Info>deltaPos = 5 iP = 5 actNum151 targ151
[472] 19:57:45.453 Export Info>deltaPos = 6 iP = 6 actNum275 targ275
[473] 19:57:45.462 Export Info>deltaPos = 7 iP = 7 actNum16 targ16
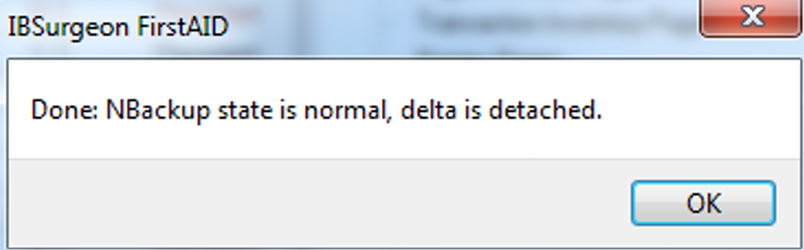
In the end of the process (the time depends on the delta size), the following message will be shown:
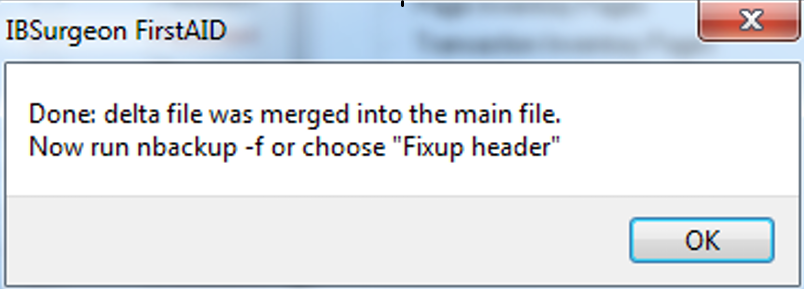
It means that data pages were copied from delta to the main database file. After that you need to fix up database file, in order to remove backup lock from the database.
The best way to do it is to run the standard nbackup command:
nbackup -fixup database_name -user SYSDBA -pass yourpass
However, this command can be not successful and give various errors.
In this case, choose Nbackup merge→ Fix up database header
After that, try to perform gbak -b backup from "Final steps after DirectFix" section — if it is Ok, database is fine, you can do restore to be 100% sure. If gbak -b fails, proceed with DirectFix recovery and then do backup/restore, or with Extraction. |
7.2. Fix up database header
If you cannot fix up the corrupted database with the standard nbackup command (nbackup -f databasename…), use this function to remove backup lock mark from the header page.
Please be careful! Always have a copy of the database before fixup with FirstAID!
To apply, open corrupted database with the backup lock in FirstAID and choose "Nbackup merge"→ "Fix up header".
As a result, the following message will appear:
After that, try to perform gbak -b backup from "Final steps after DirectFix"— if it is Ok, database is fine, you can do restore to be 100% sure. If gbak -b fails, proceed with DirectFix recovery and then do backup/restore, or with Extraction. |
8. Important information for recovery process
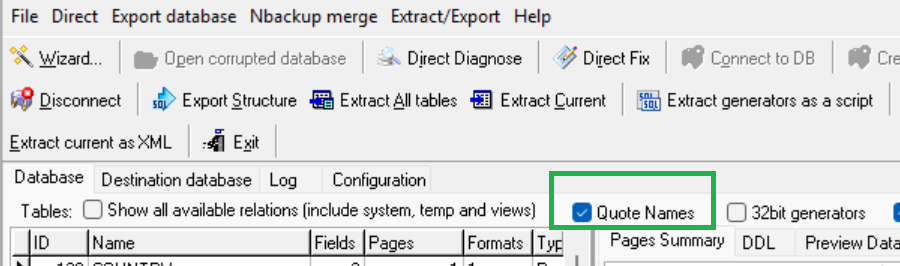
8.1. “Quote names” setting
At the tab “Database” of FirstAID you can see checkbox “Quote Names”. This checkbox determines should FirstAID quote tables and metadata names during the export, i.e. is database in Dialect 1 or in Dialect 3.
Usually it is set ON/OFF automatically, using information from the header page of the corrupted database (not from target database!).
If header page is corrupted or if you are trying to export data to the database with another dialect, you may need to check or uncheck “Quote names”.
One of the good indications that you need to change “Quote Names” setting is 0 tables as a result of “Export Structure” command
8.2. Offline registration
If you run FirstAID on the computer without Internet access, you will need to perform “Offline registration” of the database

It means that it is not possible to connect to IBSurgeon Deploy Center (http://deploy.ib-aid.com) from this computer, so you need to send UIK file through web-site or email.
1) Enter Email and Password and click "Offline registration", then save UIK file
2) Open https://deploy.ib-aid.com on another computer
3) Login there with username and password received from IBSurgeon
4) Choose "IBSurgeon FirstAID 8.x", and then choose "Activation"
5) Upload UIK there and download UNLK
6) Upload UNLK to Offline registration
|
You can send UIK by email to [email protected] (it will take some time due to manual processing of such requests) |
8.3. Export the single table
FirstAID allows exporting specific tables. Select a table, right-click and choose "Export current relation".

Steps for export are similar to export of all tables to the newly created database
8.4. External Metadata
If corruption affects system information to the point where FirstAID cannot see database contents due to lack of metadata, you can borrow metadata from:
-
A good database with the same structure (old good copy)
-
HQbird FBDataGuard metadata repository
To use external metadata:
1) Open the corrupted database
2) Choose "Extract/Export"/"Use External metadata"
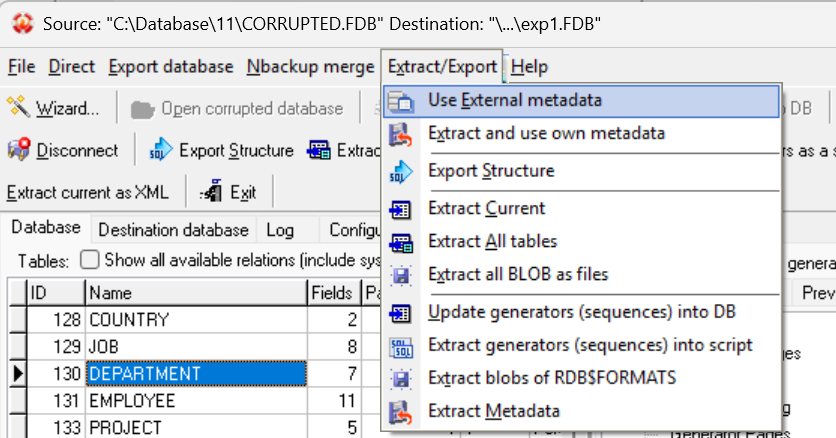
3) Select "Existing database" and choose your good database copy
The following warning will appear:
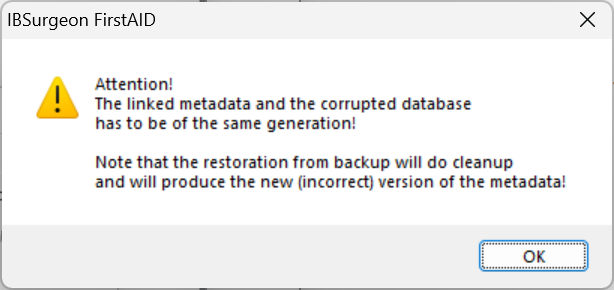
Click “Ok”.
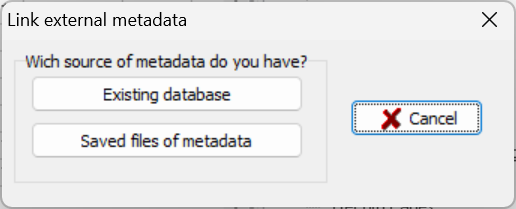
If you need to get metadata from the live database (old good copy), click “Existing database”:
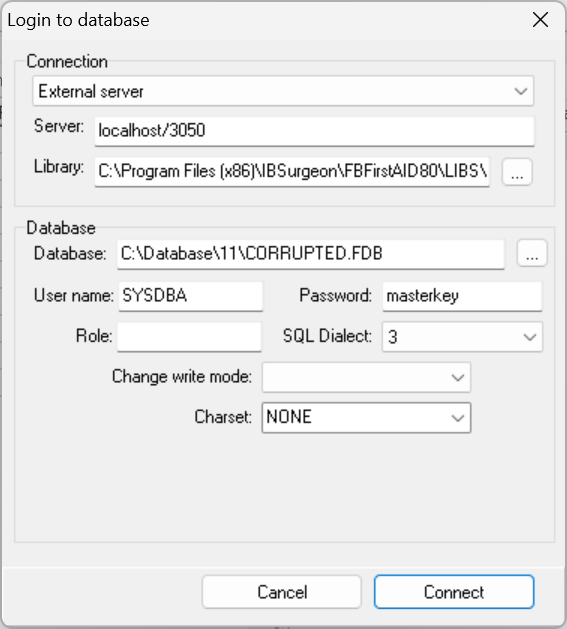
|
Firebird server must be running when FirstAID extracts metadata from the good database! |
After that FirstAID will extract metadata from the good database and reload corrupted database in order to apply new metadata. Hopefully you will be able to see data to recover.
If so, proceed with export of the data (see “Recovery through extraction” section above.)
9. Support
For questions, contact [email protected]